
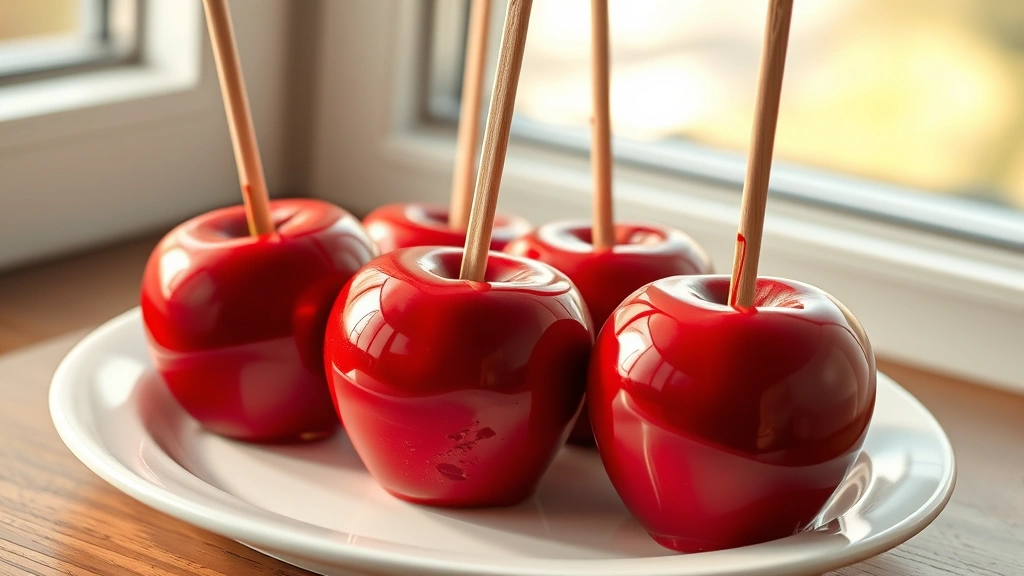
There’s something absolutely magical about biting into a crispy, glossy candy apple – that perfect combination of tart fruit and sweet, crunchy coating is simply irresistible! This easy candy apple recipe is a timeless classic that brings back nostalgic memories of autumn festivals and county fairs. Whether you’re making these for a Halloween party, a fall gathering, or just because you’re craving something sweet and fun, this recipe is foolproof and will have everyone asking for seconds.
What makes this candy apple recipe so special is how simple it truly is. With just a handful of ingredients – apples, sugar, butter, and a few pantry staples – you can create a show-stopping treat that looks far more complicated than it actually is. The glossy candy coating sets up beautifully, creating that signature hard shell that gives way to juicy apple flesh inside. I love making these with a mix of red and green apples for visual appeal, and you can customize them endlessly with different toppings like nuts, sprinkles, or even chocolate drizzle.
One of my favorite things about this recipe is how versatile it can be. You can make traditional red candy apples, or experiment with fun variations like caramel apples with a candy shell, or even white chocolate-dipped versions. The basic technique remains the same, making it easy to adapt to your preferences. Plus, these make wonderful homemade gifts when wrapped in cellophane and tied with a pretty ribbon.
I always recommend using Granny Smith apples because their tartness perfectly balances the sweetness of the candy coating, and their firm texture holds up beautifully. Make sure your apples are at room temperature and completely dry before dipping – this is key to getting that beautiful, even coating. For those who want to add a savory-sweet twist, you could even top them with a sprinkle of sea salt.
The candy mixture comes together in just minutes on the stovetop, and the hardest part is really just waiting for them to cool and set. I recommend working quickly once the candy is ready, as it hardens as it cools. Have all your apples prepped and your toppings ready before you start cooking the candy mixture. You can also make the candy mixture ahead of time and gently reheat it if needed – just be careful not to let it get too hot, or it may crystallize.
These candy apples are perfect for fall parties, Halloween trick-or-treaters, or just as a fun weekend project with the kids. They’re also surprisingly impressive to serve at dinner parties or to include in a dessert spread. Store them at room temperature in a cool, dry place, and they’ll stay fresh and delicious for several days. This easy candy apple recipe is truly a crowd-pleaser that never goes out of style.
For more detailed candy-making techniques, check out Bon Appétit’s guide to candy apples. If you’re interested in other classic fair foods, Serious Eats has wonderful variations. And for temperature control tips, The New York Times offers expert advice on achieving the perfect candy coating consistency.
Ingredients
- 6-8 medium Granny Smith apples (or a mix of red and green)
- 2 cups granulated sugar
- 1 cup light corn syrup
- 1 tablespoon butter
- 1 cup water
- 1 tablespoon apple cider vinegar or white vinegar
- 1/2 teaspoon cream of tartar
- 1/2 teaspoon vanilla extract
- 1/4 teaspoon red gel food coloring (or desired color)
- Wooden popsicle sticks or wooden skewers
- Optional toppings: chopped nuts, sprinkles, mini chocolate chips, shredded coconut
Instructions
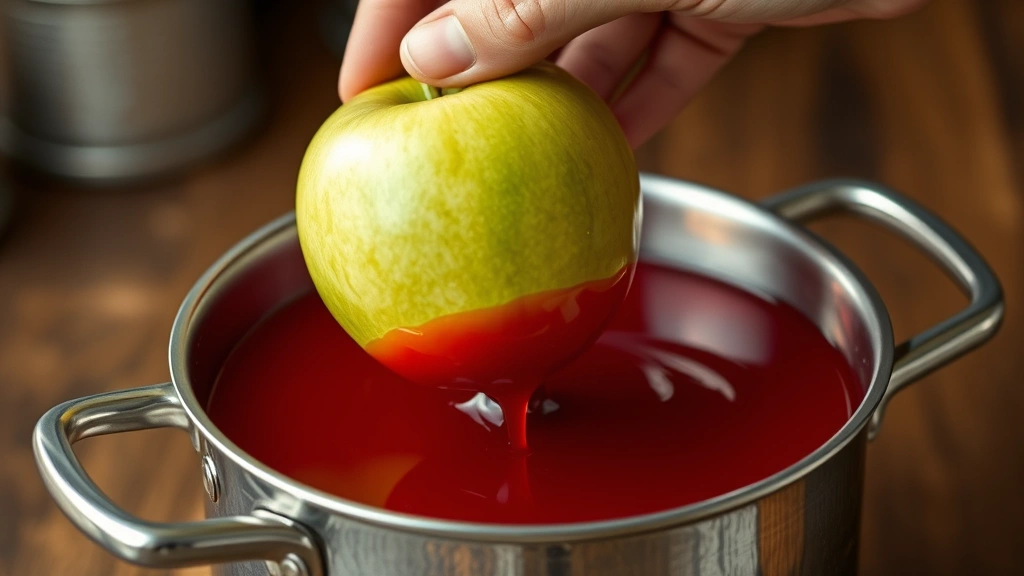
- Prepare your apples by washing them thoroughly under cool running water and patting them completely dry with paper towels. This step is crucial for the candy coating to adhere properly.
- Remove any stickers from the apples and insert a wooden popsicle stick or skewer into the top of each apple, pushing it down about halfway through the fruit.
- Line a baking sheet with parchment paper or silicone baking mat and lightly butter it to prevent sticking. Set your prepared apples on the lined baking sheet.
- Arrange any optional toppings you plan to use in small bowls and set them nearby for easy access once the candy is ready.
- In a large, heavy-bottomed saucepan, combine the granulated sugar, light corn syrup, butter, water, apple cider vinegar, and cream of tartar.
- Stir the mixture over medium heat until the sugar dissolves and the mixture comes to a boil. This should take about 3-4 minutes.
- Once boiling, stop stirring and insert a candy thermometer into the mixture. Let it cook undisturbed until it reaches 300-310°F (hard-crack stage), about 5-7 minutes.
- While the candy cooks, fill a large bowl with ice water and set it nearby. You’ll use this to test the candy consistency if needed.
- Once the candy reaches the correct temperature, remove the saucepan from heat and carefully add the vanilla extract and food coloring, stirring gently to combine.
- Let the candy cool for about 30 seconds to 1 minute. It should be thick and syrupy but still pourable.
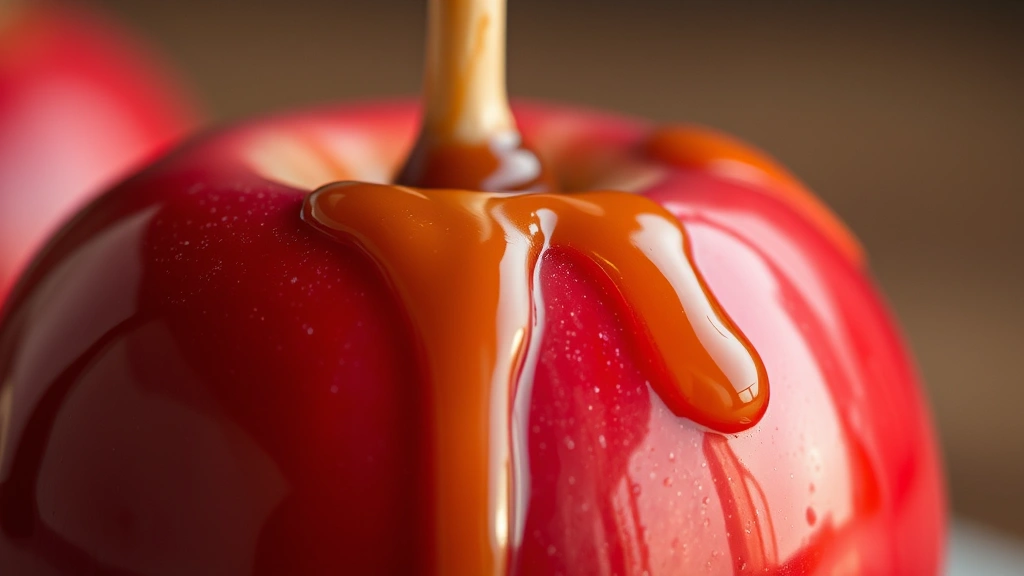
- Working quickly, tilt the saucepan and dip each apple into the hot candy coating, rotating it to ensure even coverage. The candy hardens quickly, so speed is important.
- As soon as the apple is coated, immediately roll it in your chosen toppings if desired, then place it stick-side up on the prepared baking sheet.
- If the candy in the pan gets too thick and hardens, gently reheat it over low heat for a few seconds until it’s pourable again.
- Continue dipping apples until all are coated, working efficiently before the candy sets completely.
- Allow the coated apples to cool at room temperature for 1-2 hours before serving. The candy coating will harden into a beautiful, glossy shell.
- Once fully set, you can wrap individual apples in cellophane and tie with ribbon for gift-giving or storage.
Pro Tips
Apple selection matters more than you might think. Granny Smith apples are ideal because they’re firm, tart, and less likely to get mushy. However, you can also use Honeycrisp, Gala, or Fuji apples for a sweeter flavor profile. Avoid softer varieties like Red Delicious that may become mealy.
Make sure your apples are completely dry before dipping, as any moisture will cause the candy to slide off or create an uneven coating. Some bakers even use a tiny dab of corn syrup on the stick to help it adhere to the apple better.
If your candy mixture hardens before you’ve dipped all the apples, simply place the saucepan back over low heat and stir gently until it reaches a dippable consistency again. Be patient – rushing this step could result in grainy or crystallized candy.
Toppings should be added immediately after dipping, while the candy is still slightly tacky. Nuts, sprinkles, and other decorations adhere best to warm candy. Try crushed candy canes for a festive holiday version, or cinnamon sugar for a classic autumn flavor.
Store finished candy apples at room temperature in a cool, dry place away from humidity. They’ll keep for 3-5 days, though they’re best enjoyed within the first 24 hours when the candy shell is crispiest. Don’t refrigerate them, as condensation will make the coating sticky.
If you want to make these ahead, you can prepare the candy coating the day before and store it in an airtight container. Gently reheat over low heat before dipping. You can also dip apples a few hours in advance and add fresh toppings just before serving for maximum visual appeal.
For a caramel apple variation, simply reduce the sugar slightly and add caramel coloring and flavoring to create a warm brown candy coating. You can also create white chocolate candy apples by melting white chocolate and mixing it with a small amount of coconut oil for easier dipping.
This recipe is naturally gluten-free and dairy-free (except for the butter), though the butter could be substituted with coconut oil if needed. Always supervise children when making or eating candy apples, as the candy coating can be extremely hot and hard on teeth.