

There’s nothing quite like the taste of homemade canned apple pie filling – it’s the ultimate pantry staple that transforms ordinary desserts into something truly spectacular! Whether you’re planning ahead for holiday baking or simply want to stock your shelves with this versatile filling, this recipe is an absolute game-changer. Making your own canned apple pie filling at home means you control every ingredient, from the quality of the apples to the perfect balance of warm spices. No more worrying about artificial flavors or mysterious additives – just pure, delicious apple goodness.
I absolutely love having jars of homemade apple pie filling ready to go in my pantry. It’s perfect for busy weeknights when you want to whip up a beautiful dessert without all the fuss of peeling and preparing apples from scratch. You can use this filling for traditional apple pies, but it’s equally wonderful in crisps, cobblers, turnovers, and even as a topping for vanilla ice cream or yogurt. The beauty of canning your own filling is that you’ll have it on hand whenever inspiration strikes, making last-minute desserts feel completely effortless and homemade.
What makes this recipe truly special is the combination of fresh apples, aromatic spices, and the perfect amount of lemon juice to brighten all the flavors. The apples cook down slightly to create a luscious filling that’s neither too thick nor too runny – it’s absolutely perfect for pie. This recipe yields multiple jars, so you can enjoy the fruits of your labor throughout the year. Plus, there’s something incredibly satisfying about seeing those beautiful jars lined up in your pantry, knowing you created something so delicious from scratch.
Before you begin, make sure you have all your canning supplies ready and sterilized. You’ll need quart-sized jars (or pint jars if you prefer), lids, and bands. It’s essential to follow proper canning procedures to ensure your filling stays fresh and safe. This recipe uses a hot water bath canning method, which is perfect for high-acid foods like apples. If you’re new to canning, I recommend checking out Serious Eats’ canning guide for detailed information about the process.
One of my favorite things about this recipe is how customizable it is. You can adjust the spices based on your preferences – add extra cinnamon if you love that warm, cozy flavor, or reduce it slightly if you prefer a more subtle spice profile. Some people love to add a touch of nutmeg or allspice for extra complexity, while others keep it simple with just cinnamon and a hint of vanilla. The versatility of homemade fillings means you can make this recipe your own.
The key to perfect apple pie filling is using the right variety of apples. I recommend using a combination of Granny Smith apples for tartness and Honeycrisp or Gala apples for sweetness. This blend creates a more complex, interesting flavor profile than using just one variety. The lemon juice is absolutely crucial – it not only brightens the filling but also helps preserve the color of the apples and adds a lovely tang that balances the sweetness beautifully.
When you’re preparing your apples, work quickly and keep them in a bowl of lemon water to prevent browning. This step might seem tedious, but it’s worth it for that beautiful, light color in your finished filling. As you work through your apples, you’ll start to see how much work goes into creating this filling, which makes it all the more rewarding when you pull those gorgeous jars out of the canner.
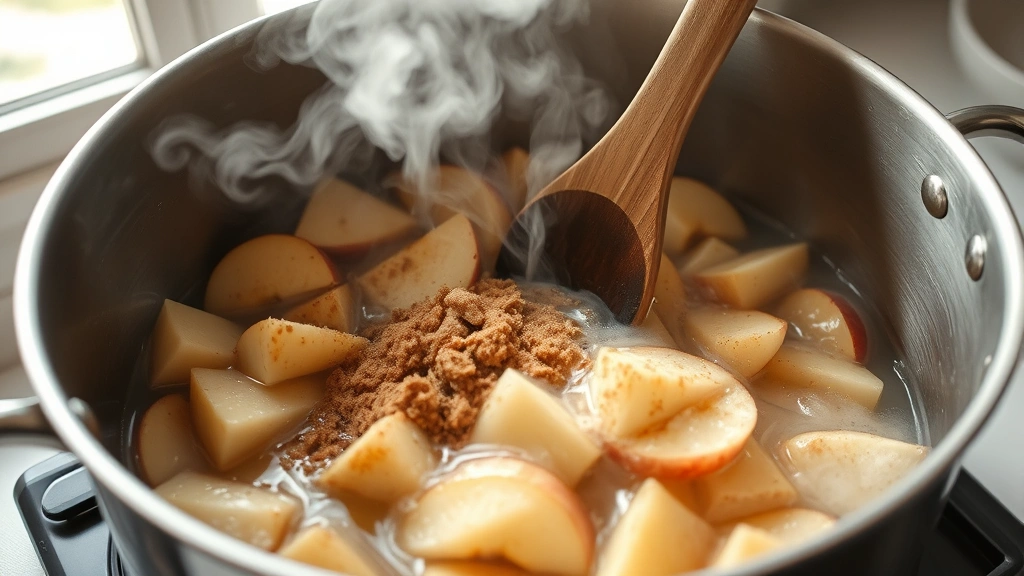
The cooking process is straightforward but requires patience and attention. You’ll combine your prepared apples with sugar, spices, and lemon juice, then cook the mixture until the apples are tender but still hold their shape. This usually takes about fifteen to twenty minutes, depending on how thick you cut your apples. You want them soft enough to be delicious in pie but firm enough that they don’t turn into applesauce.
For those looking to explore more preserve-making options, New York Times Cooking offers wonderful resources on different preservation techniques. You might also enjoy creating other homemade sauces and fillings to complement your baking endeavors.
Once your filling is ready and your jars are hot and sterilized, you’ll carefully ladle the hot filling into the jars, leaving appropriate headspace. This step is important because it allows for proper sealing and prevents overflow during processing. Make sure to remove any air bubbles by running a clean knife around the inside of the jar – this ensures your filling will seal properly and store safely.
The hot water bath processing is the final step that makes this recipe shelf-stable. By processing your jars in boiling water, you’re creating an airtight seal that allows the filling to be stored safely at room temperature for up to a year. It’s absolutely magical to watch those lids pop as the jars cool – that sound means your canning was successful!
I love to decorate my jars with pretty labels and gift them to friends and family. Homemade canned apple pie filling makes a wonderful hostess gift, and it’s perfect for holiday gift baskets. Your loved ones will absolutely appreciate the time and care you’ve put into creating something so delicious and thoughtful.
For more inspiration on what to do with your apple pie filling, check out Bon Appétit’s dessert collection. You can also explore other homemade recipe ideas to expand your culinary repertoire. Whether you’re a seasoned canner or trying this for the first time, this recipe is absolutely foolproof and will give you results you’re proud of. Happy canning!
Ingredients
- 8 pounds fresh apples (a mix of Granny Smith and Honeycrisp or Gala)
- 3 cups granulated sugar
- 1/4 cup fresh lemon juice
- 2 tablespoons cornstarch
- 1 tablespoon ground cinnamon
- 1/4 teaspoon ground nutmeg
- 1/4 teaspoon ground cloves
- 1/2 teaspoon vanilla extract
- 1/4 teaspoon salt
- 1 tablespoon butter
- Water for canning
Instructions
- Prepare your canning supplies by washing all jars, lids, and bands in hot soapy water. Sterilize the jars by either running them through a hot dishwasher cycle or submerging them in boiling water for 10 minutes. Keep them hot until ready to use.
- Fill a large pot with water and bring to a boil for your hot water bath canner. Keep this water boiling throughout the canning process.
- Peel, core, and slice your apples into 1/4-inch thick slices. As you work, place the sliced apples into a large bowl filled with water and 2 tablespoons of lemon juice to prevent browning.
- In a large, heavy-bottomed pot, combine the sugar, cornstarch, cinnamon, nutmeg, cloves, vanilla extract, and salt. Mix these dry ingredients together thoroughly.
- Drain the apples from the lemon water and add them to the pot with the sugar mixture. Stir gently to coat all the apples evenly with the spice and sugar mixture.
- Place the pot over medium-high heat and bring the mixture to a gentle boil, stirring occasionally to prevent sticking and ensure even cooking.
- Reduce heat to medium and simmer for 15-20 minutes, stirring frequently, until the apples are tender but still hold their shape and the filling has thickened slightly.
- Remove the pot from heat and stir in the butter and remaining lemon juice until fully incorporated.
- Working quickly while the filling is hot, carefully ladle the hot apple filling into your hot sterilized jars, leaving 1 inch of headspace at the top.
- Using a clean, damp cloth, wipe the rim of each jar to remove any spilled filling, which ensures a proper seal.
- Place a hot lid on each jar and screw on the band until fingertip tight – not too loose and not too tight.
- Carefully place the filled jars into the hot water bath canner, ensuring they are covered by at least 1 inch of water.
- Bring the water back to a rolling boil and process for 25 minutes for quart jars (or 20 minutes for pint jars).
- Using a jar lifter, carefully remove the jars from the boiling water and place them on a clean towel to cool completely.
- As the jars cool, listen for the distinctive ‘pop’ sound as each lid seals. This usually occurs within 12-24 hours.
- Once completely cooled, check that each lid is properly sealed by pressing down on the center – it should not flex or move.
- Remove the bands, label your jars with the contents and date, and store in a cool, dark place for up to one year.
Pro Tips
+ This recipe can be made without canning supplies if you prefer. Simply cool the filling completely and freeze it in freezer bags or containers for up to 8 months, or refrigerate for up to 2 weeks.
+ The cornstarch is essential for achieving the right consistency. It thickens the filling as it cooks without making it gummy or overly starchy.
+ Feel free to customize the spices to your preference. Some people love adding cardamom or a pinch of cayenne pepper for subtle complexity. Start with the amounts given and adjust to taste in future batches.
+ When canning, it’s crucial to follow proper food safety procedures. The hot water bath canning method ensures that any potential bacteria are eliminated, making your filling safe to store at room temperature.
+ If you don’t have a proper canning pot, you can use any large, deep pot. Just make sure your jars are covered by at least an inch of water during processing.
+ The lemon juice serves double duty: it adds flavor and brightness while also helping preserve the color of the apples and increasing the acidity for food safety.
+ Don’t skip the step of removing air bubbles from the jars. Use a clean, thin knife or bubble remover to run around the inside edges of each jar to ensure proper sealing.
+ Store your finished jars in a cool, dark place away from direct sunlight. A pantry shelf or basement is ideal. The jars will keep for up to one year, though they’re usually consumed much faster!
+ This filling is perfect for pies, tarts, crisps, cobblers, turnovers, and hand pies. You can also enjoy it on its own over ice cream, yogurt, or oatmeal.