
There’s nothing quite like biting into a crispy, glossy caramel apple – that perfect combination of tart fruit, creamy caramel, and delightful crunch. This classic treat is perfect for fall gatherings, Halloween parties, or whenever you want to impress guests with homemade candy. The beauty of making caramel apples at home is that you have complete control over the quality of ingredients and can customize them with your favorite toppings.
I absolutely love making these with my family, and they’re easier than you might think! The key to perfect caramel apples is using fresh, firm apples and keeping your caramel at the right temperature. In this guide, I’ll walk you through every step to ensure your caramel apples turn out absolutely stunning.
Making caramel apples requires a bit of patience and attention to detail, but the results are so worth it. Whether you’re a seasoned candy maker or trying this for the first time, this recipe will guide you to success. I’ve included helpful tips and tricks I’ve learned over the years to help you avoid common pitfalls.
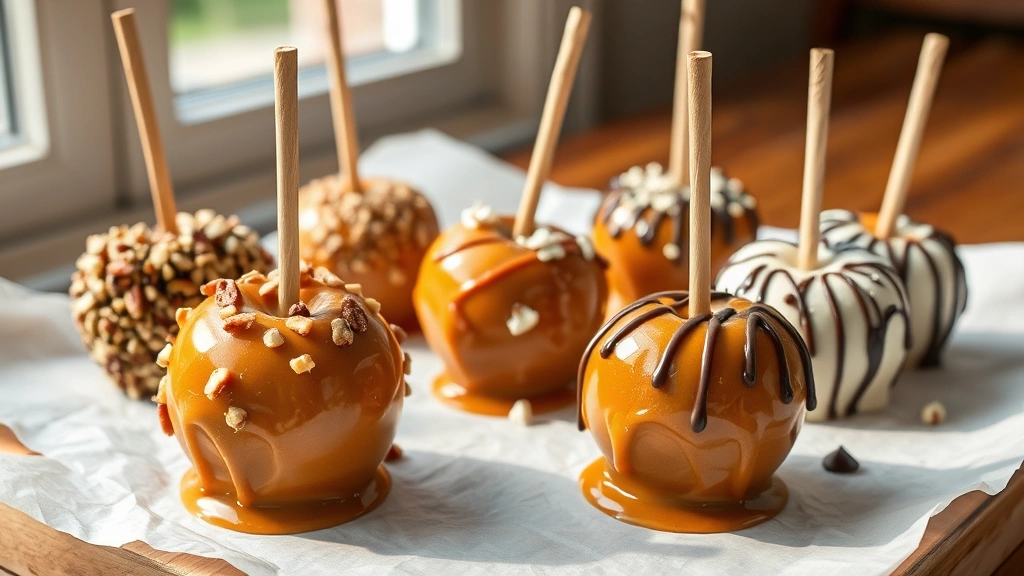
The versatility of caramel apples is one of my favorite things about them. You can dress them up with fancy toppings like crushed pretzels, chopped nuts, sprinkles, or even chocolate drizzle. Or keep them simple and elegant with just the caramel coating. Either way, they’re guaranteed to be a hit. For more creative dessert inspiration, check out our favorite sauce recipes or explore creative pasta dishes for a complete meal experience.
When you’re ready to dive into candy making, this caramel apple recipe is the perfect starting point. The process is straightforward: prepare your apples, heat your caramel to the ideal temperature, dip quickly but thoroughly, and set on parchment paper to cool. I always set up my workspace before I start, laying out all my ingredients and tools. This makes the actual dipping process smooth and stress-free.
One thing I love about this recipe is that it yields beautiful, professional-looking results without requiring special equipment. You just need a good heavy-bottomed pot, a candy thermometer, and some parchment paper. The most important factor is maintaining the right caramel temperature – too hot and it will be too thin, too cool and it will be too thick.
I often make these for holiday parties and they’re always the first thing to disappear. Guests are always amazed when I tell them I made them from scratch. The homemade flavor is so much better than store-bought versions, and you’ll understand why once you try them. For more indulgent treats, you might also enjoy our easy chicken alfredo recipe or explore pickled red onion recipes for unique flavor combinations.
These caramel apples also make wonderful gifts. Simply wrap them in cellophane and tie with a pretty ribbon. They’ll stay fresh for several days if stored in a cool place. I love packaging a few together as gifts for friends and neighbors during the fall season.
For the best results, I recommend using Honeycrisp, Granny Smith, or Fuji apples. These varieties have a nice balance of sweetness and tartness that complements the rich caramel perfectly. Make sure your apples are at room temperature before dipping, and always wash and dry them thoroughly to remove any waxy coating. A clean surface helps the caramel adhere better.
The toppings are where you can really get creative. Chopped pecans, walnuts, or almonds add a sophisticated touch. Crushed pretzels provide a fun salty element. Sprinkles, chocolate chips, or even candy pieces work wonderfully too. You can also try drizzling with white or dark chocolate for an extra special touch. The possibilities are truly endless, much like the variations you’ll find in our chickpea salad recipe collection.
Timing is important when making caramel apples. The caramel must be warm enough to coat smoothly but cool enough that it sets quickly. If your caramel cools too much while you’re working, you can gently reheat it. However, be careful not to overheat it, as this can cause the sugar to crystallize.
I also recommend having all your toppings prepared and ready to go before you start dipping. This way, you can apply them immediately while the caramel is still slightly tacky. This ensures they stick properly and create beautiful, professional-looking apples.
One final tip: if you want your caramel apples to be extra special, try using a combination of caramel and chocolate. Dip the apple in caramel first, let it set slightly, then dip halfway into melted chocolate. This creates a stunning two-tone effect that looks absolutely gorgeous. For more inspiration on flavor combinations, explore our garlic shrimp scampi recipe for savory-sweet pairings.
Now let’s dive into how to make these delicious homemade caramel apples. With this recipe and a little practice, you’ll be making stunning caramel apples that rival any candy shop creation. For professional guidance on candy making techniques, check out Bon Appétit and Serious Eats for advanced candy-making tips. You can also reference New York Times Cooking for traditional approaches to classic candy recipes.
Ingredients
- 8 medium apples (Honeycrisp, Granny Smith, or Fuji)
- 2 cups granulated sugar
- 1 cup butter
- 1 cup heavy cream
- 1 tablespoon vanilla extract
- 1/2 teaspoon salt
- 8 wooden popsicle sticks or candy apple sticks
- Optional toppings: chopped nuts, crushed pretzels, sprinkles, chocolate chips, or candy pieces
Instructions
- Prepare your apples by washing them thoroughly under cool water and drying completely with paper towels. Remove any stickers or labels. This step is crucial as it removes the waxy coating that prevents caramel from adhering properly.
- Insert wooden sticks into the top of each apple, pushing them in about halfway through the fruit. Set the prepared apples aside on parchment paper.
- Line a baking sheet with parchment paper and set it nearby. If using toppings, pour them into small bowls and arrange them within easy reach of your workspace.
- In a heavy-bottomed saucepan, combine sugar, butter, heavy cream, vanilla extract, and salt. Stir over medium heat until the mixture begins to boil.
- Attach a candy thermometer to the side of the pan, making sure it doesn’t touch the bottom. Continue cooking without stirring, allowing the mixture to reach 248°F (120°C). This is the firm ball stage and is perfect for caramel apples.
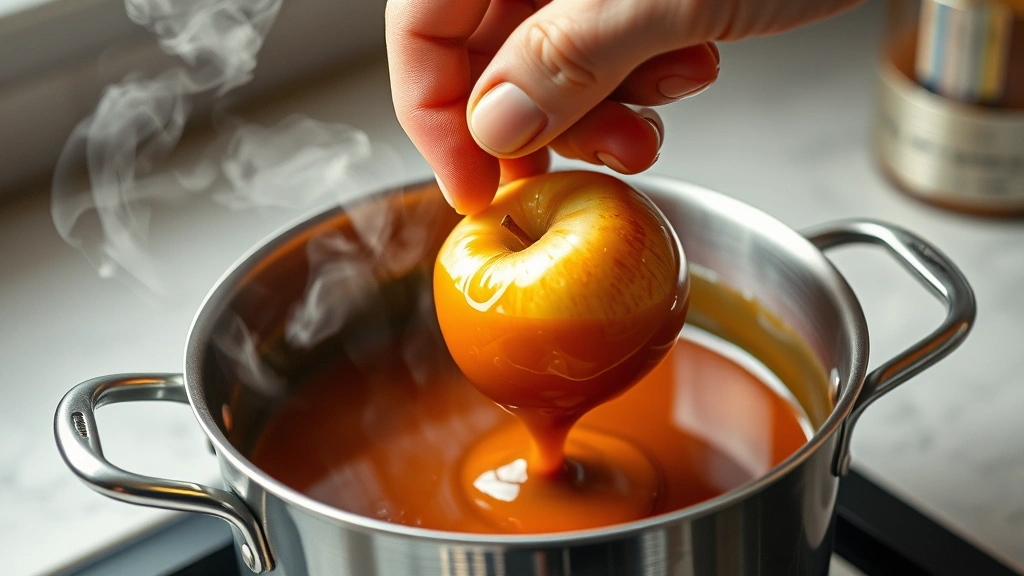
- Once the caramel reaches the correct temperature, remove the pan from heat and let it cool for about 2-3 minutes. This prevents the caramel from being too hot and sliding off the apples too quickly.
- Working quickly but carefully, hold an apple by its stick and dip it into the caramel, rotating it to coat all sides evenly. Lift the apple out and let excess caramel drip back into the pan for about 5 seconds.
- Immediately after dipping, roll the coated apple in your chosen toppings if desired, or place it on the prepared parchment paper to cool.
Repeat with remaining apples, working efficiently. If the caramel begins to thicken too much, warm it gently over low heat for a few seconds.
- Allow the caramel apples to cool completely at room temperature, approximately 30-45 minutes, before serving or wrapping.
- Store finished caramel apples in a cool place for up to 5 days. For longer storage, wrap individually in cellophane to prevent sticking.

Pro Tips
Apple preparation matters: Wash apples thoroughly to remove the waxy coating manufacturers apply. This helps the caramel stick properly and creates a more polished final product.
Timing your dipping: Work quickly but don’t rush. If your caramel cools too much between apples, gently reheat it over low heat. Never let it get too hot or it will be too thin.
Topping application: Apply toppings immediately after dipping while the caramel is still slightly sticky. This ensures they adhere properly and create that professional appearance.
Troubleshooting crystallization: If your caramel crystallizes, add a tablespoon of corn syrup or lemon juice when reheating. Don’t stir the mixture while it’s cooking, as this can cause crystallization.
Variation ideas: Try dipping half the apple in caramel and half in chocolate for a two-tone look. Create a drizzle by dipping a fork in melted chocolate and waving it over the finished apples.
Storage tips: Keep finished apples in a cool location away from direct sunlight. Humidity can cause the caramel to become sticky, so store them in a dry environment.
Gift presentation: Wrap individual caramel apples in cellophane and tie with ribbon for beautiful gifts. Include a care card with storage instructions.
Make-ahead option: You can prepare the caramel up to 2 days in advance and store it in an airtight container. Reheat gently before dipping.
Serving suggestions: Serve caramel apples at room temperature for the best flavor and texture. They pair beautifully with cold cider, coffee, or hot chocolate.