
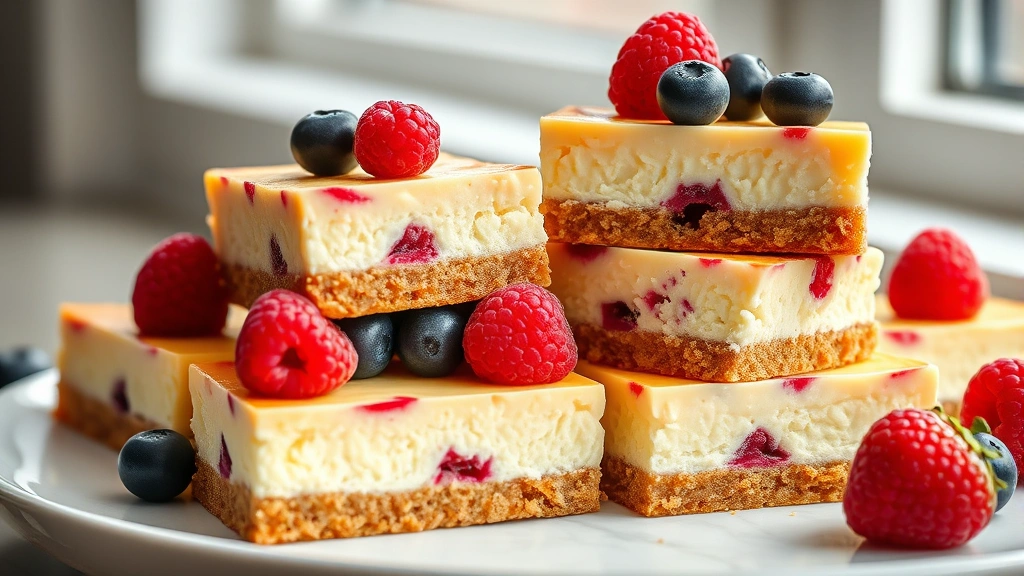
These cheesecake bars are an absolute dream! With a buttery graham cracker crust, silky smooth cheesecake filling, and optional toppings, they’re perfect for any occasion. Whether you’re hosting a dinner party or craving something sweet, this recipe delivers bakery-quality results every single time.
I absolutely love making cheesecake bars because they’re so much easier than a full cheesecake, yet taste just as decadent. The beauty of bars is that you can cut them into any size you want, making them perfect for serving a crowd or enjoying throughout the week. Plus, they look absolutely stunning when you present them to guests!
The secret to the best cheesecake bars is using room temperature cream cheese and not overbaking. You want that filling to be creamy and rich, not dry or crumbly. I also recommend using a water bath to ensure even cooking and prevent any cracks on the surface. Trust me, once you master this recipe, you’ll be making them constantly.
One of my favorite things about this recipe is how versatile it is. You can top them with fresh berries, homemade fruit compote, chocolate ganache, or even a silky smooth sauce for extra indulgence. The possibilities are truly endless, and you can customize them to match your personal taste preferences.
I’ve also found that these bars are wonderful for meal prep and entertaining. You can make them a day or two in advance, which takes so much pressure off when you’re hosting. They store beautifully in the refrigerator and actually taste even better after the flavors have had time to meld together overnight.
For more baking inspiration, check out this amazing cream-based recipe that uses similar techniques. If you’re looking for more dessert options to round out your menu, this crowd-pleasing favorite pairs wonderfully alongside sweet treats. Don’t forget about fresh accompaniments like this bright and tangy option to serve on the side.
When you’re ready to impress everyone at your next gathering, these cheesecake bars are absolutely foolproof. The combination of textures and flavors is simply irresistible, and I promise your family and friends will be asking for the recipe. Let me walk you through each step to ensure your success!
For additional topping ideas and inspiration, check out Bon Appétit’s cheesecake collection for creative variations. You might also enjoy Serious Eats’ expert baking tips for perfecting your technique. For step-by-step visual guidance, The New York Times has excellent instructional videos available.
Ingredients
- 2 cups graham cracker crumbs (about 16 crackers)
- 1/2 cup granulated sugar
- 6 tablespoons unsalted butter, melted
- 1/4 teaspoon salt
- 32 oz cream cheese (four 8-oz packages), room temperature
- 1 cup granulated sugar
- 1/4 cup all-purpose flour
- 2 teaspoons vanilla extract
- 4 large eggs, room temperature
- 1/2 cup sour cream, room temperature
- 1/4 cup fresh lemon juice
- Zest of 1 lemon
- Water for water bath
- Optional toppings: fresh berries, chocolate ganache, or fruit compote
Instructions
- Preheat your oven to 325°F. Line a 9×13 inch baking pan with parchment paper, letting it hang over the sides for easy removal later. This step is crucial for easy serving.
- In a medium bowl, combine graham cracker crumbs, 1/2 cup sugar, melted butter, and salt. Mix until the texture resembles wet sand and all crumbs are evenly coated with butter.
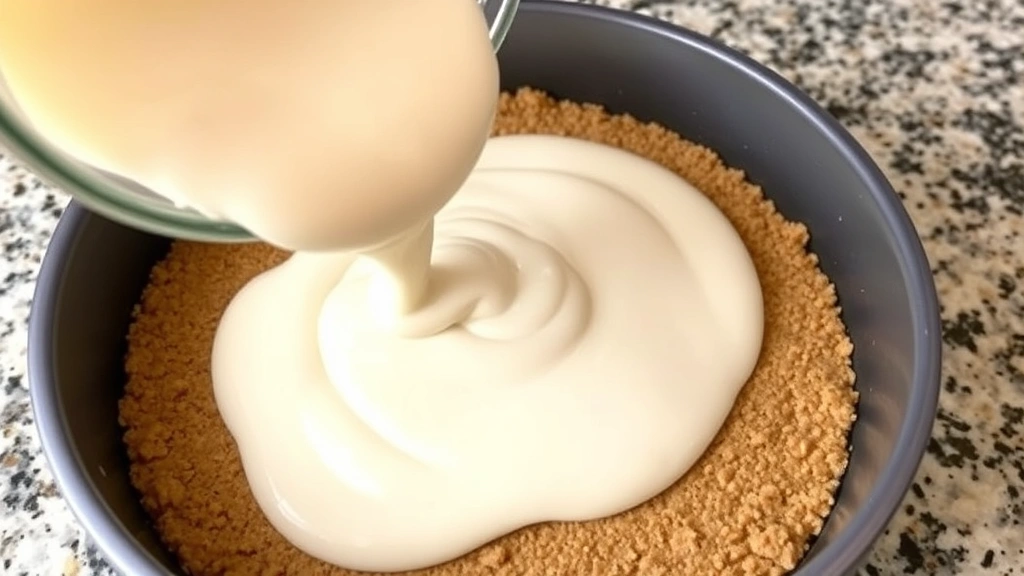
- Press the mixture firmly and evenly into the bottom of your prepared baking pan, using the bottom of a measuring cup to create an even layer. This ensures a sturdy base that won’t crumble when serving.
- Place the crust in the oven and bake for 8-10 minutes until it’s light golden brown. Remove and let cool slightly while preparing the filling.
- In a large mixing bowl, beat room temperature cream cheese on medium speed for about 3 minutes until it’s smooth and creamy. Do not skip this step, as it prevents lumps in your final cheesecake.
- Add 1 cup sugar, flour, vanilla extract, lemon zest, and lemon juice to the cream cheese. Beat on medium speed for 2 minutes until well combined, scraping down the bowl as needed.
- Add eggs one at a time to the mixture, beating on low speed after each addition and stopping to scrape the bowl. Add each egg slowly and beat only until just incorporated to avoid incorporating too much air.
- Fold in sour cream by hand using a spatula until just combined. Overmixing at this stage can create cracks in your cheesecake, so be gentle and deliberate with your motions.
- Pour the cheesecake filling over the cooled crust, smoothing the top with a spatula to create an even layer.
- Create a water bath by placing your baking pan inside a larger roasting pan. Pour hot water into the roasting pan until it reaches halfway up the sides of the baking pan. This ensures gentle, even cooking.
- Carefully place the water bath into the preheated 325°F oven and bake for 40-45 minutes. The cheesecake is done when the edges are set but the center still jiggles slightly when gently shaken.
- Turn off the oven and crack the door open about 4 inches. Leave the cheesecake in the oven for another 30 minutes. This gradual cooling prevents cracks from forming on the surface.
- Remove the cheesecake from the oven and water bath. Let it cool completely at room temperature for about 1 hour, then refrigerate for at least 4 hours or preferably overnight.
- Once fully chilled and set, use the parchment paper overhang to carefully lift the cheesecake out of the pan. Place it on a cutting board and cut into 12-16 bars using a sharp knife dipped in hot water and wiped between cuts.
- Add your desired toppings such as fresh berries, chocolate ganache, or fruit compote. Serve immediately and enjoy!

Pro Tips
The water bath is not optional if you want perfect results. It ensures the cheesecake bakes evenly and prevents the edges from overcooking while the center remains underbaked.
Cracks on top are completely normal and won’t affect the taste, but the gradual cooling process in the oven helps minimize them. A water bath also reduces cracking significantly.
Don’t skip the overnight chilling time. While the cheesecake will be set after 4 hours, the flavors continue to develop and the texture becomes even creamier after sitting overnight.
For clean cuts, use a long sharp knife dipped in hot water and wiped clean between each cut. This creates beautiful, professional-looking bars every time.
Store these bars in an airtight container in the refrigerator for up to 5 days. They also freeze beautifully for up to 3 months if you want to make them ahead of time.
You can customize the crust with different types of cookies like Oreos, digestive biscuits, or vanilla wafers. Just use the same weight of cookies and adjust the sugar as needed based on sweetness.
Lemon juice and zest add brightness and help cut through the richness of the cream cheese. If you prefer a different flavor, try substituting with lime juice, orange zest, or even eliminating citrus altogether.
Sour cream is essential as it adds tanginess and helps create that dense, creamy texture. Do not substitute with Greek yogurt or cream.
If your oven runs hot, check the cheesecake at 35 minutes to avoid overbaking. Every oven is different, so adjust cooking time as needed based on your results.