
There’s something absolutely magical about a homemade cherry cobbler that just makes you feel like you’re wrapped up in the coziest kitchen hug. This isn’t one of those complicated desserts that requires a culinary degree or fancy equipment – it’s genuinely simple, and that’s what makes it so perfect. The beauty of cherry cobbler lies in its rustic charm and the way it celebrates the star ingredient: those gorgeous, juicy cherries.
I’m thrilled to share my best cherry cobbler recipe with you today because it’s been perfected over years of baking and tweaking. The filling is straightforward – fresh or frozen cherries, a touch of sugar, a hint of almond extract, and just enough cornstarch to create that perfect jammy consistency. But the real showstopper is the topping. Instead of a traditional pie crust, we’re using a buttery biscuit topping that bakes up golden, fluffy, and absolutely irresistible.
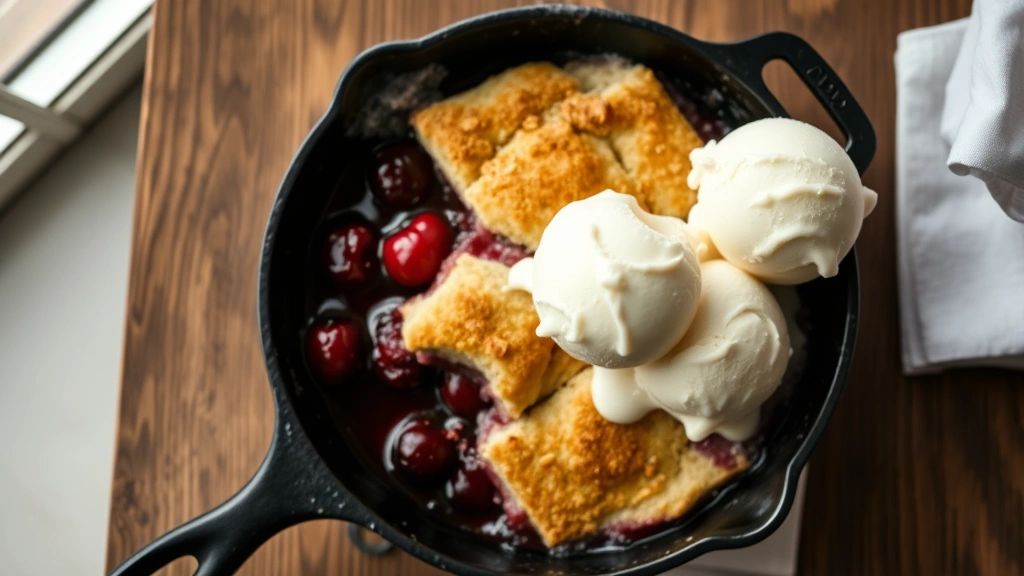
What I love most about this recipe is its flexibility. You can make it year-round using frozen cherries (honestly, they work beautifully), or you can celebrate cherry season by using fresh ones. Serve it warm with a scoop of vanilla ice cream or a dollop of whipped cream, and you’ve got yourself a dessert that tastes like it took hours but only took about 20 minutes of hands-on time. This is the kind of recipe that makes entertaining feel effortless and makes your home smell like a professional bakery.
For more delicious dessert inspiration, check out our Best Heavy Cream Alfredo Sauce Recipe for elegant dinner ideas. If you’re looking for other comforting desserts, our Delicious Heavy Cream Pasta Recipe pairs beautifully with this cobbler for a complete meal. You might also enjoy our Easy Chicken Alfredo Recipe for weeknight dinners. And don’t miss our Best Chickpea Salad Recipe for light lunch options or our Best Shishito Peppers Recipe for easy appetizers.
For expert baking tips, check out Serious Eats’ cherry cobbler guide, and for more classic cobbler variations, Bon Appétit’s cherry cobbler recipe is incredibly inspiring. The New York Times also has a wonderful cherry cobbler recipe that’s worth exploring for different techniques.
Ingredients
- 6 cups fresh cherries, pitted (or 4 cups frozen cherries, thawed)
- 3/4 cup granulated sugar
- 1/4 cup light brown sugar, packed
- 3 tablespoons cornstarch
- 1/2 teaspoon almond extract
- 1/4 teaspoon vanilla extract
- 1/4 teaspoon salt
- 2 tablespoons fresh lemon juice
- 1 1/2 cups all-purpose flour
- 1/4 cup granulated sugar (for topping)
- 2 1/2 teaspoons baking powder
- 1/2 teaspoon salt
- 6 tablespoons cold unsalted butter, cubed
- 1/2 cup whole milk or buttermilk
- 1 teaspoon vanilla extract
- 1 tablespoon coarse sugar for sprinkling (optional)
- Vanilla ice cream or whipped cream for serving

Instructions
- Preheat your oven to 375°F (190°C). Lightly butter a 9×13 inch baking dish or a 10-inch cast iron skillet – I always recommend cast iron for that gorgeous presentation.
- In a large bowl, combine the pitted cherries, granulated sugar, brown sugar, cornstarch, almond extract, vanilla extract, salt, and fresh lemon juice. Stir gently until all the cherries are evenly coated. The mixture should be fragrant and beautiful.
- Let the cherry mixture sit for about 5 minutes to allow the juices to start releasing. This step is crucial for creating that perfect jammy filling.
- Pour the cherry mixture into your prepared baking dish, spreading it evenly. Don’t worry if there seems to be a lot of liquid – that’s exactly what you want for a gorgeous filling.
- In a separate bowl, whisk together the flour, granulated sugar, baking powder, and salt. Make sure everything is well combined and there are no lumps.
- Add the cold cubed butter to the flour mixture. Using a pastry cutter, two knives, or your fingertips, work the butter into the flour until the mixture resembles coarse breadcrumbs. This is the foundation of your fluffy topping.
- Pour in the milk and vanilla extract, stirring gently with a fork until just combined. The dough should be slightly shaggy and just come together – don’t overmix, as this keeps your biscuits tender.
- Using a spoon or small ice cream scoop, drop dollops of the biscuit dough over the cherry filling. Don’t worry about covering every inch – the rustic look is part of the charm, and it allows steam to escape beautifully.
- If desired, sprinkle the coarse sugar over the top of the biscuits for a pretty, sparkly finish and extra texture.
- Place the baking dish on a baking sheet to catch any drips, then transfer to the preheated oven.
- Bake for 35-40 minutes, until the biscuit topping is golden brown and the cherry filling is bubbling around the edges. You’ll know it’s done when you see that gorgeous golden color and can smell that incredible cherry-almond aroma.
- Remove from the oven and allow the cobbler to cool for about 10 minutes before serving. This resting time helps the filling set slightly while keeping everything warm and perfect.
- Serve warm with a generous scoop of vanilla ice cream or a dollop of freshly whipped cream. The warmth of the cobbler will make the ice cream melt into pure heaven.

Pro Tips
Frozen vs. Fresh: Both work beautifully in this recipe. Frozen cherries are actually wonderful because they’re picked at peak ripeness and frozen immediately, locking in their flavor. You don’t need to thaw them completely – just let them sit out for 15-20 minutes. Fresh cherries are gorgeous during cherry season (usually June-August), and pitting them is easier than you’d think – use a cherry pitter tool for efficiency.
Substitution Options: If you can’t find almond extract or don’t enjoy it, simply use vanilla extract in its place, or try a touch of cinnamon or nutmeg for warm spice notes. You can also add a splash of bourbon or cherry liqueur to the filling for an adult version.
Biscuit Topping Secrets: Cold butter is absolutely essential for fluffy biscuits. Keep your butter in the freezer until the last minute. Don’t overmix the dough – the key to tender biscuits is minimal mixing. Some lumps and shaggy texture are your friends.
Serving and Storage: Cherry cobbler is best enjoyed the day it’s made, but leftovers keep beautifully in an airtight container in the refrigerator for up to 3 days. Reheat gently in a 300°F oven for about 15 minutes to restore warmth and freshness. You can also freeze baked cobbler for up to 2 months – thaw overnight in the refrigerator and reheat as directed.
Cast Iron Advantage: If baking in a cast iron skillet, remember it conducts heat differently than glass. Your cobbler may be ready 5 minutes earlier, so start checking at the 35-minute mark. Cast iron also provides that gorgeous crust on the bottom and retains heat beautifully for serving.
Custom Sizing: This recipe scales easily. For a smaller 8-inch square dish, reduce all quantities by about one-third. For two cobblers, simply double everything. The baking time remains roughly the same.