
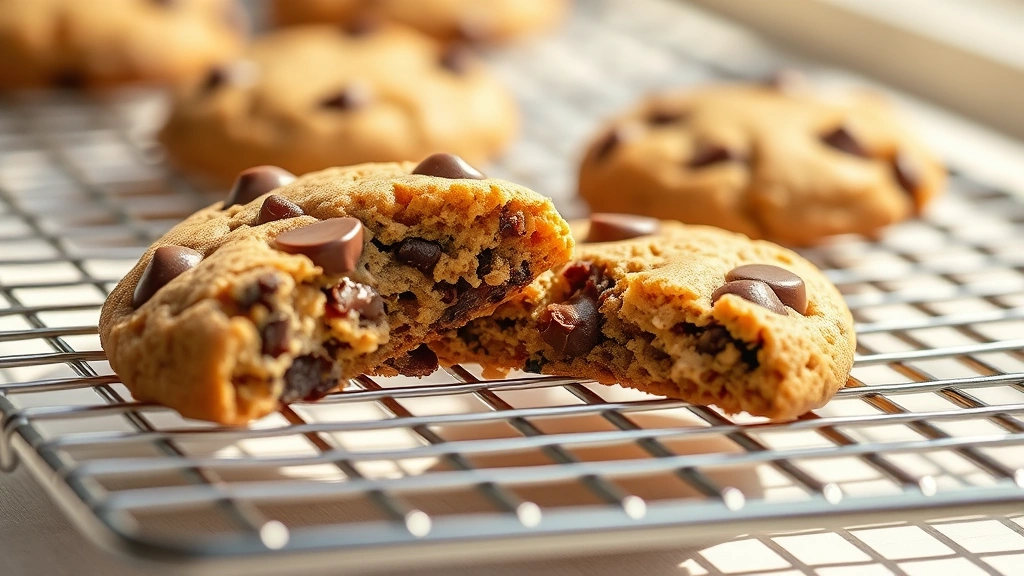
There’s nothing quite like biting into a warm, buttery chocolate chip cookie straight from the oven—that perfect combination of crispy edges and chewy centers is simply irresistible. But here’s the thing: you don’t need brown sugar to achieve that coveted texture and rich flavor. In fact, this revolutionary approach using only granulated sugar creates an even more tender, delicate crumb while delivering intense chocolate flavor in every bite.
I’ve spent years perfecting cookie recipes, and I’m thrilled to share this game-changing method with you. The secret lies in understanding how different sugars affect cookie structure and moisture content. By eliminating brown sugar entirely and relying on granulated sugar plus a touch of carefully measured ingredients, we unlock a new dimension of cookie perfection. This isn’t just a substitution—it’s a complete reimagining of what a chocolate chip cookie can be.
The beauty of this recipe is its versatility and reliability. Whether you’re a seasoned baker or someone who typically avoids the kitchen, these cookies come together with ease and consistency. The all-granulated-sugar approach means less molasses content, resulting in a lighter color and more delicate structure that lets the pure vanilla and quality chocolate shine through. It’s the kind of recipe that makes you wonder why you ever did it any other way.
What I love most about teaching this method is watching people’s faces when they taste the results. The texture is impossibly tender, the chocolate flavor is bold and unapologetic, and the vanilla notes are crystal clear. Plus, there’s something deeply satisfying about mastering a technique that seems to defy conventional baking wisdom. These cookies are perfect for gift-giving, lunchbox additions, or simply enjoying with a cold glass of milk on a lazy afternoon.
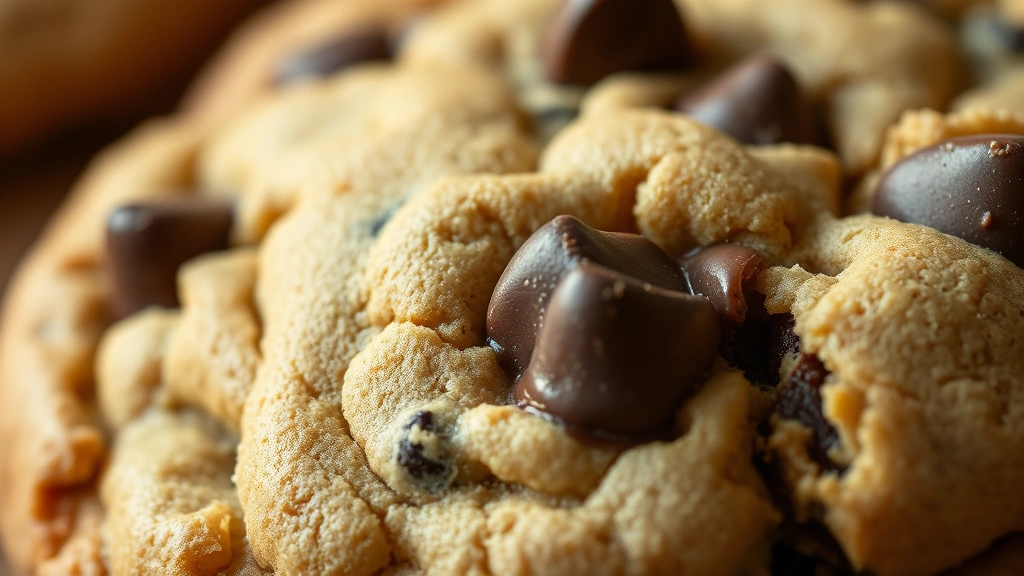
I recommend using a high-quality chocolate for this recipe—the better your chocolate, the more spectacular your cookies will be. Quality ingredients make all the difference in baking, and chocolate chip cookies are no exception. Don’t skimp on this component; it’s worth investing in excellent chocolate chips or chunks.
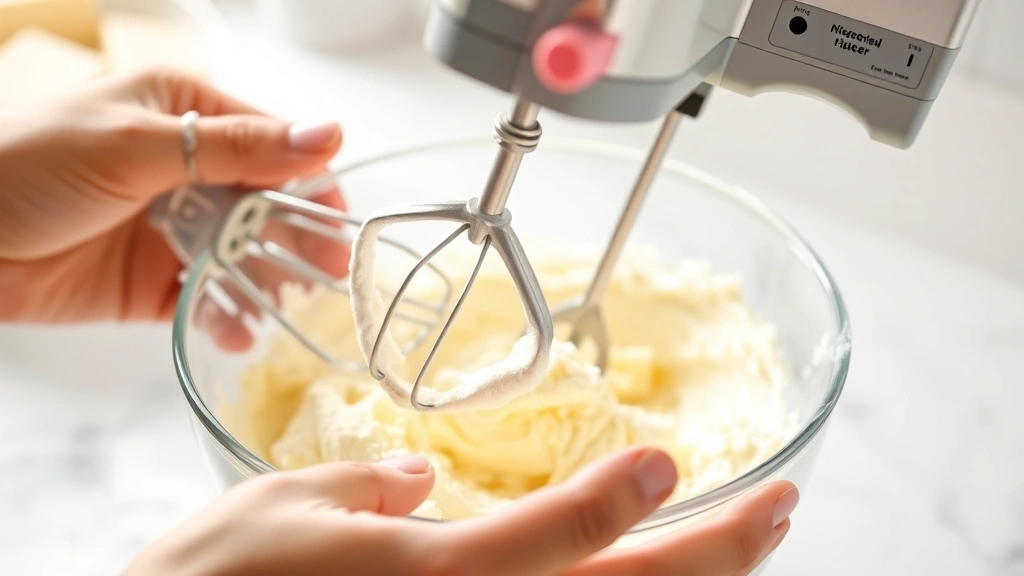
One more tip before you begin: make sure your butter is at room temperature. This is non-negotiable for achieving the proper creaming action and incorporating air into your dough. Cold butter simply won’t work the same way, and you’ll notice the difference in your final product. Room temperature butter also helps the other ingredients combine more smoothly, creating a more homogeneous dough that bakes evenly.
The baking time for these cookies is crucial—they should look slightly underbaked when you remove them from the oven, as they’ll continue cooking on the hot baking sheet. This residual heat is what creates that perfect balance of crispy edges and chewy centers. Once you nail this timing, you’ll have mastered one of baking’s most important skills. Keep a close eye on your oven during the final minutes of baking, as every oven is different and timing can vary by several minutes.
I’ve included detailed notes below about storage, variations, and troubleshooting tips. These cookies keep beautifully in an airtight container for up to five days, though honestly, they rarely last that long in my house. If you want to prepare dough ahead of time, you can refrigerate it for up to 48 hours or freeze it for up to three months, scooping onto baking sheets as needed. This makes them perfect for quick weeknight desserts or last-minute entertaining.
Baking is both an art and a science, and chocolate chip cookies are the perfect vehicle for understanding both aspects. This recipe teaches you about the importance of proper creaming, the role of eggs in structure and moisture, and how different ingredients interact to create texture. By working through this recipe, you’re building fundamental baking skills that will serve you well in all your future kitchen adventures.
One final thought: don’t be afraid to customize these cookies once you’ve mastered the base recipe. The foundation is solid enough to support variations, whether you want to add sea salt, incorporate different types of chocolate, or experiment with mix-ins like nuts or dried fruit. Start with the classic version first, though—there’s real beauty in simplicity, and you’ll appreciate the pure chocolate flavor these cookies deliver.
Ingredients
- 2 1/4 cups all-purpose flour
- 1 teaspoon baking soda
- 1 teaspoon fine sea salt
- 1 cup (2 sticks) unsalted butter, room temperature
- 3/4 cup granulated sugar
- 1/4 cup granulated sugar (additional)
- 2 large eggs, room temperature
- 2 teaspoons pure vanilla extract
- 2 cups high-quality chocolate chips or chunks
- 1/2 teaspoon fleur de sel or finishing salt (optional but recommended)
Instructions
- Preheat your oven to 375°F (190°C). Line two large baking sheets with parchment paper or silicone baking mats, ensuring they’re completely flat and even.
- In a small bowl, whisk together the all-purpose flour, baking soda, and fine sea salt. Set this dry mixture aside and make sure there are no lumps in the baking soda.
- In a large mixing bowl, add the room temperature butter and 3/4 cup granulated sugar. Using an electric mixer on medium speed, cream these together for 3-4 minutes until the mixture is light, fluffy, and pale in color—this step is absolutely crucial for proper cookie texture.
- Add the additional 1/4 cup granulated sugar to the creamed butter mixture and beat for another minute until fully incorporated and the mixture looks slightly grainy and lighter in texture.
- Add the room temperature eggs one at a time to the butter mixture, beating well after each addition to ensure they’re fully incorporated before adding the next one.
- Pour in the vanilla extract and mix on medium speed for 30 seconds until the vanilla is evenly distributed throughout the dough.
- Reduce the mixer speed to low and gradually add the flour mixture to the wet ingredients, mixing just until the dry ingredients are incorporated—do not overmix or your cookies will be tough rather than tender.
- Remove the bowl from the mixer and fold in the chocolate chips by hand using a rubber spatula, distributing them evenly throughout the dough.
- Using a cookie scoop or tablespoon measure, drop rounded portions of dough onto your prepared baking sheets, spacing them about 2 inches apart to allow for spreading during baking.
- Bake in the preheated 375°F oven for 11-13 minutes, until the edges are golden brown but the centers still look slightly underbaked and soft—this is the key to achieving that perfect chewy texture.
- Remove the baking sheets from the oven and sprinkle with fleur de sel if desired for that gourmet touch that makes people ask what your secret is.
- Let the cookies cool on the baking sheet for 5 minutes before transferring them to a wire cooling rack to cool completely, about 10 more minutes.
- Store cooled cookies in an airtight container at room temperature for up to 5 days, placing parchment paper between layers to prevent sticking.
Pro Tips
The Sugar Combination: Using only granulated sugar means less moisture and molasses content than traditional recipes with brown sugar. This creates a more delicate crumb and lets the chocolate flavor shine through more prominently. Don’t substitute back to brown sugar if you want the same results.
Cream Thoroughly: The creaming step is where air gets incorporated into your dough. This air helps create lift and a tender crumb. Spend the full 3-4 minutes creaming—you’ll notice the mixture becomes noticeably lighter and fluffier.
Don’t Overmix the Dough: Once you add the flour mixture, mix only until the dry ingredients are just incorporated. Overmixing develops gluten, which makes cookies tough rather than tender. It’s better to slightly undermix than to overmix.
Chocolate Quality: Use the best quality chocolate chips or chunks you can find. High-quality chocolate has better flavor and a superior melt in your mouth. Ghirardelli, Lindor, or even chopped bars of quality chocolate work beautifully.
Underbaking is Key: The cookies should look slightly underbaked when you remove them from the oven. They’ll continue cooking on the hot baking sheet from residual heat, finishing perfectly with crispy edges and chewy centers. Remove them too late and you’ll end up with hard cookies.
Make-Ahead Options: You can prepare the dough up to 2 days in advance and refrigerate it, or freeze it for up to 3 months. Scoop and freeze dough balls, then bake directly from the freezer, adding 1-2 minutes to the baking time.
Fleur de Sel Finishing: A sprinkle of fleur de sel or other finishing salt on warm cookies enhances the chocolate flavor and adds a sophisticated touch that guests will love.
Oven Temperature: Use an oven thermometer to ensure your oven is actually at 375°F. Ovens can be inaccurate, and this directly affects baking time and results.
Cooling Process: Let cookies cool on the baking sheet for 5 minutes before transferring to a rack. This allows them to set up enough to handle without falling apart, while still maintaining that chewy center.
Pingback: How to make the Best Hibachi Steak Recipe (So Tasty!) – Simple Recipe Finder
Pingback: How to Make the Best Slow Cooker Steak Recipe! – Simple Recipe Finder