
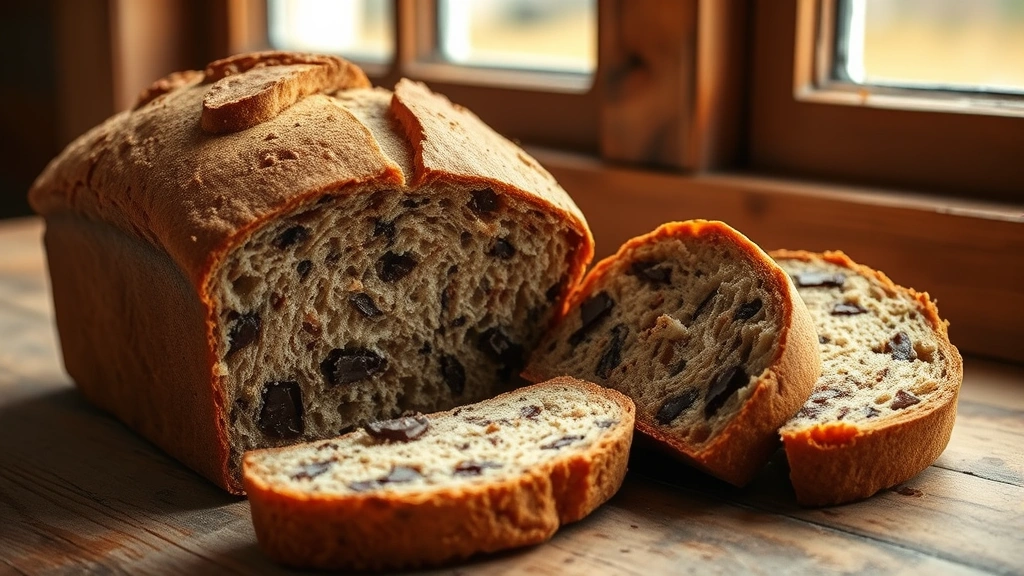
There’s something absolutely magical about chocolate sourdough bread – it’s the perfect marriage of tangy, complex sourdough flavor with rich, decadent chocolate. This isn’t your typical sweet bread; it’s sophisticated, slightly bitter, and utterly delicious. The natural fermentation of sourdough develops wonderful depth that complements dark chocolate beautifully, creating layers of flavor that make each slice feel like a special treat.
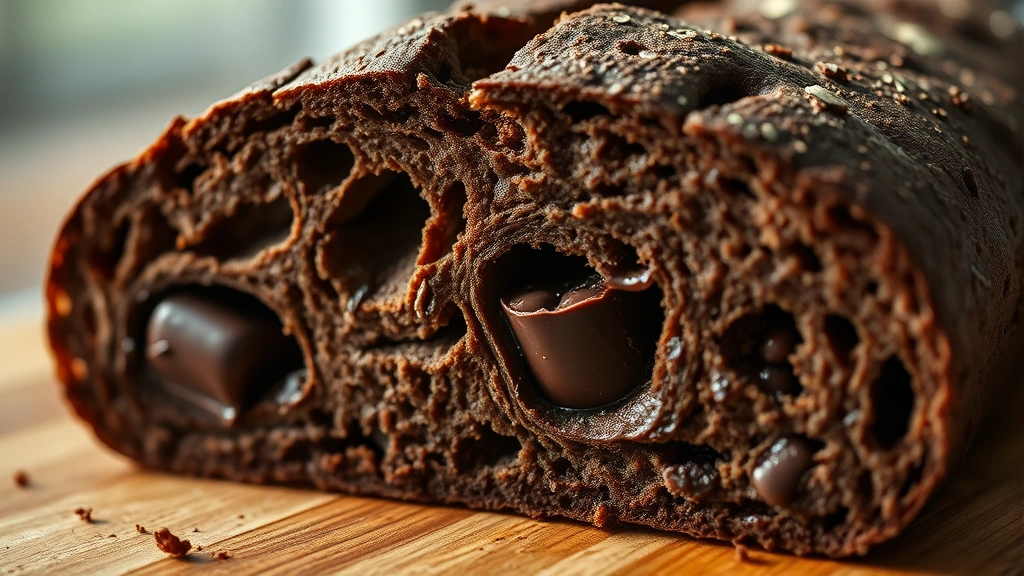
I’ve been making sourdough for years, and chocolate sourdough has become one of my absolute favorite variations. Unlike regular sandwich bread, chocolate sourdough has this incredible texture – crispy on the outside with a tender, open crumb on the inside. The chocolate doesn’t overpower the bread; instead, it whispers through, creating pockets of richness that surprise and delight with every bite.
What makes this recipe truly special is the long, cold fermentation process. This isn’t a quick bread – it requires patience and planning. But that patience rewards you with superior flavor development and a texture that’s absolutely worth the wait. The combination of active sourdough starter, quality dark chocolate, and time creates something that’s honestly better than anything you could buy at a bakery.
This recipe is perfect for serving alongside coffee or tea, enjoying for breakfast with butter and jam, or even pairing with cheese for an unexpected charcuterie board addition. It’s also wonderful toasted and topped with almond butter or honey. Once you master this technique, you’ll find yourself making it again and again.
For more creative sourdough variations, check out our sourdough feeding guide. If you’re looking to pair this with other recipes, our artisan bread pairings might inspire you. You can also explore complementary recipes that work beautifully alongside chocolate sourdough.
For additional baking inspiration, check out Bon Appétit’s bread baking guide and Serious Eats’ comprehensive sourdough resource. The New York Times sourdough master class is also incredibly helpful for perfecting your technique.
Ingredients
- 500g bread flour or all-purpose flour
- 350ml lukewarm water
- 100g active sourdough starter (fed 4-6 hours prior)
- 10g sea salt
- 150g dark chocolate (70% cacao), roughly chopped
- 15ml olive oil
- Extra flour for dusting
- Optional: 1 tablespoon cocoa powder mixed with flour for dusting
Instructions
- In a large mixing bowl, combine the lukewarm water and active sourdough starter, stirring until the starter is mostly dissolved. You’ll see some lumps, which is perfectly normal.
- Add the bread flour to the water and starter mixture, stirring until all the dry flour is incorporated and you have a shaggy dough. There shouldn’t be any visible dry flour remaining.
- Cover the bowl with a damp kitchen towel and let the dough rest for 30 minutes. This is called the autolyse period and helps develop gluten naturally.
- After the autolyse rest, sprinkle the sea salt evenly over the dough and add the olive oil. Mix thoroughly using a folding motion, working the salt and oil into the dough until fully incorporated. The dough will feel quite sticky at this stage.
- Perform the first stretch and fold: Wet your hand, then grab one side of the dough, stretch it up and fold it over the center. Rotate the bowl 90 degrees and repeat. Do this 4-6 times until the dough feels slightly tighter. Let it rest for 15 minutes.
- Repeat the stretch and fold sequence three more times at 15-minute intervals. Your dough should feel progressively smoother and more elastic with each set of folds.
- After completing all stretch and fold sequences, scatter the chopped dark chocolate pieces across the dough surface. Use a gentle folding motion to incorporate the chocolate throughout the dough, being careful not to break the pieces too much.
- Cover the bowl with plastic wrap or a damp towel and let the dough bulk ferment at room temperature (68-72°F is ideal) for 4-6 hours. You’re looking for the dough to increase in volume by about 50-75% and show visible bubbles on the surface.
- Once bulk fermentation is complete, turn the dough out onto a lightly floured surface. Gently shape it into a round boule or oval batard, being careful to maintain the air bubbles you’ve developed.
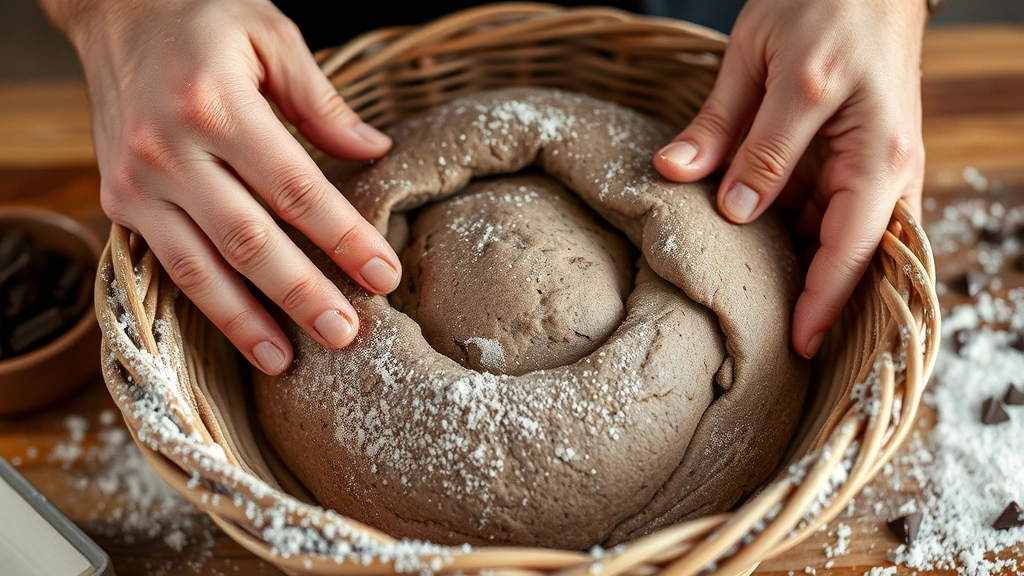
- Place the shaped dough seam-side up into a well-floured banneton basket (proofing basket). If you don’t have a banneton, line a bowl with a kitchen towel and flour it generously.
- Cover the banneton with plastic wrap and place it in the refrigerator for 12-16 hours. This cold fermentation develops incredible flavor and makes scoring easier.
- When you’re ready to bake, preheat your oven to 500°F (260°C) for at least 45 minutes. If you have a Dutch oven, place it in the oven to preheat as well.
- Turn the cold dough out onto parchment paper. If using a Dutch oven, carefully transfer the parchment with the dough into the hot Dutch oven. If baking directly on a baking stone, simply place the parchment on the preheated stone.
- Score the top of the dough with a sharp knife or bread lame, making a single diagonal cut about 1/4-inch deep across the top. This allows the bread to expand properly during baking.
- If using a Dutch oven, cover it with the lid and bake for 25 minutes. Then remove the lid and bake for an additional 20-25 minutes until the crust is deep golden brown and the internal temperature reaches 205-210°F.
- If baking on a stone, spray the oven with water three times during the first 10 minutes of baking to create steam, then bake uncovered for 40-45 minutes total until deeply golden and hollow-sounding when tapped.
- Remove the bread from the oven and transfer to a wire cooling rack. Let it cool completely for at least 1 hour before slicing, as the crumb continues to set during this time.
Pro Tips
Chocolate Selection: Use high-quality dark chocolate with at least 70% cacao content. Higher percentages work beautifully too. Avoid chocolate chips as they often contain additives that can interfere with fermentation. Chopping chocolate into various sizes creates interesting pockets of flavor throughout the loaf.
Water Temperature: The water should be lukewarm, around 80-85°F. If it’s too hot, it can damage your starter; if too cold, fermentation will be sluggish. This is one of the most important variables in sourdough baking.
Bulk Fermentation Timing: The exact timing depends on your kitchen temperature. A warmer kitchen (75°F+) might need only 4 hours, while a cooler kitchen (68°F) might need 6-7 hours. Look for visual cues rather than strict timing – the dough should increase by 50-75%, not double.
Cold Fermentation Benefits: The long, cold fermentation is crucial. It develops complex flavors and makes the dough much easier to score. You can extend this up to 24 hours if needed; just let it come closer to room temperature before baking.
Scoring Technique: A sharp blade is essential for clean scoring. The score should be 1/4-inch deep and at a 30-45 degree angle. This allows the bread to expand dramatically in the oven, creating that beautiful oven spring.
Steam Creation: Steam in the first 10-15 minutes of baking is crucial for developing a crispy crust. The Dutch oven traps steam naturally. If baking on a stone, you can place a pan of hot water on the bottom rack or spray the oven walls with water.
Cooling Period: Don’t skip the cooling period! The crumb continues to cook and set during cooling. Cutting into warm bread will result in a gummy texture. After cooling, wrap in a kitchen towel to maintain the crispy crust while keeping the interior soft.
Storage Instructions: Store cooled chocolate sourdough wrapped in a kitchen towel or paper bag at room temperature for up to 3 days. For longer storage, wrap tightly and freeze for up to 2 months. Toast thawed slices before serving.
Troubleshooting Flat Bread: If your bread comes out flat, your dough likely over-fermented. Reduce bulk fermentation time next attempt. Flat bread can also result from weak starter – ensure it’s fed regularly and at peak activity.
Troubleshooting Gummy Interior: This usually means under-baking or cutting too soon. Always reach that internal temperature of 205-210°F and cool completely before slicing.
Adjusting Chocolate Amount: You can increase chocolate to 175g for a richer bread, or reduce to 125g for subtler chocolate flavor. Experiment to find your perfect ratio.