
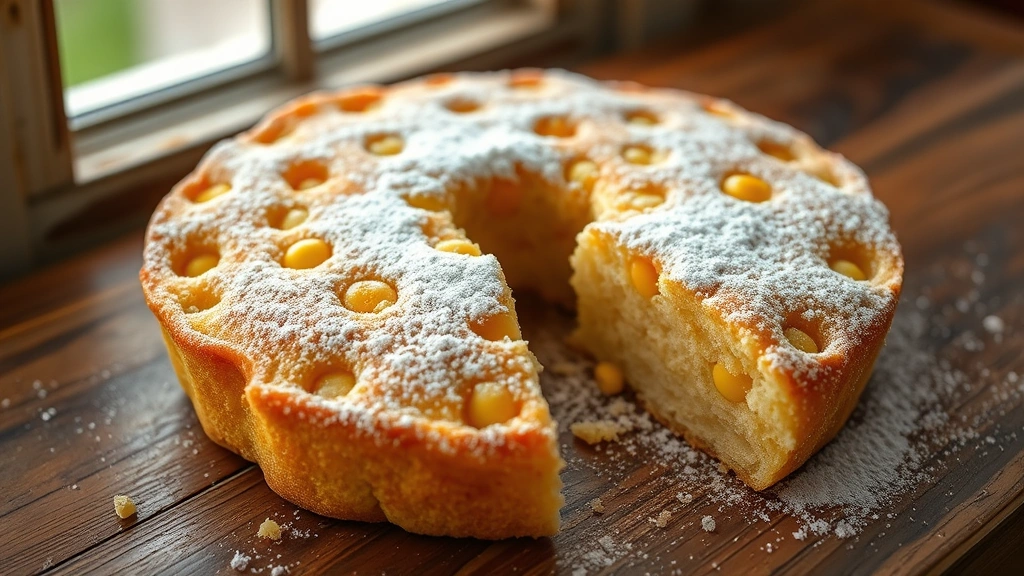
There’s something absolutely magical about a slice of homemade corn cake—it’s tender, moist, and bursting with that sweet corn flavor that reminds you of summer no matter what season it is. This isn’t just any corn cake recipe; this is THE corn cake recipe that will have everyone asking for seconds and begging for the recipe. Whether you’re looking for a simple dessert to serve at a casual gathering or an impressive treat to bring to a potluck, this corn cake delivers every single time.
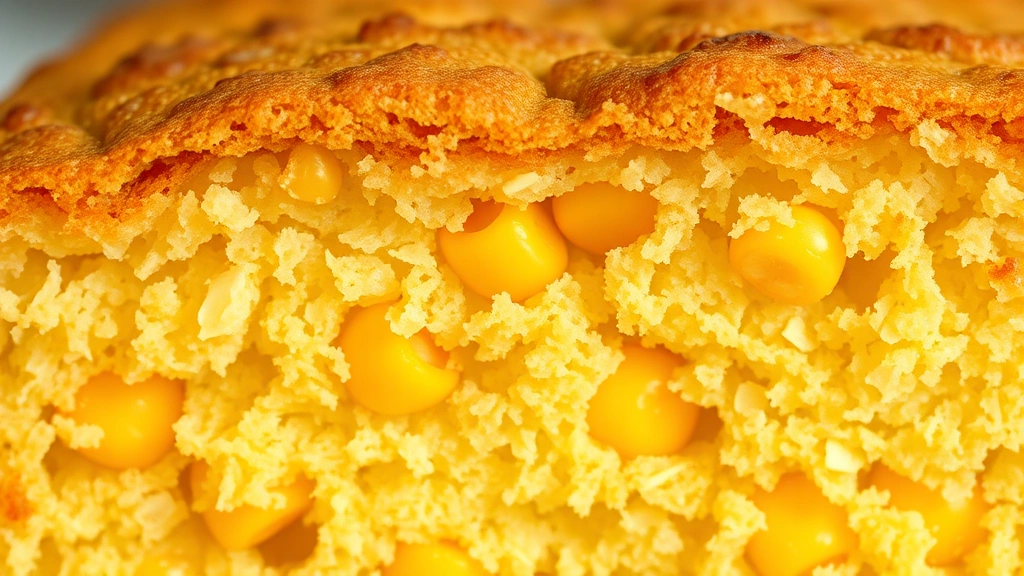
I’ve perfected this recipe over years of baking, testing different ratios of cornmeal to flour, experimenting with various sweeteners, and discovering the secret ingredients that make this cake absolutely irresistible. The result is a cake that’s wonderfully moist thanks to fresh corn kernels and a touch of buttermilk, with a subtle cornmeal crumb that adds authentic flavor and texture. Unlike dense, heavy corn cakes, this version is light and fluffy while still maintaining that distinctive corn character.
What makes this recipe truly special is how versatile it is. You can serve it plain with a dusting of powdered sugar, dress it up with a simple glaze, or go all out with frosting and fresh berries. It pairs beautifully with complementary dessert sauces, and it’s equally at home at breakfast or dessert. The cake stays fresh for several days, making it perfect for meal prep or making ahead for entertaining.
If you’re new to baking with cornmeal, don’t worry—this recipe is surprisingly straightforward. The technique is classic cake-making, with no special equipment or hard-to-find ingredients required. Just quality butter, fresh eggs, real corn, and pantry staples. I’ve included detailed instructions and helpful tips throughout to ensure your success, whether this is your first time making corn cake or your hundredth.
For more inspiration on complementary flavors, check out this pickled red onion recipe for serving alongside savory corn applications, or explore chickpea salad ideas for a complete meal. You might also enjoy learning about these shishito peppers as a savory counterpoint to sweet corn desserts.
Ingredients
- 1 cup (120g) all-purpose flour
- 1 cup (130g) cornmeal (polenta), finely ground
- 1½ teaspoons baking powder
- ½ teaspoon baking soda
- ½ teaspoon salt
- ½ teaspoon vanilla extract
- ¾ cup (170g) unsalted butter, softened to room temperature
- ¾ cup (150g) granulated sugar
- 3 large eggs, room temperature
- ½ cup (120ml) buttermilk, room temperature
- 1½ cups (255g) fresh corn kernels (about 3 ears of corn) or frozen corn, thawed and drained
- Zest of 1 lime (optional but recommended)
- 2 tablespoons honey
- Pinch of nutmeg
Instructions
- Preheat your oven to 350°F (175°C). Grease a 9-inch round cake pan or 9×13-inch rectangular pan with butter, then line the bottom with parchment paper for easy removal. This extra step ensures your beautiful cake comes out perfectly.
- In a medium bowl, whisk together the all-purpose flour, cornmeal, baking powder, baking soda, salt, and nutmeg. Set this dry mixture aside and make sure there are no lumps in the cornmeal—break them up with your fingers if needed.
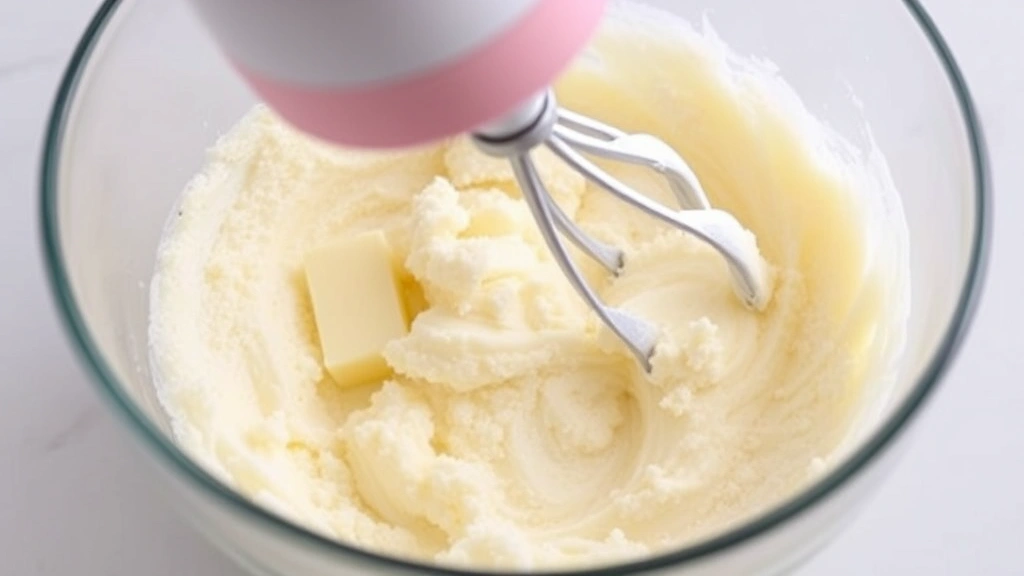
- In a large mixing bowl, cream together the softened butter and granulated sugar using an electric mixer on medium-high speed for about 3-4 minutes, until the mixture is light, fluffy, and pale yellow in color. This process incorporates air into the batter, which helps create a tender crumb.
- Add the eggs to the butter mixture one at a time, beating well after each addition to ensure they’re fully incorporated. Scrape down the sides of the bowl with a spatula between each egg addition. Once all eggs are added, mix in the vanilla extract and honey.
- Add half of the dry flour mixture to the wet ingredients and mix on low speed until just combined. Be careful not to overmix—you want to avoid developing too much gluten, which can make the cake tough.
- Pour in the buttermilk and mix on low speed until just combined. The batter will look slightly curdled, and that’s perfectly normal with buttermilk.
- Add the remaining dry flour mixture and mix on low speed until the batter just comes together. Again, don’t overmix—a few small lumps are okay.
- Gently fold in the fresh corn kernels and lime zest (if using) with a rubber spatula, stirring just until the corn is evenly distributed throughout the batter. The lime zest adds a subtle brightness that complements the corn beautifully, though it’s entirely optional.
- Pour the batter into your prepared pan and smooth the top with a spatula. Tap the pan gently on the counter a few times to release any air bubbles.
- Bake for 35-40 minutes, until a toothpick inserted into the center of the cake comes out with just a few moist crumbs clinging to it. The top should be golden brown and spring back when lightly touched.
- Remove the cake from the oven and let it cool in the pan for 15 minutes. This resting period allows the structure to set and makes it easier to turn out.
- Turn the cake out onto a wire rack to cool completely. This usually takes about 1-2 hours. Resist the urge to frost or glaze while the cake is still warm, as the frosting will melt.
- Once cooled, you can serve the cake plain, dust it with powdered sugar, drizzle with a simple glaze, or frost it with your favorite frosting. For a classic presentation, a light lemon glaze or cream cheese frosting works beautifully with corn cake.
Pro Tips
Fresh vs. Frozen Corn: Fresh corn kernels in summer are absolutely ideal, but frozen corn works wonderfully too. If using frozen corn, thaw it completely and pat it dry with paper towels to remove excess moisture, which can affect the cake’s texture.
Cornmeal Selection: Use finely ground cornmeal or polenta for the smoothest texture. Coarse cornmeal will create a grittier crumb. Stone-ground cornmeal has more flavor than regular cornmeal, so it’s worth seeking out if you can find it.
Don’t Overmix: The key to a tender crumb is not overmixing the batter. Mix just until the ingredients are combined. Overmixing develops gluten in the flour, which creates a tough, dense cake instead of the light, tender texture you want.
Lime Zest Enhancement: The lime zest is optional but highly recommended. It adds a subtle citrus note that enhances the corn flavor without making the cake taste like lemon cake. If you don’t have limes, lemon zest works too.
Storage Instructions: Store leftover corn cake in an airtight container at room temperature for up to 3 days. It also freezes beautifully for up to 3 months—wrap unfrosted cake layers tightly in plastic wrap and then aluminum foil before freezing.
Frosting Pairings: This cake pairs beautifully with cream cheese frosting, buttercream, or a simple lemon glaze. For a lighter option, try a honey-sweetened whipped cream topping with fresh berries.
Make It Savory: While this recipe is sweet, you can reduce the sugar to ½ cup and skip the honey for a less-sweet version that pairs well with chili, cornbread-style applications, or savory toppings.
Serving Suggestions: Serve at room temperature with coffee or tea. It’s also delicious slightly warmed with a scoop of vanilla ice cream or topped with fresh berries and whipped cream.