
There’s something absolutely magical about biting into a warm, pillowy donut—and now you can enjoy that same blissful experience without any gluten! This gluten free donut recipe has become my absolute go-to for weekend breakfasts and special occasions. I’ve tested this recipe dozens of times to get it just right, and I’m thrilled to share it with you today.
What makes these donuts so special is their incredible texture. Unlike many gluten-free baked goods that can be dense or crumbly, these donuts are light, fluffy, and genuinely delicious. The secret lies in using a combination of gluten-free flour blends and a few key ingredients that work together to create that perfect crumb structure. Whether you’re baking for someone with celiac disease, a gluten sensitivity, or you’re simply exploring gluten-free baking, this recipe will absolutely blow you away.
I love making these donuts on lazy Sunday mornings when I have a bit more time to spend in the kitchen. There’s something so rewarding about watching them puff up in the oil and transform into golden, beautiful treats. The recipe yields about a dozen donuts, which is perfect for sharing with family and friends—though I won’t judge you if you keep a few for yourself!
One of my favorite things about this recipe is how versatile it is. You can keep them simple with a classic glaze, or get creative with toppings and flavors. I’ve included instructions for a basic vanilla glaze, but feel free to experiment with chocolate, maple, or even cinnamon sugar. The base recipe is so reliable that it serves as a perfect canvas for whatever creative direction you want to take it.
Before we dive into the recipe, I want to mention that having the right equipment makes a huge difference. A donut pan is essential for baked donuts, and if you’re frying them, a candy or deep-fry thermometer is absolutely crucial for maintaining the right oil temperature. This ensures even cooking and that beautiful golden exterior we’re all after. You might also enjoy exploring other gluten-free treats like Heavy Cream Alfredo Sauce Recipe for brunch pairings, or checking out Best Chickpea Salad Recipe for a lighter side dish.
I’ve also found that using high-quality gluten-free flour makes a tremendous difference in the final product. While all-purpose gluten-free flour blends work well, I prefer to use a blend that includes xanthan gum already mixed in, which helps bind the ingredients together and creates a better texture. If your blend doesn’t include xanthan gum, I’ve added instructions for how to incorporate it separately.
The beauty of this recipe is that it’s not complicated or intimidating. Even if you’ve never made gluten-free baked goods before, I’m confident you’ll have fantastic results. The instructions are straightforward, and the ingredients are readily available at most grocery stores. For more baking inspiration and tips, check out Bon Appétit’s baking section and Serious Eats’ gluten-free guides.
These donuts are best enjoyed fresh, ideally within a few hours of making them. They stay soft and tender for up to two days when stored in an airtight container, though I’ve never had them last that long in my house! If you’re planning ahead, you can prepare the dough the night before and fry or bake them in the morning for maximum freshness and that wonderful just-cooked flavor.
Ingredients
- 2 cups gluten-free all-purpose flour blend (with xanthan gum)
- 1/2 cup granulated sugar
- 2 1/2 teaspoons baking powder
- 1/2 teaspoon salt
- 1/2 teaspoon vanilla extract
- 1/4 teaspoon nutmeg
- 1/8 teaspoon cinnamon
- 2 large eggs
- 1/3 cup whole milk
- 2 tablespoons melted butter
- Oil for frying or baking (vegetable or canola oil)
- 1 1/2 cups powdered sugar (for glaze)
- 2-3 tablespoons milk or cream (for glaze)
- 1 teaspoon vanilla extract (for glaze)
Instructions
- Gather all your ingredients and equipment before beginning. This includes a donut pan if baking, or a deep pot or Dutch oven if frying. Having everything ready makes the process smooth and enjoyable.
- In a large mixing bowl, whisk together the gluten-free flour blend, granulated sugar, baking powder, salt, nutmeg, and cinnamon. Make sure there are no lumps in the flour and the dry ingredients are evenly distributed.
- In a separate medium bowl, crack the eggs and beat them together with a fork until well combined. Add the vanilla extract, milk, and melted butter to the eggs and whisk until smooth and fully incorporated.
- Create a well in the center of your dry ingredient mixture. Pour the wet ingredients into the well and gently fold everything together using a spatula or wooden spoon. Mix until just combined—do not overmix, as this can lead to tough donuts. Some small lumps in the batter are perfectly fine.
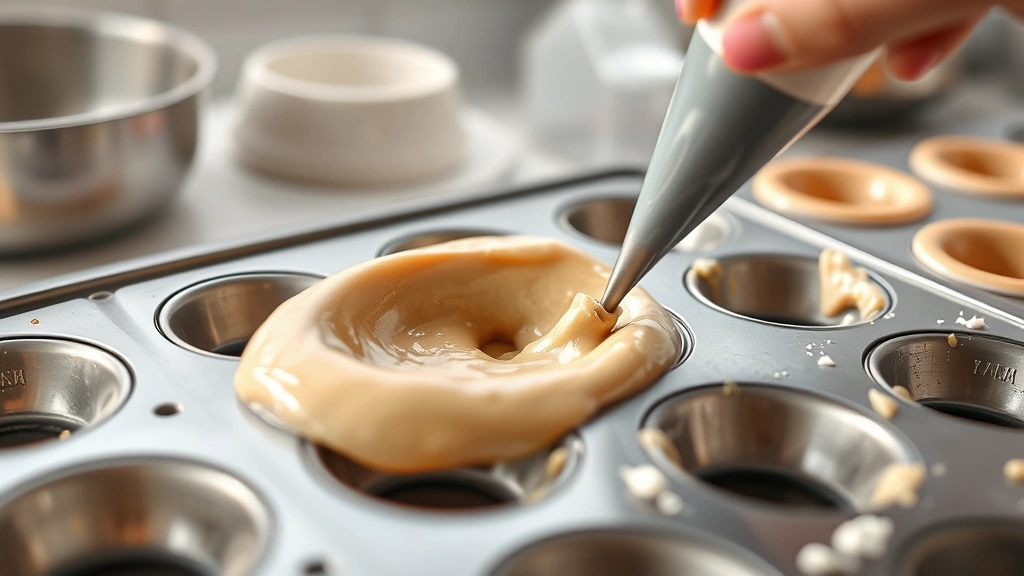
- For baked donuts: Preheat your oven to 350°F. Lightly grease your donut pan with non-stick spray or oil. Transfer the batter into a piping bag fitted with a large round tip.
- Pipe the batter into the prepared donut pan, filling each cavity about three-quarters full. This allows room for the donuts to rise during baking without overflowing.
- Bake for 10-12 minutes, or until a toothpick inserted into the thickest part of a donut comes out clean. The donuts should be light golden brown and spring back when gently touched.
- Remove the donut pan from the oven and let the donuts cool in the pan for 5 minutes. This allows them to set slightly so they release cleanly from the pan.
- Gently invert the donut pan onto a wire cooling rack and tap it lightly so the donuts release. Allow them to cool for at least 10 minutes before glazing.
- For fried donuts: Heat your oil to 375°F in a deep pot or Dutch oven. Use a candy or deep-fry thermometer to ensure accurate temperature.
- Transfer the batter to a piping bag fitted with a large round tip. Carefully pipe the batter directly into the hot oil, creating donut shapes. You may want to use scissors to cut the batter at the appropriate length.
- Fry for about 1-1.5 minutes on the first side until golden brown, then carefully flip using tongs or a slotted spoon.
- Fry for another 1-1.5 minutes on the second side until evenly golden brown. Remove with a slotted spoon and place on a paper towel-lined plate to drain excess oil.
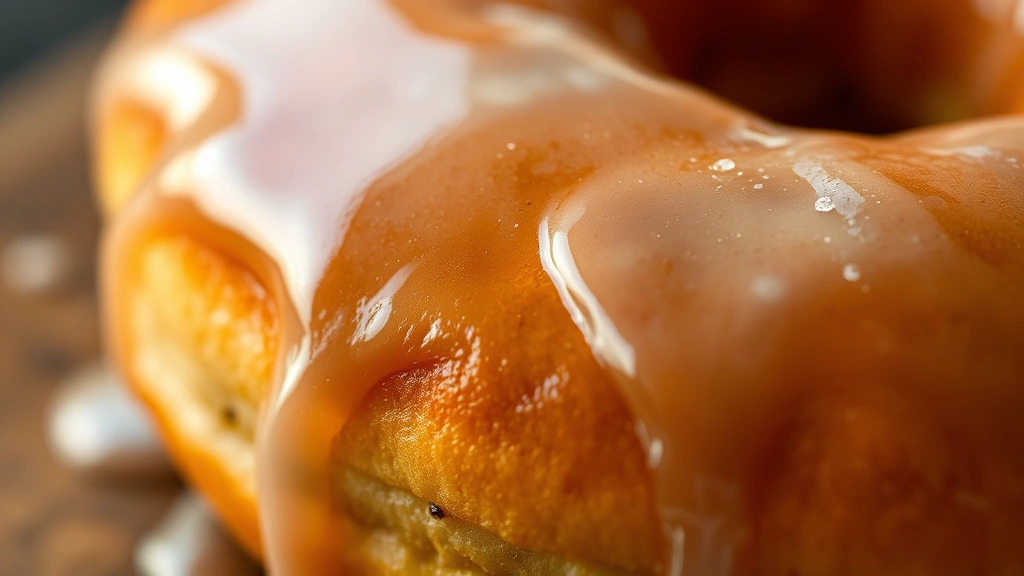
- While the donuts are still warm, prepare the glaze by whisking together the powdered sugar, milk, and vanilla extract in a small bowl. Add milk one tablespoon at a time until you reach your desired consistency.
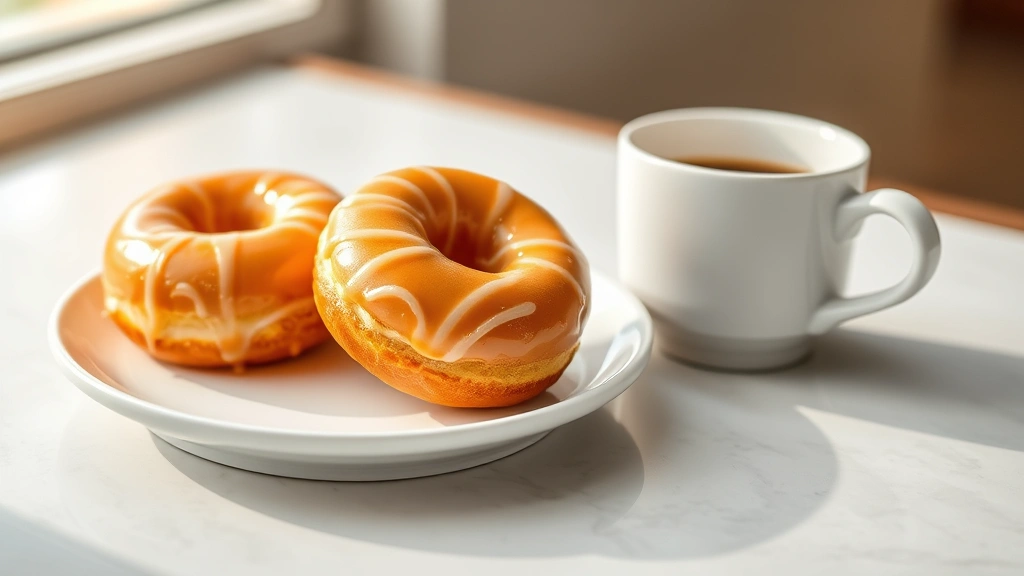
- Dip each warm donut into the glaze, allowing excess to drip off, then place back on a wire rack set over parchment paper to set.
- Allow the glaze to set for at least 15-20 minutes before serving. The donuts are best enjoyed warm or at room temperature on the day they’re made.
- Store any leftover donuts in an airtight container at room temperature for up to two days. You can gently reheat them in a 300°F oven for a few minutes to restore their warmth and softness.
Pro Tips
Testing for Doneness: When baking, donuts are done when a toothpick inserted into the thickest part comes out clean and the tops spring back when lightly touched. Overbaking can result in dry donuts, so start checking around the 10-minute mark.
Temperature Control for Frying: Maintaining consistent oil temperature is crucial for fried donuts. If the oil is too hot, the outside will brown before the inside cooks. If it’s too cool, the donuts will absorb excess oil and become greasy. An instant-read thermometer takes the guesswork out of this process.
Glaze Consistency: The glaze should be thick enough to coat the donuts but thin enough to drip slightly. If it’s too thick, add milk a few drops at a time. If it’s too thin, add more powdered sugar.
Flavor Variations: Try adding 1/2 teaspoon of lemon zest to the batter for a bright citrus flavor, or replace the vanilla with almond extract for a different twist. For chocolate donuts, replace 1/4 cup of flour with unsweetened cocoa powder.
Make-Ahead Option: You can prepare the batter the night before and refrigerate it in an airtight container. Bring it to room temperature for about 30 minutes before piping and cooking.
Perfect Pairing: These donuts are absolutely delicious alongside fresh coffee or hot chocolate. For a more substantial brunch, pair them with Delicious Heavy Cream Pasta Recipe or Best Shishito Peppers Recipe.
Baking vs. Frying: Baked donuts are slightly less indulgent and easier to make without specialized equipment, while fried donuts have that classic donut shop texture and flavor. Both methods work beautifully with this recipe.
Nutritional Considerations: Gluten-free baking sometimes requires additional binding agents, which can make these donuts slightly denser than traditional wheat-based donuts. This is completely normal and doesn’t affect their deliciousness.
Topping Ideas: Beyond the basic glaze, consider dipping warm donuts in cinnamon sugar, sprinkling with crushed nuts, or drizzling with chocolate ganache for variety.