

There’s nothing quite like the magic of the Grinch—that mischievous green character who steals Christmas but ultimately learns the true meaning of the holiday. Now you can capture that festive spirit with these absolutely delightful Grinch Cookies! These aren’t just any cookies; they’re a showstopper dessert that combines soft, chewy chocolate bases with vibrant green frosting that’s reminiscent of everyone’s favorite grouch.
These cookies are perfect for holiday parties, Christmas cookie exchanges, or simply spreading joy throughout December. The combination of rich chocolate and bright green frosting creates a visually stunning treat that tastes just as good as it looks. What makes these Grinch Cookies so special is their perfect balance of flavors—a fudgy, decadent chocolate cookie paired with creamy, not-too-sweet frosting that lets the butter shine through.
The beauty of this recipe is that it’s surprisingly simple to execute, even for novice bakers. You don’t need any fancy equipment or hard-to-find ingredients. Everything comes together in your standard mixing bowls, and the results are professional-looking cookies that will have everyone asking for your secret. Plus, these cookies stay fresh for several days in an airtight container, making them ideal for advance preparation.
Whether you’re baking for your family, friends, or coworkers, these Grinch Cookies will definitely steal the show. They’re whimsical, delicious, and perfectly on-brand for the holiday season. The green frosting can be customized to match your preferred shade—go pale and minty or deep and forest-like, depending on your vision. Some bakers even add edible glitter or pearl dust to make them extra magical.
If you’re looking for other festive treats to round out your holiday dessert spread, consider pairing these with savory appetizers or complementary sweets. You might also enjoy exploring pickled red onion recipe for a sophisticated flavor contrast. For additional holiday baking inspiration, check out this shishito peppers recipe for a unique twist on traditional fare.
The key to success with these cookies is using quality ingredients and not overbaking them. You want the chocolate base to be just slightly underbaked so it stays chewy in the center. The frosting should be smooth and spreadable—not too thick, not too thin. With a little attention to detail and these simple steps, you’ll create Grinch Cookies that are worthy of Martha Stewart herself!
Ingredients
- 2 1/4 cups all-purpose flour
- 1 teaspoon baking soda
- 1 teaspoon salt
- 1 cup (2 sticks) unsalted butter, softened
- 3/4 cup granulated sugar
- 3/4 cup packed brown sugar
- 2 large eggs
- 2 teaspoons vanilla extract
- 2 cups semi-sweet chocolate chips
- 1 cup (2 sticks) unsalted butter, softened (for frosting)
- 3 cups powdered sugar
- 2-3 tablespoons heavy cream or milk
- 1 1/2 teaspoons vanilla extract (for frosting)
- 1/2 teaspoon peppermint extract (optional)
- Green gel food coloring or liquid food coloring
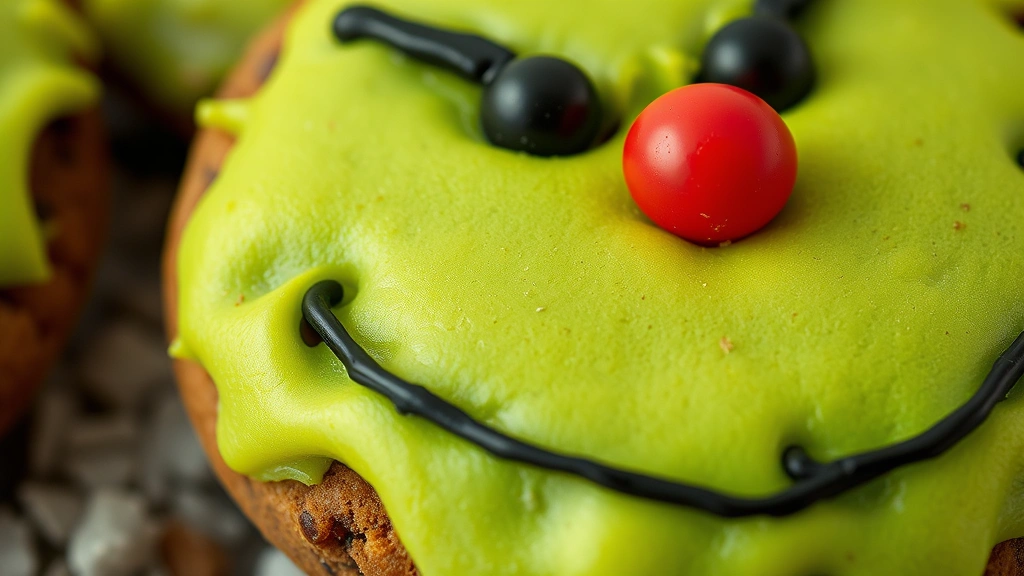
- Black frosting or black edible marker (for eyes)
- Red frosting or red edible marker (for nose)
Instructions
- Preheat your oven to 375°F. Line baking sheets with parchment paper or silicone baking mats.
- In a small bowl, whisk together the flour, baking soda, and salt. Set aside.
- In a large bowl, beat the softened butter with both sugars until light and fluffy, about 2-3 minutes.
- Add the eggs one at a time to the butter mixture, beating well after each addition. Stir in the vanilla extract.
- Gradually add the flour mixture to the wet ingredients, stirring until just combined. Do not overmix.
- Fold in the chocolate chips with a spatula until evenly distributed throughout the dough.
- Drop rounded tablespoons of dough onto prepared baking sheets, spacing them about 2 inches apart.
- Bake for 10-12 minutes, until the edges are set but the centers still look slightly underbaked. The cookies should appear soft.
- Remove from oven and let cool on baking sheets for 5 minutes before transferring to wire racks to cool completely.
- While cookies cool, prepare the green frosting by beating softened butter in a large bowl until creamy, about 1 minute.
- Gradually add powdered sugar, one cup at a time, beating well after each addition to avoid lumps.
- Add heavy cream, vanilla extract, and peppermint extract (if using), beating until smooth and spreadable.
- Add green gel food coloring a few drops at a time, mixing thoroughly until you achieve your desired shade of green.
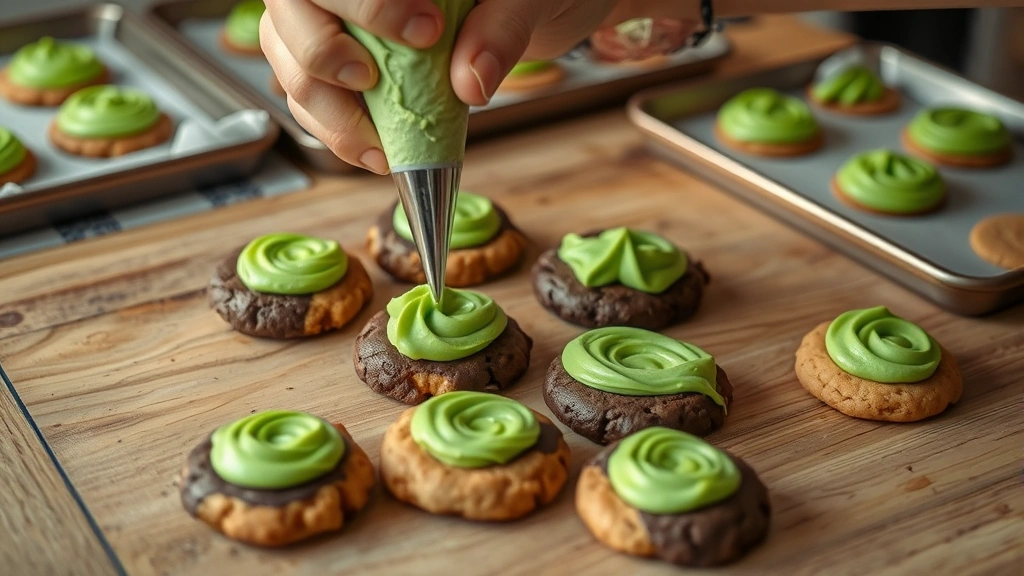
- Transfer frosting to a piping bag fitted with a round tip or use a spreader for a more rustic look.
- Once cookies are completely cool, pipe or spread green frosting on top of each cookie.
- Using black frosting or an edible marker, create two dots for eyes on each frosted cookie.
- Using red frosting or an edible marker, create a small dot or line for the Grinch’s grumpy nose.
- Allow frosting to set for at least 30 minutes before serving or storing.
Pro Tips
FROSTING CONSISTENCY: If your frosting is too thick, add cream one tablespoon at a time. If it’s too thin, add more powdered sugar. The frosting should be spreadable but hold its shape when piped. Room temperature butter is crucial for achieving the right consistency.
GREEN COLOR OPTIONS: Use gel food coloring rather than liquid for more vibrant, deeper greens without affecting the frosting consistency. You can make the green as light or as dark as you prefer—pale minty green or deep forest green both look appropriately Grinchy.
STORAGE INSTRUCTIONS: Store these cookies in an airtight container at room temperature for up to 5 days. Layer them with parchment paper between each cookie to prevent the frosting from smudging. They can also be frozen for up to 2 months if wrapped tightly.
CUSTOMIZATION IDEAS: Add edible glitter or pearl dust to the frosting for extra sparkle. Use different shades of green for variety. Add red or white details for a more festive look. Consider making these cookies in different sizes for a tiered presentation.
BATCH BAKING: This recipe makes about 24 cookies, but it can easily be doubled if you need more. Just make sure to bake in batches and allow your baking sheets to cool between batches.
CREAMY FROSTING TIP: Make sure all your butter is truly softened before starting. If it’s too cold, the frosting will be lumpy. If it’s too warm, it will be greasy. Room temperature is key to success.