

There’s something absolutely magical about homemade ice cream—that silky, luxurious texture that simply cannot be replicated by store-bought versions. This creamy ice cream recipe is proof that you don’t need an ice cream maker or complicated techniques to create restaurant-quality frozen desserts at home. With just a handful of simple ingredients and a little patience, you’ll have the most decadent, dreamy ice cream that will have everyone asking for your secret.
What makes this recipe so special is the perfect balance of heavy cream, condensed milk, and vanilla that creates an incredibly smooth base without any icy crystals. The key is understanding how these ingredients work together: the fat in the heavy cream provides that luxurious mouthfeel, while the sweetened condensed milk acts as both sweetener and a natural stabilizer, preventing large ice crystals from forming. This means you can make stunning ice cream without fancy equipment—just a freezer and a willingness to stir occasionally.
I’ve been making this recipe for years, and it never fails to impress. Whether you’re looking for a classic cream-based dessert or wanting to experiment with flavors, this foundation is absolutely foolproof. The beauty of this method is its versatility—you can keep it classic vanilla, or easily customize it with extracts, fruits, or mix-ins. I’ve served this at dinner parties, family gatherings, and simple Tuesday nights, and the reaction is always the same: pure joy.
One of my favorite things about this recipe is how it demonstrates that simpler is often better. There’s no need for eggs, cornstarch, or a double boiler setup. You’re not making custard or dealing with tempering techniques. This is straightforward, approachable, and absolutely delicious. Even if you’ve never made homemade ice cream before, this recipe will make you feel like a pastry chef. The technique is so simple that kids can help, making it a perfect family activity.
The texture you’ll achieve is something special—it’s creamier than most ice cream shop versions, with a smooth consistency that melts beautifully on your tongue. Because of the condensed milk and the no-churn method, you don’t get that rock-hard texture that sometimes happens with frozen desserts. Instead, you get something that’s almost custard-like, but lighter and more refreshing. This is the kind of ice cream that makes you want to sit on the porch with a bowl and just savor every spoonful.
I also love this recipe because it’s incredibly budget-friendly. The ingredients are staples you probably already have in your kitchen, and they’re inexpensive compared to specialty ice cream bases. You can make multiple batches throughout the summer for the cost of one trip to an ice cream parlor. Plus, because you’re making it at home, you control exactly what goes into it—no strange additives, no preservatives, just real cream and real vanilla.
The timing is also perfect for this recipe. If you want ice cream for tonight’s dinner, you can have it ready in just a few hours. If you’re planning ahead, it keeps beautifully in the freezer for up to two weeks (though it rarely lasts that long in my house). This makes it perfect for unexpected guests or when you suddenly crave something sweet.
For those interested in exploring more cream-based recipes, you might enjoy checking out our heavy cream pasta recipe or our chicken Alfredo recipe. While they’re savory rather than sweet, they showcase the same quality ingredient philosophy. And if you’re looking to round out a summer menu, our pickled red onion recipe and shishito peppers recipe are wonderful accompaniments to any meal.
For more inspiration on ice cream making techniques, I recommend checking out Serious Eats’ ice cream guide, which offers excellent insights into ice cream science and variations. You might also enjoy Bon Appétit’s vanilla ice cream recipe for additional inspiration, or explore The New York Times’ approach to classic ice cream. These resources will deepen your understanding of ice cream making and inspire endless flavor variations.
Making ice cream at home is one of those simple pleasures that feels luxurious and indulgent but is actually quite easy. This recipe proves that you don’t need to be a professional pastry chef to create something extraordinary. So grab your ingredients, give yourself a few hours, and prepare to make the most spectacular ice cream you’ve ever tasted. Your summer desserts are about to get a major upgrade.
Ingredients
- 2 cups heavy cream, cold
- 1 can (14 ounces) sweetened condensed milk
- 2 tablespoons vanilla extract or 1 vanilla bean, scraped
- 1 tablespoon granulated sugar
- Pinch of sea salt
- Optional: 1/2 cup mix-ins such as chocolate chips, cookie crumbles, or fresh fruit
Instructions
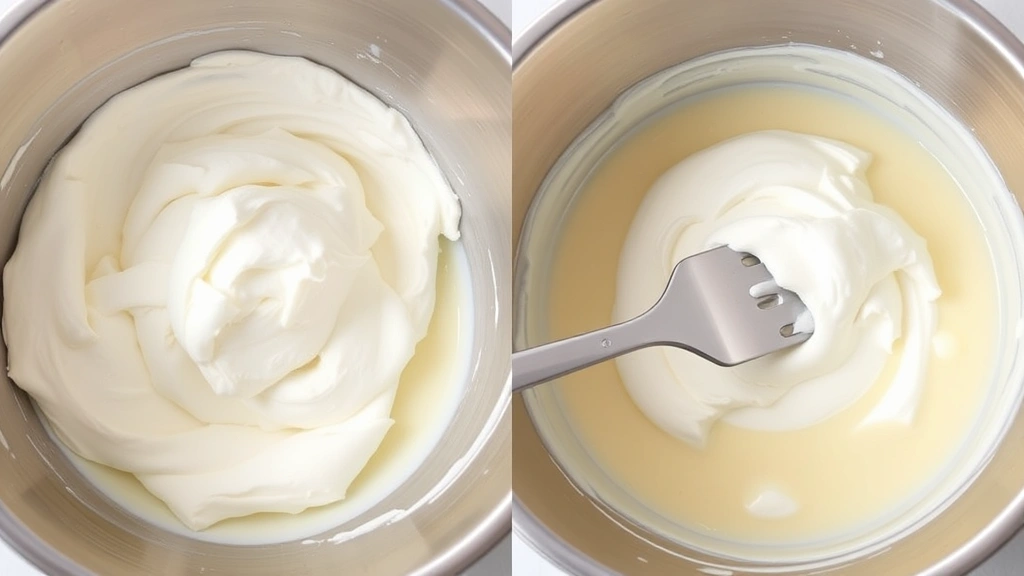
- Pour the cold heavy cream into a large mixing bowl. Using an electric mixer or whisk, begin beating the cream on medium-high speed. You’re looking for soft peaks to form—this typically takes 2-3 minutes with a mixer. The cream should be fluffy and doubled in volume, but still have some flow to it. Do not overbeat or you’ll end up with butter.
- In a separate bowl, combine the sweetened condensed milk, vanilla extract (or scraped vanilla bean seeds), granulated sugar, and sea salt. Stir this mixture gently with a spoon until the sugar dissolves completely and all ingredients are well incorporated. Taste a small spoonful and adjust vanilla or salt to your preference.
- Gently fold the condensed milk mixture into the whipped cream using a spatula. Use slow, careful motions, folding from the bottom of the bowl up and over the top. Do this about 10-15 times until no white streaks remain and the mixture is uniform in color and texture. The key is maintaining the airiness of the whipped cream while fully incorporating the condensed milk.
- If you’re using mix-ins like chocolate chips or cookie crumbles, fold them in gently at this point. Fresh fruit can be added but drain it well to avoid excess moisture. Don’t overmix; just fold a few more times to distribute evenly.
- Pour the ice cream mixture into a freezer-safe container—a loaf pan, square baking dish, or airtight freezer container all work beautifully. Smooth the top with a spatula or the back of a spoon.
- Cover the container tightly with plastic wrap or an airtight lid to prevent freezer burn and to keep the ice cream from absorbing odors from other frozen foods. Place it in the back of your freezer where it’s coldest.
- Freeze for at least 3-4 hours, though overnight is ideal for the best texture and firmness. Unlike traditional ice cream makers, this method doesn’t require stirring or checking on it—you can simply let it be.
- When ready to serve, remove the ice cream from the freezer 5 minutes before scooping. This brief resting time allows it to soften just slightly, making scooping much easier and creating a more luxurious mouthfeel. Scoop into bowls or cones and serve immediately.
- Store any leftovers in an airtight container in the freezer for up to 2 weeks. If the ice cream becomes very hard, let it sit at room temperature for 10-15 minutes before scooping.

Pro Tips
- This is a no-churn ice cream recipe, meaning you don’t need an expensive ice cream maker. The condensed milk and whipped cream method creates an incredibly creamy texture naturally.
- The key to perfect texture is not overbeating the cream initially. You want soft peaks, not stiff peaks. Soft peaks mean the cream still flows slightly and will incorporate more easily with the condensed milk.
- The sweetened condensed milk is crucial because it acts as a stabilizer, preventing large ice crystals from forming during freezing. This is why the texture is so smooth and creamy.
- Don’t skip the salt—even just a pinch enhances the vanilla flavor and balances the sweetness beautifully.
- For chocolate ice cream, add 1/4 cup unsweetened cocoa powder to the condensed milk mixture and whisk until smooth before folding into the cream.
- For strawberry ice cream, puree fresh strawberries and fold them in gently, or use strawberry jam for a more intense flavor.
- For coffee ice cream, dissolve 2 tablespoons instant espresso powder in the vanilla extract before mixing with the condensed milk.
- The ice cream is ready to scoop when it reaches the consistency of soft-serve. If it’s too hard, let it sit out for a few minutes before scooping.
- This recipe doubles easily if you’re feeding a crowd—just multiply all ingredients by two.
- Make sure your cream is very cold before starting. Cold cream whips faster and creates better volume.
- For a lighter version, you can use half-and-half instead of heavy cream, though the texture will be slightly less rich.
- The ice cream can be made up to 2 weeks ahead, making it perfect for meal prep or entertaining.
- If you notice any separation after freezing, simply let it soften slightly at room temperature and re-mix gently before serving.
Pingback: How to Make Perfect Pork Belly Burnt Ends Recipe! – Simple Recipe Finder
Pingback: How to make the BEST Venison Tenderloin Recipe! – Simple Recipe Finder