
There’s something absolutely magical about an Oreo ice cream cake – it’s the dessert that makes everyone at the table light up with joy! This showstopping creation combines two beloved classics: the iconic crunch of Oreo cookies and the creamy indulgence of homemade ice cream, all layered together in one stunning cake. Whether you’re planning a summer celebration, birthday party, or just want to impress your family with something special, this recipe is your ticket to dessert glory.
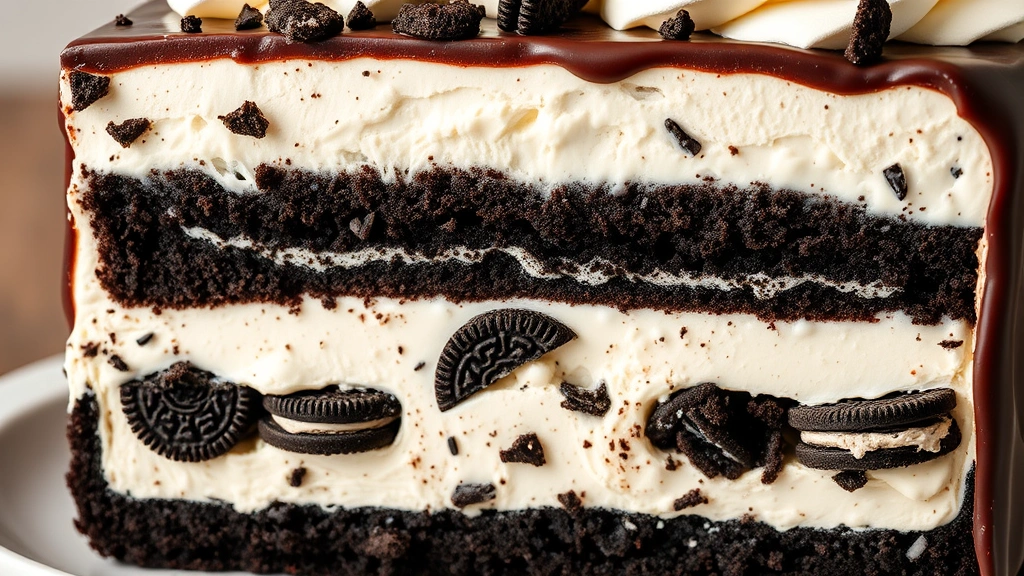
What I absolutely love about this Oreo ice cream cake is how elegantly simple it is to make, despite looking like you spent hours in the kitchen. The beauty lies in the layers – a buttery Oreo cookie crust that’s both sturdy and delicious, topped with a cloud-like vanilla ice cream filling, more crushed Oreos for extra texture, and finished with a layer of creamy cookies and cream ice cream. It’s a celebration of flavors and textures that just works perfectly together.
The best part? You can make this cake ahead of time, which makes it perfect for entertaining. Prepare it the day before, keep it in the freezer, and you’ll have an elegant, impressive dessert ready to go without any last-minute stress. I’ve included some helpful tips throughout this recipe to ensure your cake turns out absolutely perfect every single time.
One of my favorite things about this recipe is how customizable it is. Want to add a chocolate ganache layer? Go for it! Prefer a dark chocolate crust instead of the traditional Oreo base? That works beautifully too. You can even drizzle it with caramel sauce or top it with whipped cream and extra cookie crumbles. The foundation is solid, so feel free to make it your own and add your personal touches.
If you’re looking for other impressive desserts to add to your repertoire, you might also enjoy exploring creative uses for cream-based recipes or indulgent cream dessert techniques. For more inspiration on layered desserts and impressive entertaining menus, check out our collection of show-stopping recipes.
This recipe has been perfected through countless batches, and I’m thrilled to share it with you. The combination of textures – the crunch of the Oreo crust, the smoothness of the ice cream, and the delightful cookie pieces throughout – creates an experience that’s truly unforgettable. Let’s get started on creating this magnificent dessert together!
Ingredients
- 2 cups crushed Oreo cookies (about 20 cookies), including cream filling
- 6 tablespoons unsalted butter, melted
- 3 tablespoons granulated sugar
- 1 quart vanilla ice cream, softened slightly
- 1 cup crushed Oreo cookies (about 10 cookies), for middle layer
- 1 quart cookies and cream ice cream, softened slightly
- 1/2 cup heavy cream
- 4 ounces semi-sweet chocolate, chopped
- 2 tablespoons butter
- Whole Oreo cookies, for garnish
- Whipped cream, for serving (optional)
Instructions
- Prepare a 9-inch springform pan by lining it with parchment paper on the bottom and sides. This makes removal much easier once your cake is frozen solid.
- In a medium bowl, combine the 2 cups of crushed Oreo cookies (with cream filling included) with the melted butter and 3 tablespoons of granulated sugar. Mix until the texture resembles wet sand and everything is evenly combined.
- Press the Oreo mixture firmly into the bottom of your prepared springform pan, creating an even layer. Use the bottom of a measuring cup to help compact it, ensuring there are no gaps. This crust needs to be sturdy enough to support the ice cream layers.
- Place the crust in the freezer for 15 minutes while you prepare the next layer. This helps it set and prevents it from crumbling when you add the ice cream.
- Remove the vanilla ice cream from the freezer and let it sit at room temperature for 5-10 minutes until it’s soft enough to spread but still holds its shape.
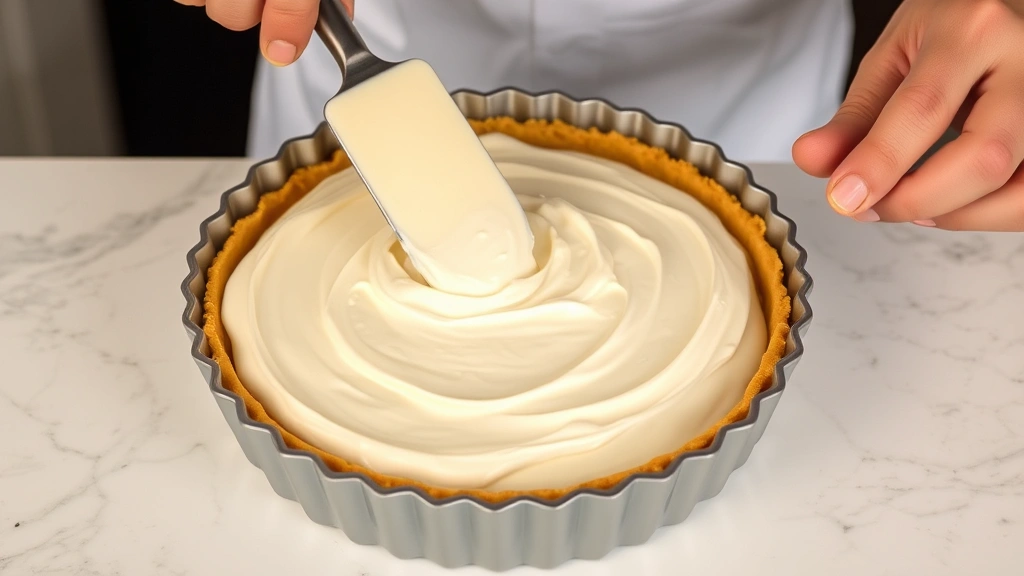
- Spread the softened vanilla ice cream evenly over the chilled Oreo crust, creating a smooth, even layer. You can use an offset spatula or the back of a spoon dipped in warm water to help smooth it out.
- Sprinkle the 1 cup of crushed Oreo cookies (about 10 cookies) evenly over the vanilla ice cream layer. These cookies add wonderful texture and flavor throughout the middle of your cake.
- Place the cake back in the freezer for 30 minutes to allow this layer to firm up before adding the final layer.
- Remove the cookies and cream ice cream from the freezer and let it soften at room temperature for about 5-10 minutes, just as you did with the vanilla.
- Spread the softened cookies and cream ice cream evenly over the Oreo cookie layer, creating a smooth, beautiful top layer. This is your showcase layer, so take your time making it look neat and attractive.
- Cover the top of the springform pan with plastic wrap and place it in the freezer for at least 4-6 hours, or preferably overnight, until the cake is completely solid.
- While the cake freezes, you can prepare the chocolate ganache topping if desired. Heat the heavy cream until it just begins to steam (don’t let it boil).
- Pour the hot cream over the chopped chocolate in a heat-safe bowl and let it sit for 1-2 minutes to allow the chocolate to soften.
- Add the 2 tablespoons of butter to the chocolate and cream mixture and stir until completely smooth and glossy. Let this cool to room temperature before using.
- Once the cake is completely frozen and you’re ready to serve, remove it from the freezer and let it sit at room temperature for 5-10 minutes to make removal easier.
- Run a thin, warm knife around the edges of the springform pan, then carefully remove the springform ring.
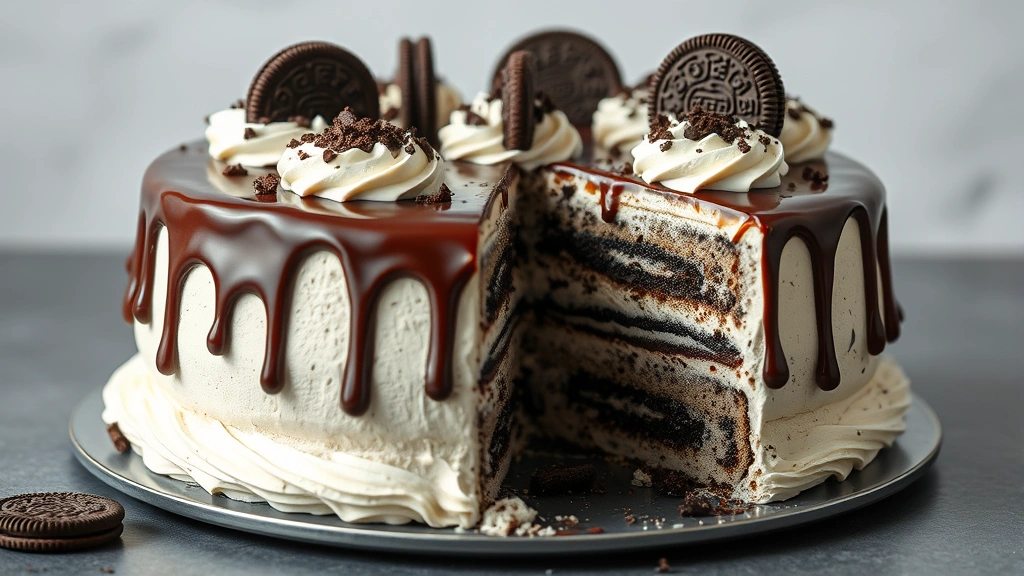
- If making the ganache topping, pour or drizzle it over the top of the frozen cake, allowing it to drip down the sides for a beautiful presentation.
- Garnish the top with whole Oreo cookies arranged decoratively, and add any additional toppings like whipped cream if desired.
- Slice with a sharp knife that you dip in warm water between each cut, wiping the knife clean to ensure clean, beautiful slices.
- Serve immediately and watch everyone’s faces light up as they take their first bite of this absolutely incredible dessert!
Pro Tips
Ice Cream Temperature Matters: The key to layering this cake successfully is getting your ice cream to the right consistency. It should be soft enough to spread easily but still cold enough to hold its shape. If it gets too soft, place it back in the freezer for a few minutes.
Crust Customization: You can absolutely customize your crust beyond the basic Oreo version. Try mixing in some melted dark chocolate, adding crushed Oreos dipped in white chocolate, or even creating a half-and-half crust with regular Oreos and golden Oreos for visual interest.
Ganache Optional But Recommended: While the ganache topping is optional, it really takes this cake to the next level. It adds elegance, richness, and a beautiful visual contrast to the white and black layers beneath it.
Storage Tips: Keep your finished cake in the freezer until ready to serve. It will stay fresh for up to one week when properly wrapped and protected from freezer burn.
Serving Size Adjustment: This recipe makes a generous cake that serves 12-14 people. If you’re making it for a smaller gathering, you can easily halve the recipe and use a smaller springform pan.
Flavor Variations: Feel free to experiment with different ice cream flavors. Chocolate ice cream with cookies and cream would be delicious, as would a combination of mint chocolate chip and vanilla.
Whipped Cream Topping: Fresh whipped cream adds a beautiful finishing touch and provides a cool, light contrast to the rich ice cream layers. Make it just before serving for the best texture.
Kid-Friendly Note: This dessert is absolutely beloved by children and adults alike. It’s perfect for birthday parties, and you can even let kids help with the assembly process.
Warm Knife Tip: Always use a warm knife when slicing ice cream cakes. Dip your knife in hot water, wipe it dry, make your cut, then repeat for clean, neat slices that look professionally done.