

Homemade peppermint patties are the ultimate holiday treat that taste even better than the store-bought versions! These delightful little chocolates feature a smooth, creamy peppermint filling enrobed in rich dark chocolate. The beauty of making them at home is that you control exactly how minty and sweet they are, plus they make absolutely stunning gifts.
I absolutely love making these during the holiday season because they’re surprisingly simple to create, yet they look and taste incredibly impressive. The peppermint filling comes together in just minutes with basic pantry ingredients, and the whole process is so satisfying. Whether you’re a candy-making novice or a seasoned pro, this recipe will have you creating professional-looking peppermint patties that rival any luxury chocolate shop.
What makes this recipe truly special is the foolproof technique for dipping the patties in chocolate. We’ll walk through a simple method that ensures a smooth, glossy chocolate coating every single time. These are perfect for holiday parties, cookie exchanges, or simply keeping a stash in your fridge for those moments when you need a sophisticated chocolate treat. Learn more about working with chocolate by checking out our guide to achieving perfect textures in your cooking.
The beauty of homemade peppermint patties is their versatility. You can make them as thin and delicate as Girl Scout thin mints, or thicker and more substantial. Some people prefer their peppermint patties intensely minty, while others like them subtly flavored. This recipe gives you the freedom to adjust everything to your personal preferences. Plus, when you see the joy on people’s faces when they bite into one of your homemade creations, you’ll understand why candy making is such a cherished kitchen tradition.
These peppermint patties also make wonderful additions to dessert platters. Pair them with other homemade treats for an impressive spread, or package them beautifully for holiday gift-giving. The combination of cool peppermint and rich chocolate is truly unbeatable, and once you master this recipe, you might find yourself making multiple batches throughout the season. I promise your friends and family will be asking for the recipe!
Before you begin, gather all your ingredients and make sure your workspace is clean and organized. Having everything ready will make the process smooth and enjoyable. The key to success is working quickly but carefully, especially when dipping the patties in chocolate. Don’t worry if your first batch isn’t perfect—even slightly imperfect homemade peppermint patties taste absolutely delicious. For more candy inspiration, check out other indulgent recipes in our collection.
Ingredients
- 2 cups powdered sugar
- 3 tablespoons unsalted butter, softened
- 1 tablespoon heavy cream
- 1/2 teaspoon peppermint extract (or 1 teaspoon for stronger flavor)
- 1/4 teaspoon salt
- 8 ounces dark chocolate, chopped (or chocolate chips)
- 1 tablespoon coconut oil or shortening
- Optional: crushed candy canes for garnish
Instructions
- In a medium mixing bowl, combine the powdered sugar, softened butter, heavy cream, peppermint extract, and salt. Mix with an electric mixer or by hand until the mixture comes together into a smooth, thick paste. If the mixture seems too dry, add another teaspoon of heavy cream. If it’s too wet, add a bit more powdered sugar.
- Transfer the peppermint mixture to a piping bag fitted with a small round tip, or simply scoop it onto parchment paper using a small cookie scoop or rounded tablespoon.
- Using the piping bag or a small spoon, create small mounds of the peppermint filling on a parchment-lined baking sheet, spacing them about 1 inch apart. You should have approximately 24 patties.
- Place the baking sheet in the freezer for at least 30 minutes, or until the peppermint filling is completely firm and solid. This is crucial for the dipping process.
- While the patties chill, prepare your chocolate coating. Chop the dark chocolate into small, uniform pieces and place in a microwave-safe bowl.
- Add the coconut oil or shortening to the chocolate. This ingredient will thin the chocolate slightly, making it easier to dip without creating a thick coating.
- Microwave the chocolate mixture in 30-second intervals, stirring between each interval, until completely melted and smooth. Be careful not to overheat, as chocolate can burn easily.
- Remove the chocolate from the microwave and let it cool for about 2 minutes. It should be warm but not hot—the ideal temperature is around 88-90 degrees Fahrenheit for best dipping consistency.
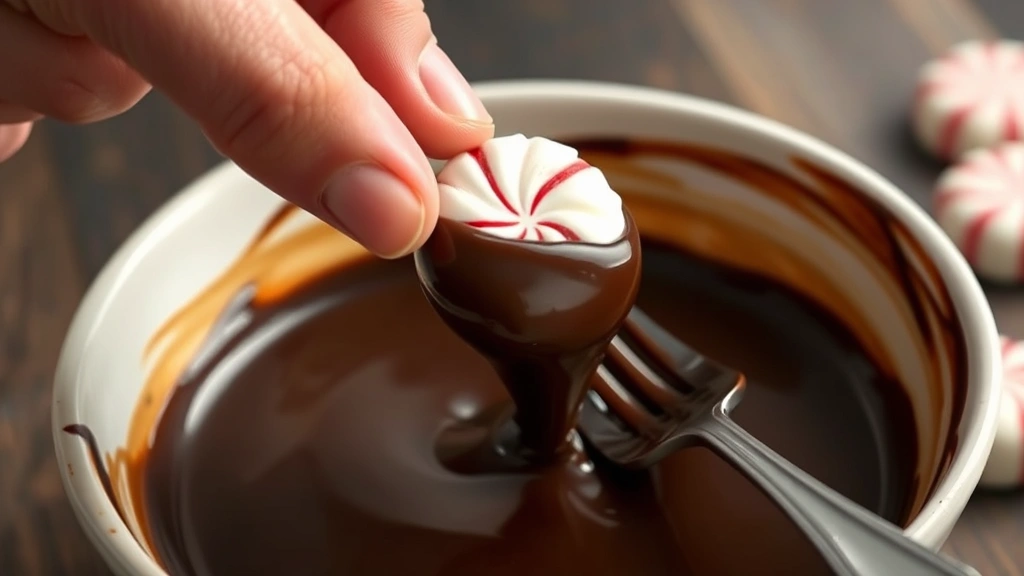
- Remove the chilled peppermint patties from the freezer. Working quickly, use a fork to pick up one patty and gently submerge it into the melted chocolate, coating all sides evenly.
- Tap the fork gently against the side of the bowl to remove excess chocolate, then place the coated patty back onto the parchment-lined baking sheet.
- Repeat the dipping process with the remaining patties, working quickly so the chocolate stays at the proper consistency. If the chocolate begins to thicken as you work, reheat it briefly.
- If desired, while the chocolate coating is still wet, sprinkle crushed candy canes or peppermint bits on top of each patty for decoration and extra peppermint flavor.
- Once all patties are dipped and decorated, place the baking sheet in the refrigerator for at least 1 hour, or until the chocolate is completely set.
- Store the finished peppermint patties in an airtight container in the refrigerator for up to two weeks, or in the freezer for up to one month. Enjoy them chilled straight from the fridge for the best texture and flavor.

Pro Tips
The peppermint extract you choose will greatly impact the final flavor. Pure peppermint extract is more potent than imitation, so start with less and taste the filling before adding more.
For a creamier filling, you can add an extra tablespoon of heavy cream, but be aware this may require additional chilling time. The filling should always be firm enough to hold its shape when dipped.
Chocolate quality directly affects the final result. Use good quality chocolate with real cocoa butter rather than chocolate-flavored coating for superior taste and texture.
If you don’t have a piping bag, you can use two spoons or a small ice cream scoop to form the patties. They don’t need to be perfectly shaped—rustic homemade charm is part of their appeal.
The coconut oil is essential for achieving the proper dipping consistency. Without it, the chocolate coating will be too thick and heavy. Don’t skip this ingredient.
If the chocolate becomes too thick while dipping, briefly reheat it in 10-second microwave intervals. Alternatively, add a small amount of additional coconut oil and stir well.
For a white chocolate version, substitute white chocolate for dark chocolate and reduce the peppermint extract slightly, as white chocolate tends to taste sweeter.
These make excellent gifts when packaged in small boxes lined with parchment paper or arranged in a decorative tin. They also work wonderfully as additions to holiday dessert boards.
If you prefer thinner patties, gently flatten the filling mounds before freezing using the bottom of a glass or measuring cup.
For extra fancy patties, drizzle white chocolate over the dark chocolate coating in thin lines after the initial coat sets.
These can be made several days in advance, making them perfect for holiday entertaining and gift-giving. Simply store in the refrigerator in an airtight container.