

Making the perfect pot pie crust from scratch is easier than you think, and it’s absolutely worth the effort! There’s something so special about that golden, flaky, buttery crust that makes any pot pie feel like a restaurant-quality meal. Whether you’re filling it with creamy chicken, vegetables, or seafood, a homemade crust elevates everything.
I’ve been making pot pies for years, and I’ve learned that the secret to a perfect crust comes down to a few key things: keeping your ingredients cold, not overworking the dough, and using the right ratio of butter to flour. This recipe is foolproof and will have your family asking for seconds!
The beauty of making your own pot pie crust is that you can customize it however you like. Some people prefer a thinner, more delicate crust, while others love a thicker, more substantial one. I’m sharing my go-to method that gives you a gorgeous, flaky exterior with a tender crumb that just melts in your mouth.
What I love most about this recipe is that you can make the dough ahead of time and refrigerate it, or even freeze it for later. It’s perfect for busy weeknights when you want to serve something homemade but don’t have hours to spend in the kitchen. Pair this crust with a delicious filling like my Best Heavy Cream Alfredo Sauce Recipe for a creamy pot pie, or go traditional with chicken and vegetables.
One of my favorite things about pot pie is how versatile it is. You could make it with Easy Chicken Alfredo Recipe filling, or keep it classic with a savory chicken and vegetable mixture. The crust works beautifully with any filling you choose.
If you’re looking for other comforting, creamy dishes to pair with this crust, check out my Delicious Heavy Cream Pasta Recipe for a complete comfort food dinner. For more inspiration, you might also enjoy my Quick Tasty Bacon Carbonara Recipe, which uses similar techniques for a flaky, delicious result.
Let me walk you through this step-by-step. The process is really simple, but the results are impressive. I promise you’ll be making this crust again and again!
Ingredients
- 2 1/2 cups all-purpose flour
- 1 teaspoon salt
- 1 tablespoon sugar
- 1 cup (2 sticks) cold unsalted butter, cubed
- 6-8 tablespoons ice water
- 1 egg yolk mixed with 1 tablespoon water for egg wash
- Salt and pepper to taste
Instructions
- In a large bowl, whisk together the flour, salt, and sugar until well combined.
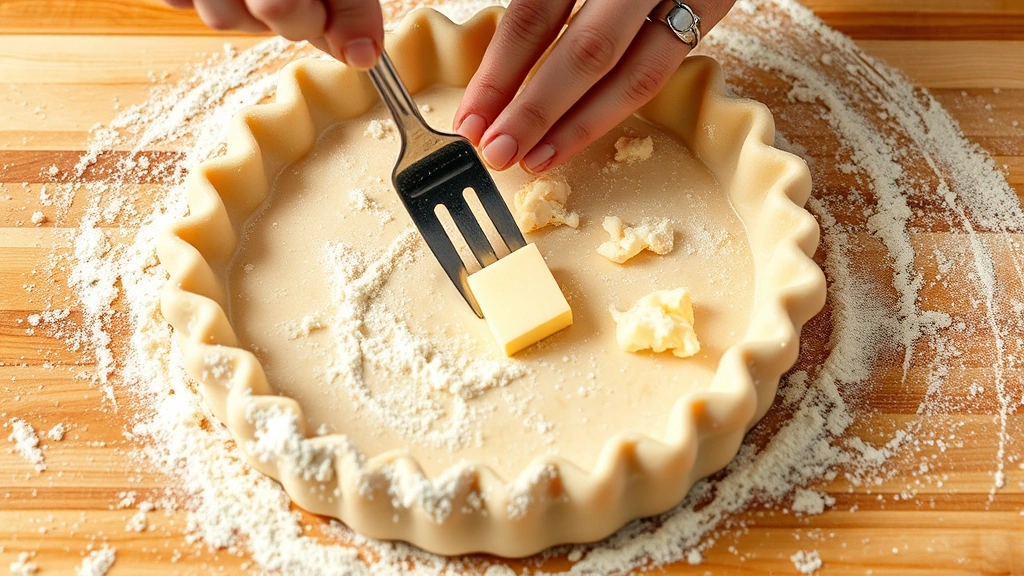
- Add the cold cubed butter to the flour mixture and using a pastry cutter or your fingertips, work the butter into the flour until the mixture resembles coarse breadcrumbs with some pea-sized pieces of butter still visible.
- Add the ice water one tablespoon at a time, gently tossing the mixture with a fork until the dough just comes together when pressed. Do not overwork the dough.
- Shape the dough into a disk, wrap it tightly in plastic wrap, and refrigerate for at least 30 minutes, or up to overnight.
- When ready to use, remove the dough from the refrigerator and let it sit at room temperature for 5 minutes to soften slightly.
- On a lightly floured surface, roll out the dough to about 1/8-inch thickness, making sure it’s large enough to cover your pot pie dish with a slight overhang.
- Carefully transfer the dough to your pot pie dish, pressing it gently into the corners and allowing it to drape over the edges.
- Trim any excess dough with a sharp knife, leaving about 1/2 inch of overhang for crimping.
- Using your fingers or a fork, crimp the edges of the crust all the way around for a decorative finish.
- If desired, cut small decorative shapes from dough scraps and arrange them on top of the crust.
- Brush the entire crust with the egg wash, making sure to coat all visible surfaces for a beautiful golden finish.
- Refrigerate the assembled pot pie for at least 15 minutes while you prepare your filling.
- Preheat your oven to 400°F (200°C).
- Fill the pot pie with your desired filling, then place it on a baking sheet to catch any drips.
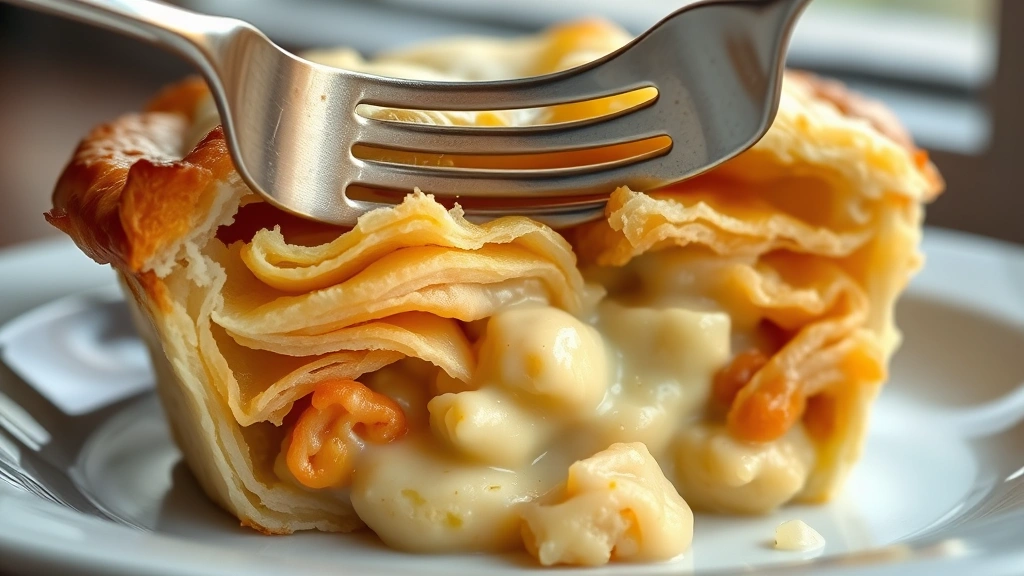
- Bake for 35-40 minutes, until the crust is golden brown and the filling is bubbling at the edges.
- If the crust begins to brown too quickly, loosely tent it with aluminum foil for the remaining baking time.
- Remove from the oven and let cool for 5-10 minutes before serving to allow the filling to set slightly.
Pro Tips
- The key to a flaky crust is keeping all ingredients as cold as possible. This helps the butter create steam pockets during baking, resulting in those beautiful flaky layers.
- If your kitchen is warm, chill your mixing bowl and even your flour for 15 minutes before starting.
- Ice water is essential. Keep a bowl of ice water nearby and measure out your water just before mixing.
- Do not overwork the dough when mixing. Overworking develops gluten, which makes the crust tough instead of tender and flaky.
- The dough can be made up to 2 days in advance and stored in the refrigerator, or frozen for up to 3 months.
- If making individual pot pies, divide the dough into portions before chilling and roll out accordingly.
- For a more decorative top crust, brush with egg wash and sprinkle with coarse sea salt or freshly cracked black pepper before baking.
- If your crust starts to brown too quickly, tent it loosely with foil. This prevents burning while the filling finishes cooking.
- You can use this same crust recipe for double-crust pies by doubling the ingredients and chilling two disks of dough.
- Leftover dough scraps can be baked separately with cinnamon and sugar for a sweet treat.
- Let the finished pot pie cool for a few minutes before cutting into it. This allows the filling to set and makes serving much easier.
- For an extra-special touch, brush the crust with heavy cream instead of egg wash for an even richer golden color.
- If you’re short on time, you can use store-bought pie dough, but homemade is always superior in flavor and texture.
- The dough should feel slightly sticky but not wet. If it’s too sticky, add a bit more flour. If it’s too dry, add a touch more ice water.