
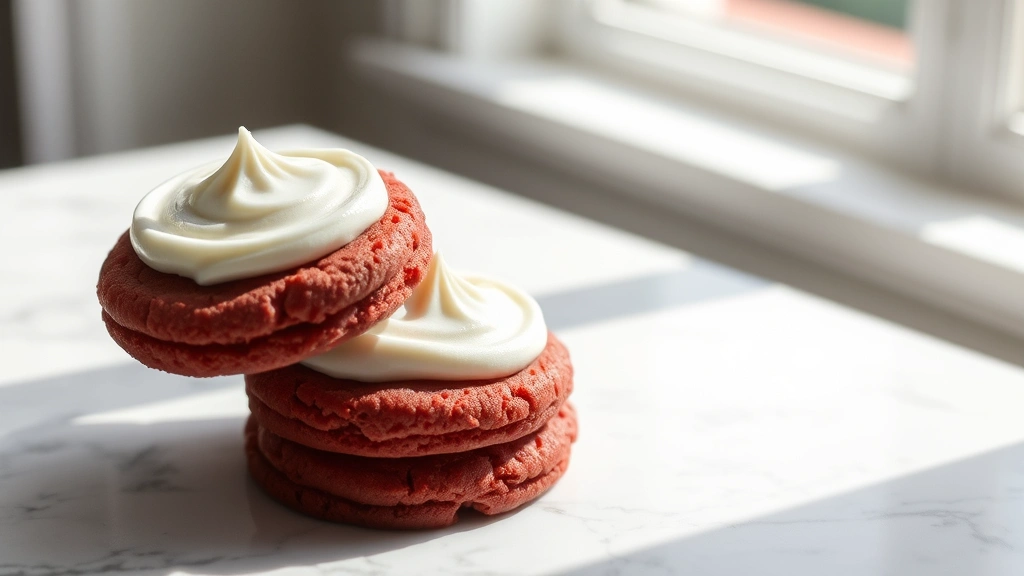
Red velvet cookies are an absolute showstopper that brings all the elegance and charm of the classic red velvet cake into the most adorable, bite-sized package! These beauties feature that signature deep crimson color, a tender crumb with just the right amount of cocoa depth, and they’re absolutely divine when topped with a silky cream cheese frosting. There’s something so special about red velvet that makes these cookies perfect for holidays, special occasions, or whenever you want to impress someone with homemade goodness.
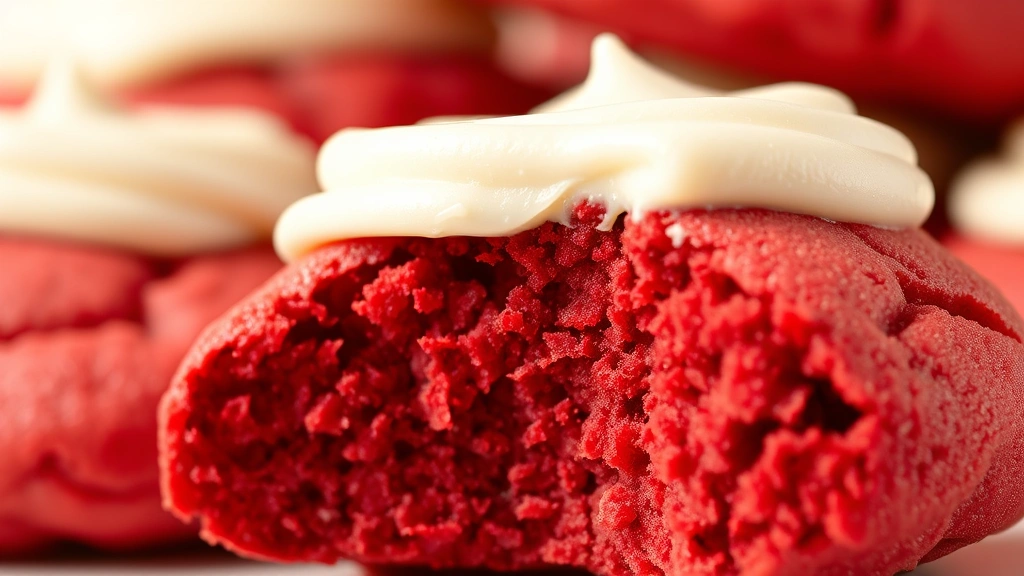
What makes these red velvet cookies truly the best is the balance of flavors and textures. The cookies themselves have a subtle cocoa flavor that’s complemented by buttermilk and vinegar, creating that classic red velvet tang. They’re soft and cake-like rather than crispy, which is exactly how a red velvet cookie should be. And let me tell you, the cream cheese frosting is absolutely essential—it’s tangy, slightly sweet, and provides the perfect contrast to the rich cookies.
I love making these for Valentine’s Day, Christmas, or even just because. They’re impressive enough to give as gifts, but simple enough that even home bakers can achieve bakery-quality results. The key is not overbaking them and ensuring your cream cheese frosting is perfectly whipped. This recipe has been perfected over countless batches, and I’m thrilled to share it with you!
If you love red velvet treats, you might also enjoy exploring other classic cream-based recipes or trying creamy comfort dishes that have that same indulgent quality. And for a fun twist on presentation, consider making pickled red onions for a striking color contrast in your holiday spread. You can also pair these with easy chicken alfredo for a complete meal, or round out your dessert table with fresh chickpea salad as a lighter option.
Ingredients
- 2 1/4 cups all-purpose flour
- 1/2 cup unsweetened cocoa powder
- 1 teaspoon baking soda
- 1/2 teaspoon salt
- 1/2 cup unsalted butter, softened
- 1 cup granulated sugar
- 1 large egg
- 1/2 cup buttermilk
- 1 tablespoon white vinegar
- 1 teaspoon vanilla extract
- 2 tablespoons red gel food coloring
- 8 ounces cream cheese, softened
- 4 tablespoons unsalted butter, softened
- 2 cups powdered sugar
- 1 teaspoon vanilla extract
Instructions
- Preheat your oven to 350°F (175°C). Line baking sheets with parchment paper for easy cleanup and even baking.
- In a medium bowl, whisk together the all-purpose flour, unsweetened cocoa powder, baking soda, and salt. Set this dry mixture aside.
- In a large mixing bowl, cream together the softened butter and granulated sugar using an electric mixer on medium speed for about 2-3 minutes, until light and fluffy.
- Add the egg to the butter mixture and beat well, then add the vanilla extract and red gel food coloring, mixing until the color is evenly distributed throughout.
- In a small bowl, combine the buttermilk and white vinegar—this creates a homemade buttermilk substitute that activates the baking soda for perfect rise.
- Alternately add the flour mixture and buttermilk mixture to the butter mixture, beginning and ending with the flour. Mix on low speed until just combined, being careful not to overmix.
- Drop rounded tablespoons of dough onto your prepared baking sheets, spacing them about 2 inches apart to allow for slight spreading.
- Bake for 10-12 minutes, until the edges are set but the centers still look slightly underbaked. This is crucial for achieving that soft, cake-like texture.
- Remove from the oven and allow the cookies to cool on the baking sheet for 5 minutes, then transfer to a wire rack to cool completely.
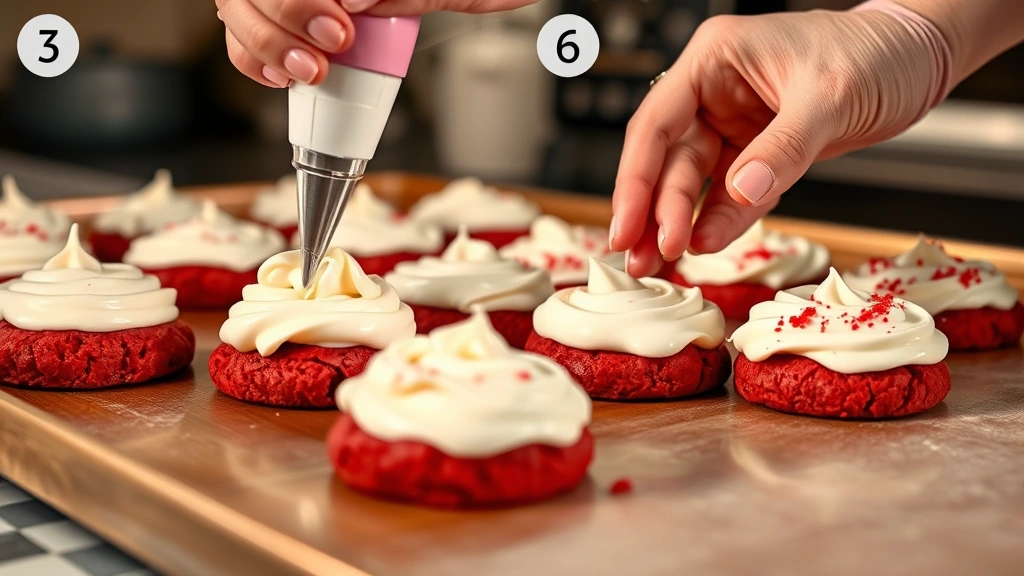
- While the cookies cool, prepare the cream cheese frosting by beating the softened cream cheese and butter together in a medium bowl until smooth and creamy.
- Gradually add the powdered sugar to the cream cheese mixture, one cup at a time, beating on low speed until fully incorporated.
- Add the vanilla extract and beat on high speed for about 1 minute until the frosting is light, fluffy, and spreadable.
- Once the cookies are completely cool, pipe or spread a generous dollop of cream cheese frosting onto the flat side of each cookie.
- Optionally, sandwich two cookies together with frosting in the middle, or simply top each cookie with a swirl of frosting for a more casual presentation.
Pro Tips
o The red gel food coloring is far superior to liquid red food coloring because it won’t affect the dough’s consistency or the baking results. If you only have liquid coloring, use less than the amount recommended.
o Don’t skip the buttermilk and vinegar combination. This creates the signature tangy flavor that makes red velvet so distinctive. You can make your own by adding 1 tablespoon of vinegar to regular milk and letting it sit for 5 minutes.
o It’s crucial not to overbake these cookies. They should look slightly underbaked when you remove them from the oven—they’ll continue to bake on the hot pan. Overbaking will make them dry and cake-like in a bad way.
o For the creamiest frosting, make sure both the cream cheese and butter are fully softened. Cold cream cheese will create lumpy frosting that’s difficult to spread.
o These cookies can be made ahead and stored in an airtight container in the refrigerator for up to 4 days. You can frost them before storing or frost them fresh when ready to serve.
o If you want to make this recipe vegan, substitute the egg with a flax egg (1 tablespoon ground flaxseed mixed with 3 tablespoons water) and use vegan butter and vegan cream cheese.
o For a piping-ready frosting, chill it in the refrigerator for 15-20 minutes before transferring to a piping bag fitted with your favorite tip.
o These cookies freeze beautifully. Bake the unfrosted cookies and freeze them in an airtight container for up to 3 months. Thaw at room temperature and frost when ready to serve.
o For extra visual appeal, consider adding a small amount of white frosting piped on top or dusting with crushed freeze-dried strawberries for a pop of color and texture.
Pingback: How to make Delicious Roasted Tomatoes Recipe (So Easy!) – Simple Recipe Finder