

Russian buttercream is an absolute showstopper that deserves a permanent place in your baking repertoire! This luxurious frosting combines the richness of butter with the delicate sweetness of condensed milk, creating a silky, cloud-like texture that’s absolutely divine. Unlike traditional American buttercream, Russian buttercream has a more sophisticated flavor profile and a gorgeously smooth finish that makes any cake look professionally decorated.
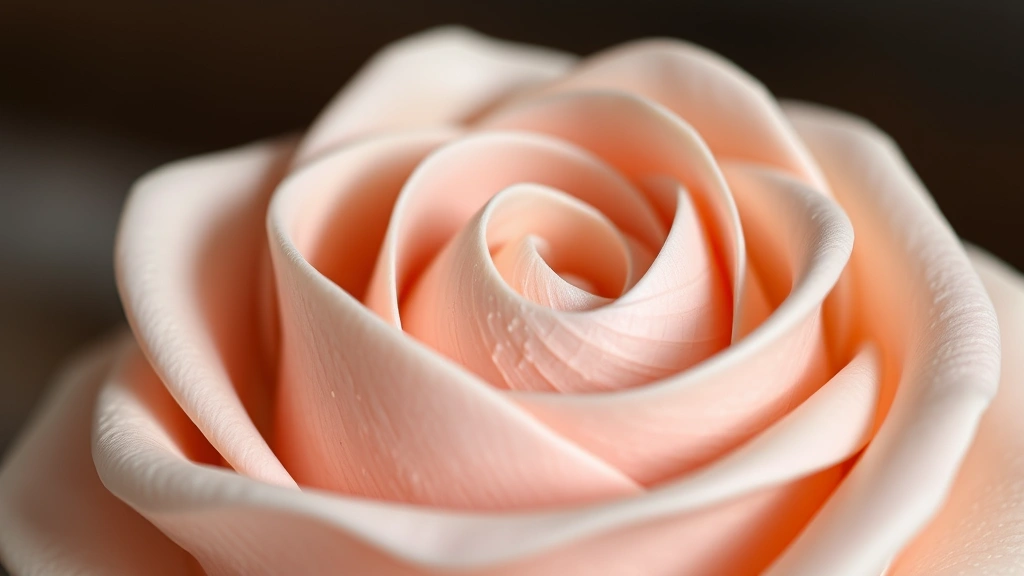
What makes this frosting so special is its incredible versatility. You can whip it to create decorative piped roses and intricate designs, or keep it slightly looser for a rustic crumb coat. The condensed milk adds a subtle caramel note that pairs beautifully with vanilla cakes, chocolate layers, or even fruit-filled creations. Whether you’re preparing a birthday cake for someone special or simply treating yourself to an elegant dessert, this rich and creamy frosting will elevate your baking game significantly.
I’ve been making Russian buttercream for years, and I’m thrilled to share my foolproof method with you today. The key to success is understanding the proper temperature and consistency, which I’ll walk you through step-by-step. This frosting works beautifully on both layer cakes and cupcakes, and it holds up wonderfully even in warm weather. Many bakers find it superior to traditional buttercream because it’s less likely to separate or become greasy. If you love this frosting, you’ll also adore our creamy dessert recipes that celebrate luxurious textures and flavors.
The beauty of Russian buttercream lies in its simplicity and the quality of ingredients. You’ll need just three main components: unsalted butter, sweetened condensed milk, and a touch of vanilla extract. Some variations include a splash of heavy cream or milk to achieve the perfect consistency, which I highly recommend for the creamiest results. The technique involves whipping softened butter until it’s pale and fluffy, then gradually incorporating the condensed milk while maintaining proper speed and temperature throughout the process.
Master this recipe and you’ll have the confidence to create stunning cakes that look like they came straight from a professional bakery. For more inspiration on creating beautiful layered desserts, check out our guide on building perfect cake structures. The Russian buttercream technique has become increasingly popular among home bakers and professional pastry chefs alike, and once you taste it, you’ll understand why. This frosting has converted many skeptics who thought they could never work with anything other than traditional American buttercream.
Ingredients
- 1 pound (450g) unsalted butter, softened to room temperature
- 1 can (14 ounces) sweetened condensed milk, chilled
- 1 teaspoon vanilla extract
- 2-3 tablespoons heavy cream or whole milk, if needed for consistency
- Pinch of salt
Instructions
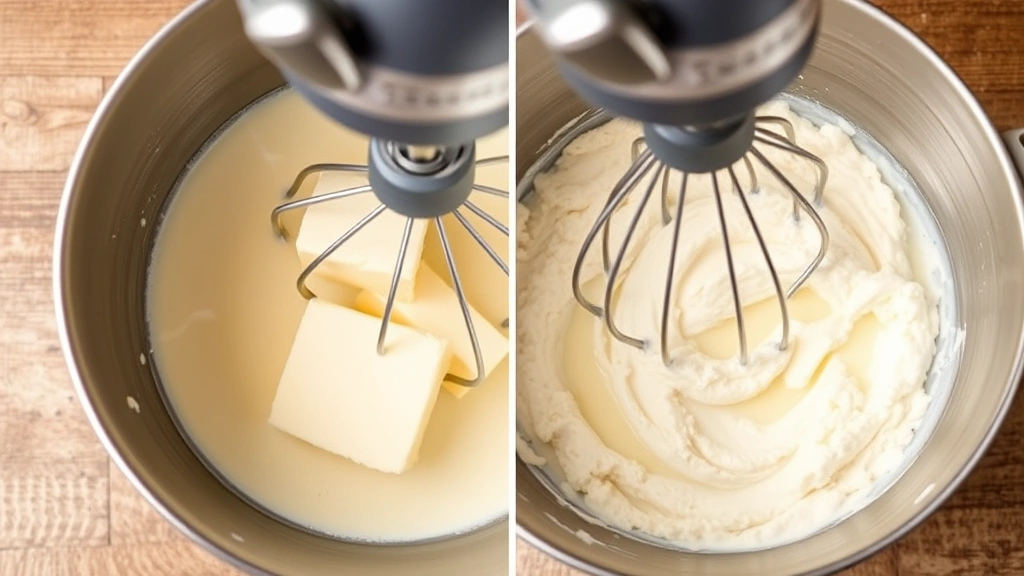
- Cut your softened butter into 1-tablespoon pieces and place them in a large mixing bowl. Using an electric mixer on medium-low speed, begin whipping the butter for about 2-3 minutes until it becomes pale yellow, creamy, and significantly increased in volume. This step is crucial as it incorporates air into the butter, creating the light and fluffy texture that makes Russian buttercream so special.
- While continuing to mix on medium speed, slowly add the chilled sweetened condensed milk one tablespoon at a time. This gradual incorporation is absolutely essential—if you add it too quickly, the frosting may become grainy or separate. The mixture should come together beautifully within about 3-4 minutes of careful mixing.
- Once all the condensed milk has been incorporated, add your vanilla extract and pinch of salt. Continue mixing on medium speed for another 1-2 minutes until the frosting becomes incredibly smooth, glossy, and light. The mixture should appear almost fluffy and mousse-like at this point.
- If your frosting seems too soft or thin, add the heavy cream or milk one tablespoon at a time while mixing until you reach your desired consistency. For piping decorative elements like roses, you want a slightly stiffer consistency. For spreading and crumb coating, a creamier consistency works better.
- Stop the mixer and scrape down the sides of the bowl with a spatula, making sure to incorporate any unmixed ingredients. Give the frosting one final 30-second mix on medium speed to ensure everything is perfectly combined and smooth throughout.
- Your Russian buttercream is now ready to use! If you’re not using it immediately, transfer it to an airtight container and refrigerate for up to one week. Before using chilled frosting, allow it to come back to room temperature and give it a quick whip with your mixer for about 1 minute to restore its fluffy texture.
- To apply the frosting to your cake, use a straight spatula for a smooth finish or a decorating bag fitted with your favorite piping tip for creating beautiful designs. Russian buttercream holds its shape wonderfully, making it perfect for creating dimensional piped decorations like roses, stars, or elegant swirls. Work quickly but confidently—this frosting is very forgiving.
Pro Tips
Consistency adjustments depend on your intended use. For piping decorative roses and intricate designs, aim for a slightly stiffer consistency by using less heavy cream. For spreading and crumb coating, a creamier texture with additional milk makes application easier and smoother. You can always adjust consistency by adding more milk or chilling the frosting for a few minutes.
This frosting performs beautifully in warm weather compared to traditional American buttercream. The condensed milk content helps stabilize the frosting and prevents it from becoming greasy or separating, even in humid conditions. Store decorated cakes in a cool room or lightly refrigerate if you live in a very warm climate.
Flavor variations are endless with this base recipe. Add cocoa powder for chocolate Russian buttercream, incorporate fruit purees for berry flavors, or infuse it with coffee for a sophisticated mocha version. You can also add a splash of almond extract or incorporate lemon zest for different flavor profiles.
The frosting can be made up to one week in advance and stored in an airtight container in the refrigerator. Before using, allow it to come to room temperature, which typically takes about one hour depending on your kitchen temperature. Once thawed, give it a quick whip with your mixer for about one minute to restore its light, fluffy texture and ensure proper consistency.
If your frosting becomes too soft while decorating, simply refrigerate it for 15-20 minutes to firm it up. Conversely, if it becomes too stiff, let it sit at room temperature for a few minutes or add a tablespoon of milk and mix briefly to restore workability.