
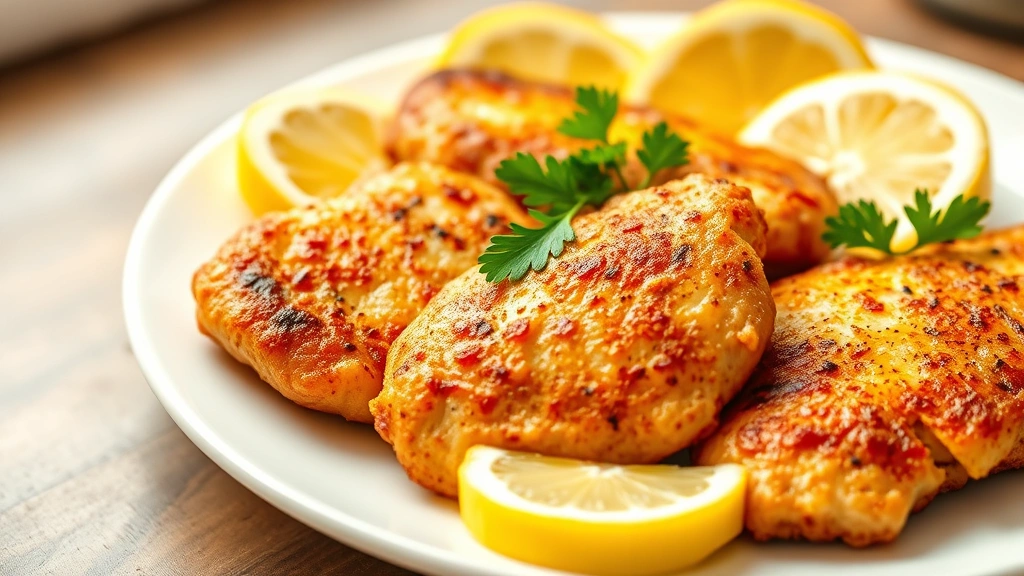
There’s something absolutely divine about a perfectly baked chicken cutlet—crispy on the outside, tender and juicy on the inside, and ready in under thirty minutes. This quick baked chicken cutlet recipe is a weeknight dinner dream that tastes like you spent hours in the kitchen when really, you’ve barely lifted a finger. I absolutely love how this method gives you all the satisfaction of fried chicken with a fraction of the guilt, and honestly, I think it tastes even better.
The secret to achieving that gorgeous golden crust without deep frying is all about the breading technique and a little trick with cooking spray or butter. When you pound those chicken breasts thin, you’re not only creating more surface area for that irresistible crunch, but you’re also ensuring they cook through evenly in the oven. I always use a combination of panko breadcrumbs and grated Parmesan cheese for maximum flavor and texture—it’s the kind of simple addition that makes people ask for your recipe.
What I love most about this baked chicken cutlet recipe is its versatility. Serve it over delicious heavy cream pasta, alongside a fresh chickpea salad, or even tucked into a sandwich with pickled red onions. You can dress it up with a creamy Alfredo sauce or keep it simple with lemon and fresh herbs. The possibilities are truly endless with this one.
If you’re looking for a protein that works beautifully in any meal, this is it. The beauty of baked chicken cutlets is that they’re equally at home on a fancy dinner table or as part of a casual family meal. According to Serious Eats’ guide to cooking chicken breast, proper breading and even cooking temperature are key to success, and that’s exactly what this recipe delivers. Plus, if you’re meal prepping for the week, these cutlets reheat beautifully and stay crispy thanks to the baking method.
I’ve tested this recipe countless times with different variations, and I keep coming back to these exact proportions and techniques. The combination of egg wash and seasoned panko creates an unbeatable crust, while baking at the right temperature ensures the chicken stays moist inside. Whether you’re cooking for yourself or feeding a crowd, this quick baked chicken cutlet recipe is one you’ll be making again and again. Trust me, once you master this technique, you’ll never look back!
Ingredients
- 4 boneless, skinless chicken breasts (about 6-8 ounces each)
- 1 cup panko breadcrumbs
- 1/2 cup grated Parmesan cheese
- 2 large eggs
- 1/4 cup whole milk or buttermilk
- 1 cup all-purpose flour
- 2 teaspoons garlic powder
- 2 teaspoons Italian seasoning
- 1 teaspoon paprika
- 1 teaspoon salt
- 1/2 teaspoon black pepper
- Cooking spray or 3 tablespoons melted butter
- Zest of 1 lemon (optional but recommended)
- 2 tablespoons fresh parsley, chopped (for garnish)
Instructions
- Preheat your oven to 400°F (200°C). Line a large baking sheet with parchment paper or aluminum foil for easy cleanup—trust me, this step makes everything easier.
- Place one chicken breast between two pieces of plastic wrap. Using a meat mallet or the bottom of a heavy skillet, gently pound the chicken to an even thickness of about 1/4 inch. Repeat with remaining chicken breasts. This ensures even cooking and creates those tender, delicate cutlets we’re after.
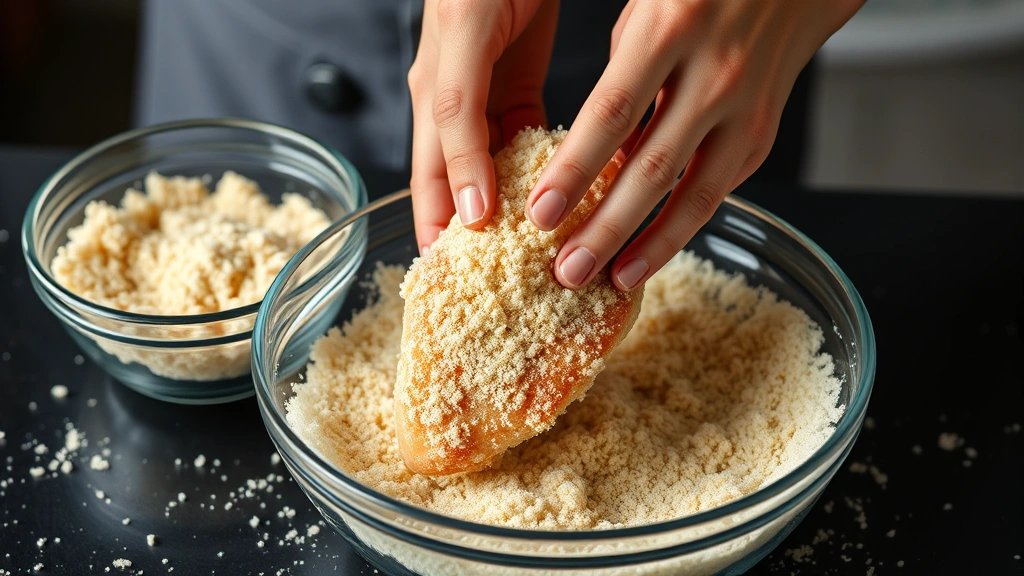
- Set up your breading station with three shallow bowls or plates. In the first bowl, combine the flour, 1/2 teaspoon salt, and 1/4 teaspoon black pepper. In the second bowl, whisk together the eggs and milk until well combined. In the third bowl, mix the panko breadcrumbs, Parmesan cheese, garlic powder, Italian seasoning, paprika, remaining salt, and black pepper. Add the lemon zest here if you’re using it for extra brightness.
- Working with one chicken cutlet at a time, dredge it thoroughly in the flour mixture, shaking off any excess. This flour layer helps the egg adhere properly and creates a better crust.
- Next, dip the floured cutlet into the egg mixture, making sure both sides are well coated. Let any excess egg drip back into the bowl—you want a coating, not a puddle.
- Finally, press the chicken into the panko mixture, making sure to coat both sides generously and get the breading into all the nooks and crannies. The more breadcrumb coverage, the crispier your cutlet will be.
- Arrange the breaded chicken cutlets on your prepared baking sheet in a single layer, making sure they don’t touch. This allows hot air to circulate around each piece for even crisping.
- Lightly spray or brush the top of each cutlet with cooking spray or melted butter. This is the magic step that gives you that gorgeous golden-brown crust without deep frying. Don’t skip it!
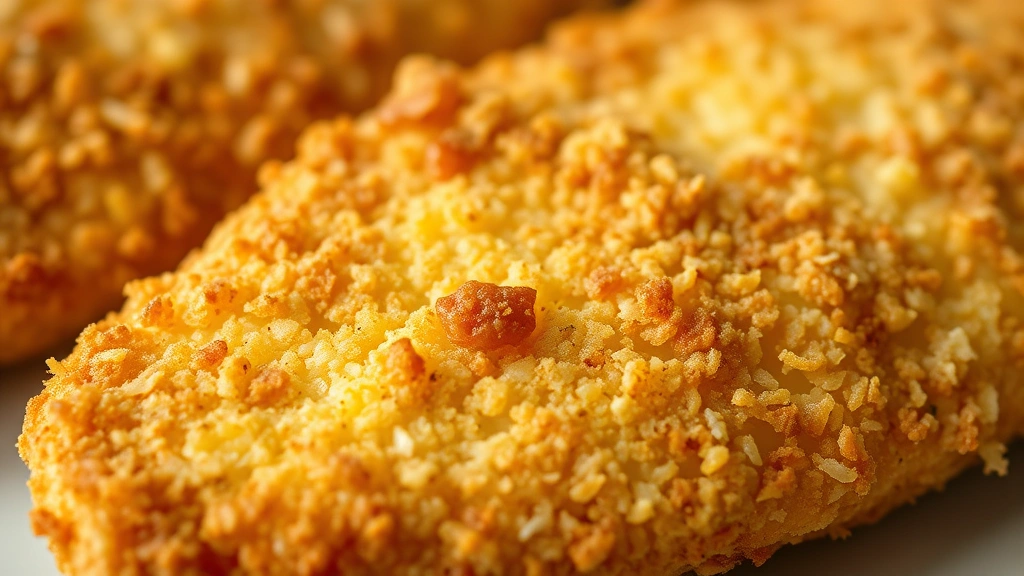
- Bake in the preheated oven for 18-22 minutes, depending on the thickness of your cutlets. The chicken should be cooked through (internal temperature of 165°F or 74°C) and the coating should be golden brown and crispy.
- Remove the baking sheet from the oven and let the cutlets rest for 2-3 minutes before serving. This brief resting period allows the juices to redistribute, keeping the chicken moist.
- Garnish with fresh parsley and a squeeze of fresh lemon juice if desired. Serve immediately while the coating is still crispy and the chicken is at its best.
Pro Tips
- The key to juicy chicken is not overcooking it. Use an instant-read meat thermometer to check for the safe internal temperature of 165°F (74°C). Chicken breasts can dry out quickly, so start checking around the 18-minute mark.
- Pounding the chicken to an even thickness is non-negotiable for this recipe. It ensures that the thinner parts don’t overcook while waiting for the thicker parts to cook through. A meat mallet works best, but you can also use the bottom of a heavy skillet.
- For extra crispy cutlets, you can double-bread them. After the first coating of panko, lightly mist with cooking spray, then dip back into the egg mixture and coat with panko a second time. This creates an extra-crunchy exterior.
- Make sure your panko is fresh and not stale. Stale breadcrumbs won’t crisp up as nicely and can result in a soggy coating. Store opened panko in an airtight container in your pantry.
- Buttermilk works slightly better than regular milk for the egg wash because of its acidity, which helps create an even more golden crust. If you don’t have buttermilk, add a tablespoon of lemon juice to regular milk and let it sit for five minutes.
- This recipe scales beautifully for feeding a crowd. You can prepare all the cutlets and refrigerate them on a baking sheet for up to 4 hours before baking. Add an extra 2-3 minutes to the baking time if cooking from cold.
- Leftovers can be stored in an airtight container in the refrigerator for up to 3 days. Reheat them in a 350°F oven for about 5 minutes to restore the crispiness. Don’t use the microwave, as it will make them soggy.
- Feel free to customize the seasonings in the panko mixture. Try adding cayenne pepper for heat, dried oregano for an Italian twist, or Old Bay seasoning for a coastal vibe.
- These cutlets pair beautifully with simple sides like roasted vegetables, a fresh green salad, or mashed potatoes. They’re also fantastic sliced and served over a creamy pasta or tucked into sandwiches.