
There’s nothing quite like perfectly baked chicken tenderloins—crispy on the outside, juicy and tender on the inside, and ready in under 30 minutes. This is the recipe that will become your weeknight go-to, your meal prep secret weapon, and the dish your family requests again and again. I’m sharing all my tricks for achieving restaurant-quality results right in your own kitchen, plus three delicious variations that will keep things exciting.
What makes these chicken tenderloins absolutely foolproof is a combination of proper seasoning, the right oven temperature, and a simple technique that ensures even cooking every single time. Whether you’re serving them alongside a creamy Best Heavy Cream Alfredo Sauce, tossing them into a Best Chickpea Salad, or serving them with simple roasted vegetables, these tenderloins are the perfect protein.
I grew up watching my mother make chicken tenderloins for our family dinners, and she taught me that the secret isn’t in complicated seasonings or fancy techniques—it’s in respecting the ingredient and giving it exactly what it needs to shine. Over the years, I’ve refined her method, testing different temperatures, seasonings, and cooking times to create what I genuinely believe is the best baked chicken tenderloin recipe out there.
The beauty of this recipe is its versatility. You can bread them for extra crunch, marinate them for added flavor, or keep them simple and let quality ingredients speak for themselves. I’ll walk you through my preferred method, but I’ll also share how to adapt this recipe based on what you’re in the mood for and what you have on hand.
One of my favorite aspects of cooking with chicken tenderloins is how quickly they cook compared to full chicken breasts. They’re also naturally more tender, which means less risk of drying them out—a common concern with chicken. The key is understanding that chicken tenderloins are thinner and more delicate, so they need a slightly different approach than their larger cousins.
I always recommend investing in a good meat thermometer for this recipe. It removes all the guesswork and ensures your chicken is perfectly cooked every single time. I use mine constantly, and it’s genuinely one of my most valuable kitchen tools. You’re aiming for an internal temperature of 165°F, and once you hit that mark, you know you’re golden.
For serving suggestions, I love pairing these with creamy pasta dishes, fresh salads with Perfect Pickled Red Onions, roasted potatoes, or even in grain bowls. They’re also fantastic for meal prep—bake a big batch on Sunday and you’ll have protein ready for the week.
The seasoning I use is simple but impactful: kosher salt, freshly ground black pepper, garlic powder, and just a hint of paprika for warmth and color. These seasonings complement the natural flavor of the chicken without overpowering it. If you want more excitement, you can absolutely add herbs like thyme, rosemary, or Italian seasoning.
I promise that once you master this recipe, you’ll be making it constantly. It’s become such a staple in my kitchen that I have the technique memorized, and I can have dinner on the table in the time it takes to preheat the oven and prep the chicken. Let me show you exactly how I do it.
Ingredients
- 2 pounds chicken tenderloins, patted dry with paper towels
- 3 tablespoons olive oil
- 2 teaspoons kosher salt
- 1 teaspoon freshly ground black pepper
- 1 teaspoon garlic powder
- ½ teaspoon paprika
- ¼ teaspoon cayenne pepper (optional, for a slight kick)
- Fresh lemon juice from 1 lemon
- 2 tablespoons fresh parsley, chopped (optional, for garnish)
Instructions
- Preheat your oven to 400°F and position the rack in the upper-middle portion of the oven. This temperature is crucial—it’s hot enough to get a nice golden exterior while keeping the inside tender and juicy.
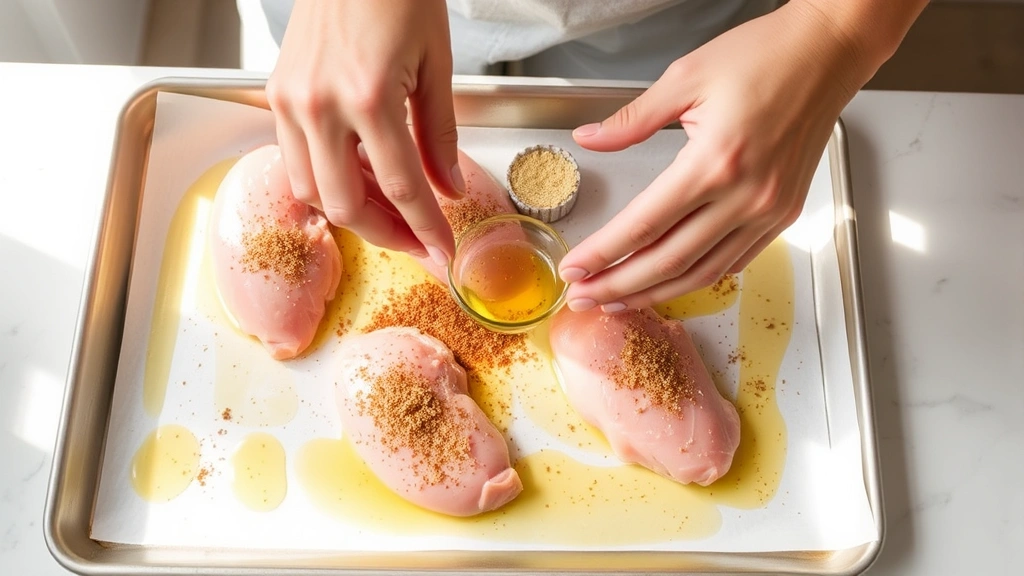
- While the oven preheats, pat your chicken tenderloins completely dry with paper towels. This is an important step that many people skip, but it’s what gives you that beautiful golden exterior. Any moisture on the surface will steam rather than brown.
- In a small bowl, combine the kosher salt, black pepper, garlic powder, paprika, and cayenne pepper (if using). Mix these together with a fork until well combined. Taste a tiny pinch of the seasoning mixture—it should taste flavorful but not overly salty.
- Place the dried chicken tenderloins on a large rimmed baking sheet, arranging them in a single layer with space between each piece. They shouldn’t be touching, as this allows heat to circulate properly.
- Drizzle the olive oil evenly over the chicken tenderloins, then use your hands to coat each piece on both sides. Make sure every surface is lightly coated with oil—this is essential for browning and keeping the chicken moist.
- Sprinkle the seasoning mixture evenly over all the chicken pieces, using your hands to gently rub it into the oil so it adheres well. Make sure both sides are seasoned, and don’t be shy with the seasoning.
- Place the baking sheet in your preheated 400°F oven on the upper-middle rack. Set a timer for 12 minutes, but don’t walk away—you want to keep an eye on them.
- After 12 minutes, check the chicken by inserting a meat thermometer into the thickest part of the largest tenderloin. You’re looking for an internal temperature of 165°F. If they’re not quite there, return them to the oven for 2-3 more minutes.
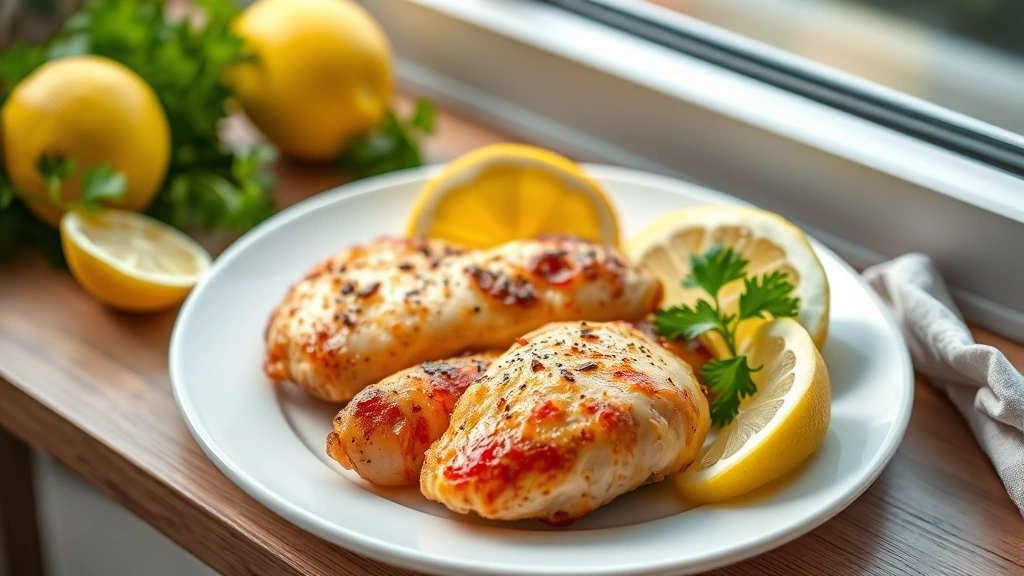
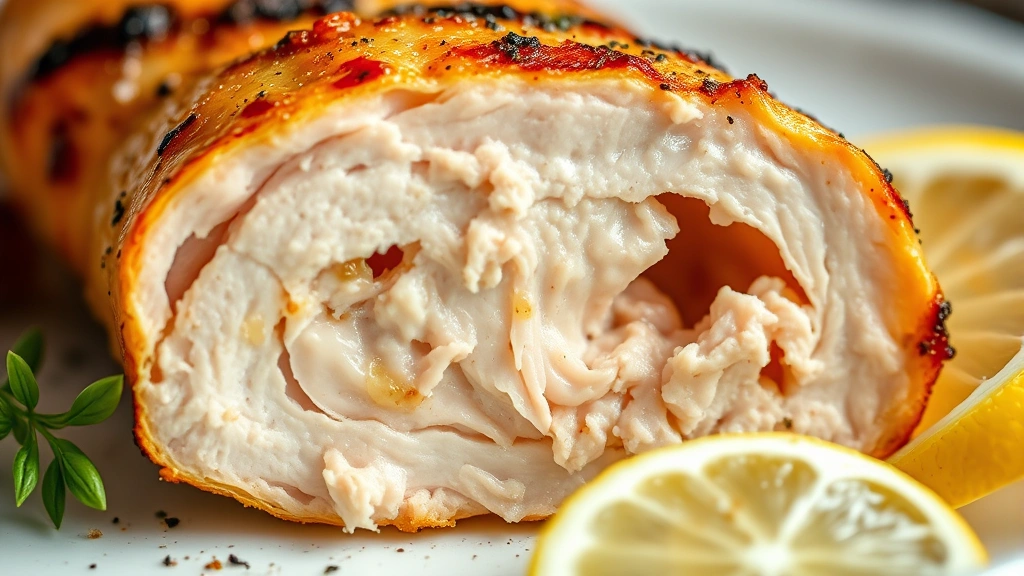
- Remove the baking sheet from the oven once the chicken reaches 165°F internally. The exterior should be golden brown and the chicken should feel firm when pressed gently.
- Squeeze fresh lemon juice over the hot chicken tenderloins immediately after removing them from the oven. The heat will help the lemon flavor penetrate the chicken beautifully.
- Sprinkle with fresh chopped parsley if desired, and let the chicken rest for 5 minutes before serving. This resting period allows the juices to redistribute throughout the meat.
- Serve immediately while hot, or cool completely and refrigerate for meal prep. These are delicious warm, at room temperature, or even cold straight from the fridge the next day.
Pro Tips
o Don’t skip the resting time after removing from the oven, even though it’s tempting to dig in immediately. Those five minutes make a real difference in how juicy the chicken stays
o If your chicken tenderloins are particularly thick (over ¾ inch), you can gently pound them to an even thickness before seasoning. This ensures they cook at the same rate
o For a breaded version, coat the seasoned chicken in beaten egg, then dredge in panko breadcrumbs mixed with grated Parmesan cheese before baking. Increase cook time by 2-3 minutes
o These chicken tenderloins are perfect for meal prep. Bake a double batch on Sunday and store in an airtight container in the refrigerator for up to four days. They’re fantastic in salads, grain bowls, or alongside pasta dishes throughout the week
o If you want to marinate the chicken first, combine ¼ cup olive oil, juice of 2 lemons, 4 minced garlic cloves, 1 tablespoon Dijon mustard, and 1 teaspoon Italian seasoning. Marinate the chicken for 30 minutes to 2 hours before baking. Pat dry before seasoning and baking
o A meat thermometer is genuinely worth the investment if you don’t already have one. It removes all guesswork from cooking chicken and ensures perfectly cooked results every single time
o For extra flavor, try adding fresh herbs to your seasoning mix—dried thyme, rosemary, or Italian seasoning all work beautifully. You can use 1-2 teaspoons of dried herbs or 1-2 tablespoons of fresh herbs mixed into your olive oil
o Leftovers are delicious sliced and added to salads, tucked into sandwiches, or chopped and mixed into pasta. They store well in the refrigerator for up to four days in an airtight container
o If your oven runs hot, watch carefully during the last few minutes of cooking. Every oven is different, so getting to know yours is important for consistent results
o Don’t skip the lemon juice at the end—it brightens the chicken beautifully and adds a fresh, vibrant flavor that elevates the entire dish