
There’s something absolutely special about a perfectly crafted bison burger that just can’t be replicated with traditional beef. Bison meat is leaner, more flavorful, and has a delicate richness that makes every bite feel luxurious without being heavy. If you’ve never tried bison, this recipe is the perfect introduction to this incredible protein that’s been gaining popularity among home cooks and professional chefs alike.
What makes bison burgers so exceptional is the meat itself. Bison has a lower fat content than beef, which means it requires a slightly different approach in the kitchen. The key to achieving the juiciest, most flavorful bison burger is understanding how to work with this premium meat while keeping it moist and tender. Many people make the mistake of treating bison like regular ground beef, but with just a few simple adjustments, you’ll create something that’s truly restaurant-quality.
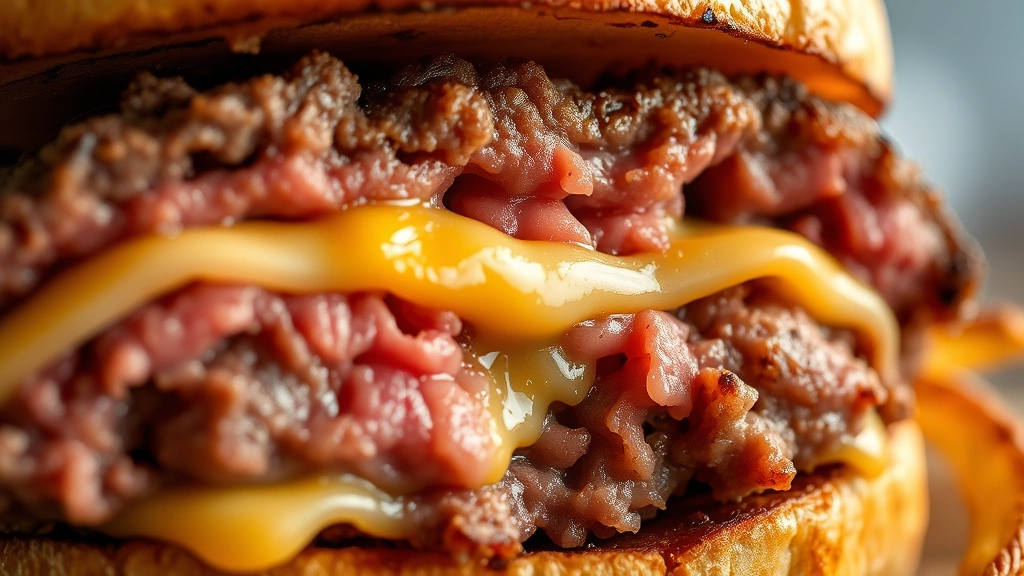
I’ve been perfecting this bison burger recipe for years, and I’m thrilled to share my secrets with you. We’re talking about burgers with an incredible crust, a perfectly pink center, and toppings that complement rather than overpower the meat’s natural flavor. The beauty of this recipe lies in its simplicity and respect for the ingredient. We’re not drowning the patty in heavy sauces or complicated seasonings. Instead, we’re letting the bison shine while building layers of complementary flavors that make each bite unforgettable.
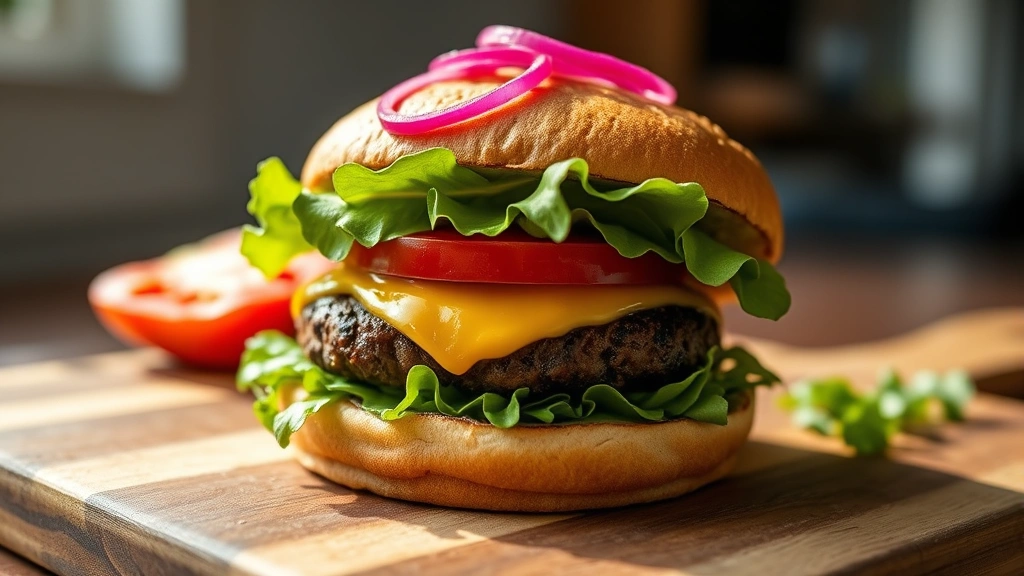
One of my favorite aspects of making these burgers is customizing the toppings. A perfectly pickled red onion adds brightness and tang, while a simple tomato slice lets the bison take center stage. Some days I keep it classic with just lettuce, tomato, and cheese, and other times I get creative with fresh salad components for a lighter twist. The beauty is that bison’s subtle flavor profile pairs beautifully with both traditional and unexpected toppings.
I also love serving these burgers at summer gatherings because they always spark conversation. People are often curious about bison, and this recipe gives them a delicious reason to try something new. Whether you’re a seasoned home cook or someone looking to elevate your burger game, this recipe delivers impressive results every single time. Let me walk you through the process step by step, and you’ll understand why these bison burgers have become my go-to for entertaining and weeknight dinners alike.
Ingredients
- 1.5 pounds ground bison meat, preferably 90/10 or 93/7 blend
- 1 teaspoon kosher salt
- ½ teaspoon freshly ground black pepper
- ¼ teaspoon garlic powder
- ¼ teaspoon onion powder
- 2 tablespoons whole milk or beef broth
- 2 tablespoons finely minced fresh parsley (optional but recommended)
- 4 slices of your favorite cheese (cheddar, Swiss, or American work beautifully)
- 4 high-quality burger buns, lightly toasted
- 4 leaves crisp lettuce
- 4 slices fresh tomato
- 4 tablespoons mayonnaise or burger sauce
- Pickled red onions for serving
- 2 tablespoons butter, divided, for cooking
Instructions
- Remove your ground bison from the refrigerator about 10 minutes before you plan to cook. This allows it to come closer to room temperature, which helps it cook more evenly and develop better flavor.
- Gently combine the bison meat with kosher salt, black pepper, garlic powder, onion powder, and fresh parsley in a large bowl, being careful not to overwork the meat. Overworking develops the gluten structure and results in dense, tough patties.
- Drizzle the milk or beef broth over the meat mixture. This is the secret to keeping bison burgers moist—the liquid helps compensate for bison’s lower fat content without affecting flavor.
- Using your hands, gently fold the ingredients together until just combined. The mixture should look slightly loose and tender, not packed tightly.
- Divide the mixture into 4 equal portions, approximately 5.5 ounces each. Gently form each portion into a loose ball without compacting.
- Create a slight depression in the center of each patty with your thumb—about the size of a marble and roughly ½-inch deep. This prevents the burger from puffing up during cooking.
- Season the outside of each patty generously with a tiny pinch of salt and pepper just before cooking. Do not season ahead of time, as this draws out moisture.
- Heat a cast iron skillet or heavy-bottomed skillet over medium-high heat for about 2 minutes until it’s very hot but not smoking.
- Add 1 tablespoon of butter to the skillet and let it foam slightly.
- Carefully place 2 bison patties in the skillet, working with 2 at a time to avoid crowding.
- Cook without moving the patties for exactly 4 minutes. This allows a beautiful crust to develop and creates the Maillard reaction that adds incredible flavor.
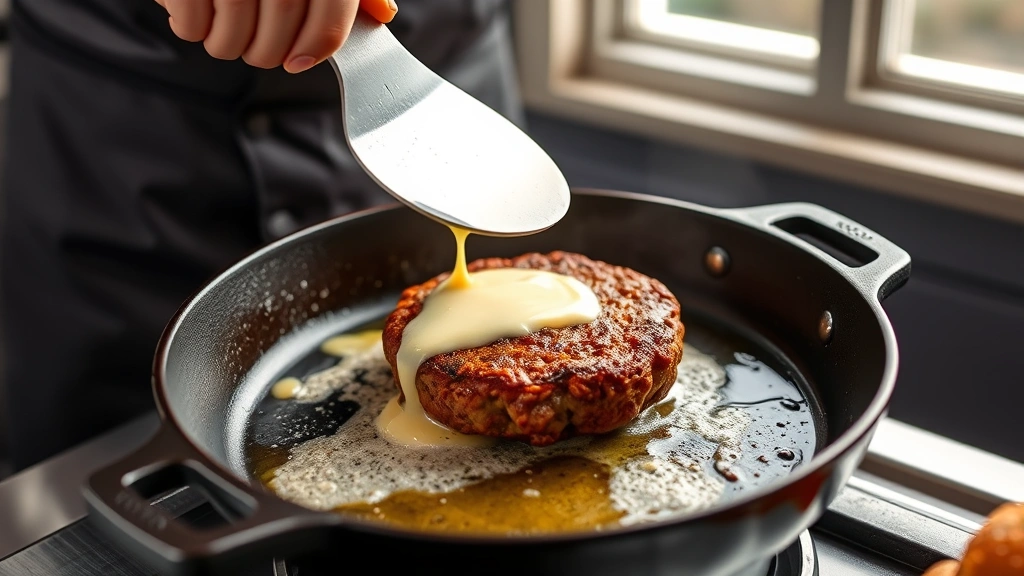
- Flip each patty carefully and immediately top each with a slice of cheese.
- Cook for an additional 3-4 minutes for medium-rare (internal temperature of 130-135°F), or 4-5 minutes for medium (135-145°F). Bison is best served medium-rare to medium as overcooking will dry it out.
- Transfer the cooked burgers to a warm plate and tent loosely with foil.
- Repeat the cooking process with the remaining butter and 2 patties.
- While the burgers rest for 2 minutes, lightly toast your burger buns cut-side down in the same skillet or on a separate griddle for 1-2 minutes until golden and warm.
- Spread mayonnaise or your favorite burger sauce on the bottom bun.
- Layer the lettuce, tomato slice, and a bison burger patty (cheese side up) on the bottom bun.
- Top with pickled red onions and any additional toppings you prefer.
- Place the top bun on the burger and serve immediately while warm.
Pro Tips
The Milk or Broth Addition: This is not a traditional burger technique, but it’s absolutely essential for bison. The liquid hydrates the meat and replaces some of the moisture that would typically come from fat. Don’t skip this step—it makes a remarkable difference in juiciness and texture.
Not Overworking the Meat: This cannot be overstated. Gentle handling is crucial with bison. When you overwork ground meat, you’re developing gluten strands that make the burger dense and tough. Think of it like making biscuits—you want the finished product to be tender and crumbly, not dense and chewy.
The Thumbprint Technique: Creating a small depression in the center of each patty serves two purposes. First, it gives the burger room to expand during cooking without creating a dome shape. Second, it helps ensure even cooking throughout the patty. This is a professional technique used by many upscale burger restaurants.
Temperature Matters: Invest in a meat thermometer for the best results. Bison burgers can go from perfectly cooked to overdone very quickly. The sweet spot is 130-135°F for medium-rare, where the meat is still juicy and tender with a beautiful pink center.
Topping Combinations: While I love the classic lettuce, tomato, and cheese, bison pairs beautifully with more adventurous toppings. Try caramelized onions, crispy bacon, avocado slices, or fresh herbs like cilantro. The mild, delicate flavor of bison won’t be overwhelmed by flavorful accompaniments.
Source of Bison: Purchase your ground bison from a reputable butcher or specialty meat supplier. Look for meat that’s bright red and smells fresh. Some grocery stores now carry bison in their specialty meat section. If buying online, ensure it arrives well-packed with appropriate cooling elements.
Make-Ahead Options: You can form the patties up to 24 hours ahead and store them covered in the refrigerator. You can also freeze formed patties for up to 3 months. Cook from frozen by adding 2-3 minutes to the cooking time, or thaw in the refrigerator overnight before cooking.
Bun Selection: Don’t underestimate the importance of quality buns. A sturdy bun that can hold up to the juices of the burger without falling apart is essential. Brioche buns are classic, but potato buns or even hearty whole wheat options work wonderfully with bison.