

This beet hummus recipe is hands-down the easiest way to make a show-stopping dip in just 10 minutes. I’m talking vibrant, gorgeous, naturally pink-hued hummus that tastes as good as it looks. Your guests will be amazed when you tell them it’s completely homemade, and honestly, they don’t need to know how ridiculously simple it is.
The first time I made beet hummus, I was skeptical. Beets in hummus? Really? But then I tasted it—earthy, slightly sweet, with that creamy chickpea base we all know and love. The flavor is subtle and sophisticated, nothing weird or off-putting. It’s like traditional hummus decided to dress up for a fancy dinner party.
Jump To Section
What makes this recipe so special is that it comes together faster than you’d think possible. No roasting vegetables for hours. No complicated techniques. Just a food processor, a few pantry staples, and boom—you’ve got restaurant-quality hummus that will make you look like a culinary genius.
Why This Recipe Works
The beauty of this beet hummus recipe lies in its simplicity and speed. Canned beets (yes, really!) are the secret weapon here. They’re pre-cooked, perfectly tender, and require zero prep time. No peeling, no roasting, no waiting around for an oven. You just open a can and you’re halfway there.
Chickpeas provide the creamy, protein-packed base that makes hummus, well, hummus. Tahini adds that nutty depth and helps create that silky texture we all crave. A squeeze of fresh lemon juice brightens everything up beautifully. Meanwhile, garlic gives it just enough punch without overwhelming the delicate beet flavor. The combination is perfectly balanced—not too earthy, not too sweet, just right.
This dip is naturally vegan, gluten-free, and packed with nutrients. Beets are loaded with antioxidants and vitamins, chickpeas bring protein and fiber, and tahini contributes healthy fats and minerals. You’re basically serving your guests a nutritional powerhouse that happens to taste incredible.
Ingredient Tips & Substitutions
Fresh beets work beautifully too, but they’ll add about 20 minutes to your total time since you’ll need to roast them. If you go that route, simply wrap them in foil and roast at 400°F until tender (usually 35-40 minutes), then peel and chop. The flavor will be slightly earthier and more complex, which is lovely if you have the time.
For the chickpeas, canned is convenient and works perfectly. However, if you prefer dried chickpeas, you’ll need to cook them first—another reason canned is the way to go for this quick version. Drain and rinse your canned chickpeas thoroughly to reduce sodium and improve texture. Additionally, if you can’t find tahini, you can substitute with almond butter or sunflower seed butter, though the flavor will be slightly different.
The lemon juice is non-negotiable—it’s what prevents the hummus from tasting too earthy and one-dimensional. Fresh lemon is always better than bottled, but in a pinch, bottled works. Garlic intensity varies wildly depending on the clove size and freshness, so start with one clove and add more if you want it garlickier. You can always add more, but you can’t take it out!
Olive oil should be good quality—this is one of the few ingredients you really taste directly. Sea salt and cumin round out the flavor profile beautifully. The cumin adds warmth and complexity without making the hummus taste like traditional Middle Eastern hummus, which is exactly the point. Water helps achieve the perfect creamy consistency without making it soupy.
Making It Perfect Every Time
The key to silky, smooth hummus is patience with the food processor. Don’t rush it. Start by blending your beets, chickpeas, tahini, and garlic for about two minutes until it starts breaking down. Then gradually add your lemon juice, olive oil, and water while the processor runs. This prevents lumps and ensures everything incorporates evenly.
If your hummus is too thick, add water one tablespoon at a time until you reach your desired consistency. Too thin? Add a bit more tahini or another handful of chickpeas. The texture should be somewhere between thick yogurt and soft serve ice cream—spreadable but not runny.
Taste as you go and adjust seasonings accordingly. Some people like their hummus garlicky and bold; others prefer it subtle and let the beet flavor shine. There’s no wrong answer here—make it exactly how you like it. That’s the beauty of homemade.
Serving Suggestions
This gorgeous dip is perfect for entertaining. Serve it with pita chips, crudités, or toasted pita triangles. The vibrant color makes it an instant conversation starter on any appetizer spread. It pairs beautifully with Mediterranean salad recipe for a cohesive, restaurant-worthy meal.
Hummus also works wonderfully as a sandwich spread. Try it on best vegan sandwich recipe for a nutritious lunch. For a fun appetizer twist, dollop it onto endive leaves or use it as a dipping sauce for PF Chang’s lettuce wraps recipe.
You can also swirl it into soups for color and creaminess, use it as a base for grain bowls, or serve it alongside roasted vegetables. The possibilities are genuinely endless. This recipe makes about two cups, so you’ll have plenty to experiment with different serving ideas.
Storage & Make-Ahead Tips
One of the best things about homemade hummus is how well it keeps. Store it in an airtight container in the refrigerator for up to five days. The flavors actually deepen slightly as it sits, so making it a day ahead is totally fine and sometimes even preferable.
For longer storage, freeze it in ice cube trays, then transfer the frozen cubes to a freezer bag. You can keep it frozen for up to three months. Simply thaw in the refrigerator overnight before serving. This is genius if you like having homemade hummus on hand for impromptu entertaining or quick snacks.
If your hummus seems to have separated slightly after sitting, just give it a good stir or pop it back in the food processor for a quick blend. This is totally normal and doesn’t mean anything went wrong. The oil sometimes rises to the top, but it all comes back together beautifully.
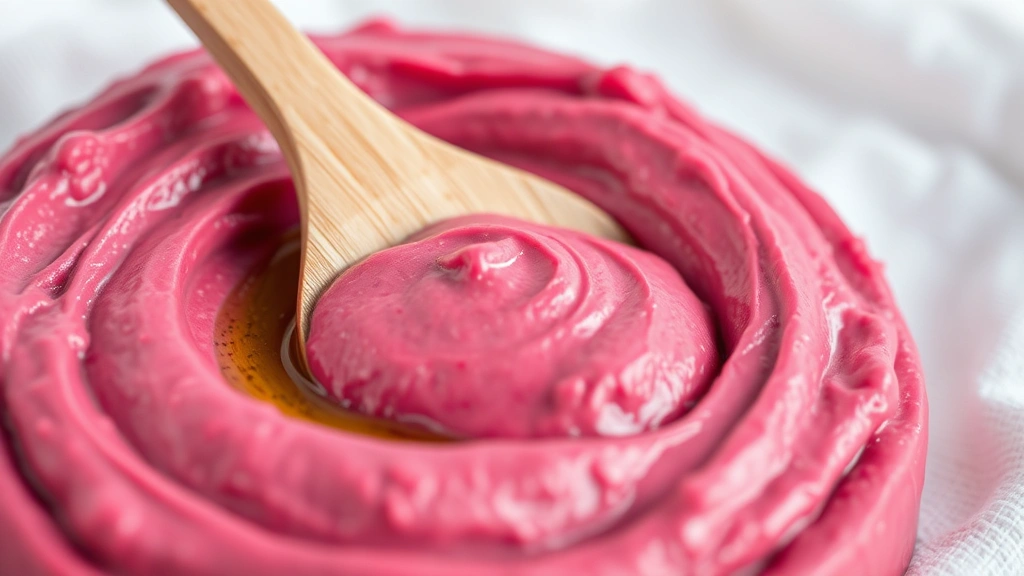
When you’re ready to serve, drizzle the top with a little extra virgin olive oil and maybe a sprinkle of paprika or toasted pine nuts if you’re feeling fancy. This elevates the presentation and adds a nice textural element. Your guests will think you spent hours on this, and you’ll know the delicious truth—it took ten minutes flat.
For a complete plant-based meal, pair this with best Waldorf salad recipe or serve alongside delicious pinto bean soup recipe. Both complement the earthy, elegant flavors of beet hummus perfectly. You could even make it a whole theme—best vegan soup recipe as a starter, then this hummus with crudités and bread as your main spread.
This beet hummus recipe has become my go-to for potlucks, dinner parties, and lazy weeknight snacking. It’s healthy, impressive, ridiculously easy, and absolutely delicious. Once you make it once, you’ll be making it constantly. Trust me on this one.
Ingredients
- 1 (15-ounce) can beets, drained and rinsed
- 1 (15-ounce) can chickpeas, drained and rinsed
- 3 tablespoons tahini
- 2 tablespoons fresh lemon juice
- 1 clove garlic, minced
- 2 tablespoons extra virgin olive oil
- 1 teaspoon ground cumin
- 1/2 teaspoon sea salt, plus more to taste
- 2-4 tablespoons water
- Freshly cracked black pepper to taste

Instructions
- Add the drained beets, chickpeas, tahini, and minced garlic to a food processor.
- Blend for about 2 minutes until the mixture starts to break down and become creamy.
- While the processor is running, slowly drizzle in the lemon juice and olive oil.
- Add the cumin and sea salt, then pulse to combine evenly.
- Gradually add water one tablespoon at a time while blending until you reach your desired consistency—it should be smooth and spreadable.
- Taste the hummus and adjust seasonings as needed, adding more salt, lemon juice, or garlic to your preference.
- Transfer to a serving bowl and drizzle with a little extra olive oil if desired.
- Serve immediately with pita chips, fresh vegetables, or warm pita bread.
Pro Tips
Storage is simple and convenient. Keep your finished beet hummus in an airtight container in the refrigerator for up to five days. The flavors actually develop and deepen slightly after the first day, so making it ahead is a smart move for entertaining.
For longer storage, freeze individual portions in ice cube trays, then transfer the cubes to a freezer bag. Your hummus will keep frozen for up to three months. Simply thaw overnight in the refrigerator before serving. This method is perfect if you like having homemade dip ready whenever guests drop by.
If your hummus seems too thick, add water just a little at a time—you can always add more, but you can’t take it back out. Similarly, if it’s too thin, blend in an extra tablespoon of tahini or a few more chickpeas. The consistency should be thick enough to hold a dip but smooth enough to spread easily on pita or crackers.
The garlic flavor will intensify over time as the hummus sits. If you’re making it ahead for a party, you might want to use slightly less garlic than you think you need. You can always add more when you serve it, but toning down garlic is harder once it’s blended in.
Fresh beets will give you a more complex, earthy flavor, but they require roasting first—about 35-40 minutes at 400°F. Canned beets are convenient, nutritious, and work beautifully in this recipe. Both options are equally valid; it just depends on whether you have time.
For a nuttier, deeper flavor, toast your cumin in a dry skillet for about one minute before adding it to the food processor. This small step makes a surprisingly big difference and is totally worth the extra thirty seconds. Additionally, if you don’t have cumin on hand, you could use a tiny pinch of smoked paprika instead—it won’t taste the same, but it will be delicious.
Presentation matters with this recipe because the color is so stunning. Serve it in a shallow bowl, create a little well in the center with the back of a spoon, and drizzle with good olive oil. A sprinkle of pomegranate seeds, toasted pine nuts, or fresh herbs adds elegance without much effort. Your guests will be absolutely charmed by how beautiful it looks.