

A brown sugar syrup recipe is one of those magical kitchen skills that transforms your cooking in the most delightful ways. This easy 5-minute method creates a silky, caramel-like syrup that’s perfect for drizzling over pancakes, stirring into coffee, or glazing your favorite dishes—and honestly, once you make it at home, you’ll wonder why you ever bought the bottled stuff.
I discovered the power of homemade brown sugar syrup years ago when I was trying to recreate that café-quality sweetness in my morning oatmeal. The store-bought versions always felt cloyingly sweet and oddly artificial. But this syrup? It’s pure, simple, and tastes like actual caramelized brown sugar with warm vanilla notes. The best part is that you probably have everything in your pantry already.
Jump To Section
Why This Recipe Works
The magic happens because brown sugar already contains molasses, which gives it depth and complexity that white sugar simply can’t match. When you dissolve it with water and heat, you’re not fighting against crystallization or complicated chemistry—you’re just letting those flavors bloom naturally. This approach is far simpler than traditional caramel-making, which requires careful temperature monitoring and a steady hand.
The beauty of this method is its forgiving nature. You can’t really mess it up. Even if your syrup is slightly thicker or thinner than expected, it’ll still taste absolutely delicious. Additionally, the syrup keeps beautifully in the refrigerator, so you can make a batch on Sunday and enjoy it all week long.
This syrup works beautifully in so many applications. Drizzle it over grilled proteins for a glossy finish, or use it as a base for glazes and sauces. You could even incorporate it into stir fry sauce recipes for added depth and sweetness that restaurant chefs swear by.
Ingredient Tips & Substitutions
Brown sugar is the star here, and I recommend using packed brown sugar for the best results. The molasses content is what gives this syrup its characteristic rich flavor. Light or dark brown sugar both work beautifully—light brown sugar creates a milder, more delicate syrup, while dark brown sugar delivers that deeper, almost toffee-like complexity.
The water is equally important, though it’s just a supporting player. I use filtered water because it ensures nothing interferes with that pure brown sugar taste. However, if all you have is tap water, don’t stress—it works perfectly fine. The butter adds silkiness and richness, but if you prefer a dairy-free version, you can skip it entirely and still have a fantastic syrup.
Vanilla extract brings warmth and prevents the syrup from tasting one-dimensional. Meanwhile, a tiny pinch of sea salt acts like a flavor amplifier, making all those brown sugar notes sing without adding any perceptible saltiness. If you’re avoiding salt, simply omit it. For a spiced variation, consider adding a whisper of cinnamon or nutmeg—just 1/8 teaspoon makes a surprising difference.
Step-by-Step Guidance
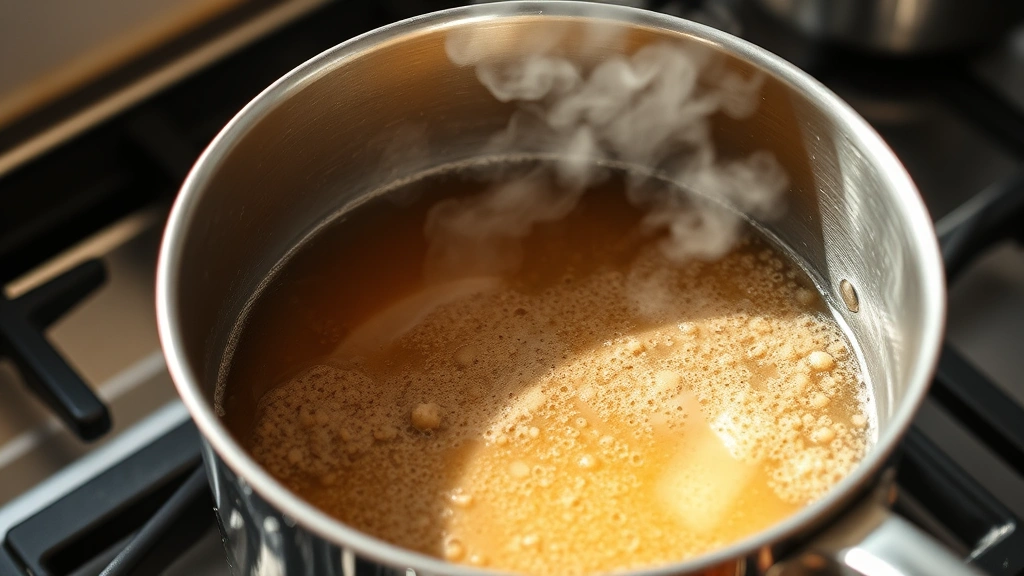
The process is genuinely straightforward, but I want to walk you through it so you understand what’s happening at each stage. You’re essentially dissolving sugar in liquid and letting it reach the perfect consistency—nothing intimidating about that. Start with medium heat because you want the mixture to warm gradually and allow the brown sugar to dissolve evenly.
As the syrup heats, you’ll notice it becoming more fluid and taking on a beautiful amber hue. This is when you know the molasses is releasing all its flavor potential. The mixture will bubble slightly around the edges—that’s perfectly normal and exactly what you want. Once it reaches a gentle simmer, you’re nearly done. The whole process takes about five minutes from start to finish, which means you could make this while your coffee brews.
Removing it from heat at exactly the right moment ensures you get that ideal syrup consistency. It’ll thicken slightly as it cools, so don’t worry if it seems a bit loose while it’s still hot. This is where the butter comes in—it creates a silkier mouthfeel and adds a subtle richness that makes you feel like you’re splurging, even though you’re not.
Serving Suggestions & Uses
I keep a jar of this syrup in my refrigerator at all times because the possibilities are genuinely endless. Pour it over pancakes, waffles, or French toast for that restaurant-quality breakfast experience. Drizzle it over vanilla ice cream, yogurt, or fresh fruit for an instant dessert upgrade. Stir a spoonful into your morning coffee or oatmeal, and suddenly breakfast feels special.
For savory applications, this syrup is a game-changer. Use it as a glaze for roasted vegetables or grilled meats—the caramelized sweetness plays beautifully against smoky and savory flavors. You can even incorporate it into oriental dressing recipes or use it to brush over lettuce wraps for an authentic Asian-inspired sweetness.
Bakers will appreciate how beautifully this syrup works in sweet glazes for cakes, donuts, or pastries. It’s also wonderful drizzled over pork tacos or used as a finishing touch on panini sandwiches that need a touch of sweetness. The versatility is genuinely impressive.
Storage & Reheating Tips
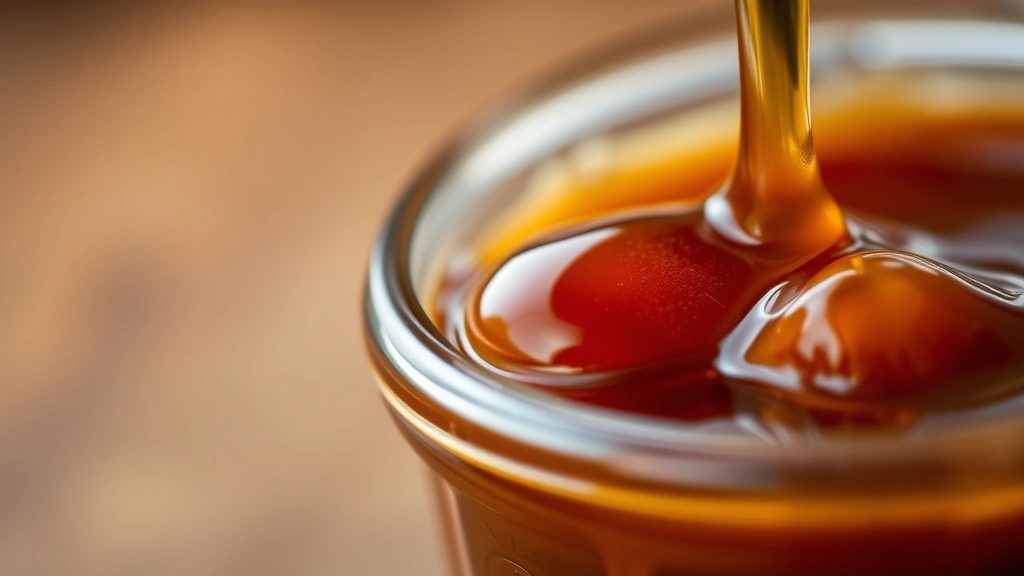
This syrup stores beautifully in the refrigerator for up to three weeks in an airtight container. The cool part is that it actually keeps getting better as the flavors meld together over a few days. If you want to store it longer, you can freeze it in ice cube trays and pop out individual portions whenever you need them—how convenient is that?
When your syrup thickens up in the refrigerator, simply warm it gently over low heat or microwave it in short 15-second bursts until it reaches your desired consistency. You can also thin it slightly with a little water if it becomes too thick. There’s truly no wrong way to adjust it to your preferences.
For those who love making things ahead, you can actually prepare this syrup weeks in advance and store it properly. The flavors develop beautifully over time, so it’s the opposite of most syrups that lose their charm. Just keep it sealed tightly and away from direct sunlight, and you’ll have homemade sweetness whenever inspiration strikes.
Making your own brown sugar syrup recipe is genuinely one of those small kitchen victories that yields big results. According to Serious Eats food science experts, understanding how sugar dissolves in liquid opens up endless flavor possibilities. Once you master this basic technique, you’ll understand the foundations that professional pastry chefs and New York Times cooking columnists use regularly. Your breakfasts, desserts, and even savory dishes will taste noticeably more refined.
The investment of five minutes is absolutely worth the weeks of homemade syrup goodness you’ll enjoy. Your taste buds will thank you, and honestly, once you experience the difference between homemade and commercial syrups, there’s no going back. Start making this today, and you’ll wonder how you ever lived without it.
Ingredients
- 1 cup packed brown sugar
- ½ cup water
- 2 tablespoons unsalted butter
- 1 teaspoon vanilla extract
- ¼ teaspoon sea salt
Instructions
- Combine brown sugar and water in a small saucepan over medium heat, stirring occasionally until the brown sugar dissolves completely, about 2-3 minutes.
- Once the mixture reaches a gentle simmer, let it bubble softly for another 1-2 minutes without stirring—this allows the molasses flavors to fully develop.
- Remove the saucepan from heat and stir in the butter until it melts and incorporates smoothly into the syrup.
- Add vanilla extract and sea salt, stirring well to combine all ingredients evenly throughout the mixture.
- Let the syrup cool for 2-3 minutes at room temperature—it will thicken slightly as it cools, reaching the perfect pourable consistency.
- Transfer to an airtight container and refrigerate until ready to use. The syrup will continue to thicken as it cools completely.
Pro Tips
Storage is wonderfully simple with this brown sugar syrup recipe. Keep it in an airtight jar in your refrigerator for up to three weeks, and it actually tastes better after a day or two as the flavors develop. If it thickens too much, just warm it gently over low heat or microwave it in 15-second bursts until you reach your desired consistency.
For a dairy-free version, simply omit the butter or substitute it with coconut oil or vegan butter. The syrup will still be delicious, though you’ll lose some of that silky richness. If you prefer a spiced variation, add ⅛ teaspoon of cinnamon, nutmeg, or a combination of both during the final stirring step.
Dark brown sugar creates a deeper, more molasses-forward flavor, while light brown sugar produces a more delicate, subtle sweetness. Both work beautifully, so choose based on your taste preference. Additionally, you can adjust the water amount slightly depending on your desired consistency—use less water for a thicker syrup, more water for something more pourable.
This syrup freezes exceptionally well when poured into ice cube trays. Once frozen, pop the cubes into a freezer bag and grab them whenever you need a quick burst of brown sugar sweetness. They thaw in minutes and work perfectly for sweetening beverages or adding to sauces.
For restaurant-quality applications, consider making a larger batch and keeping it on hand throughout the week. Many professional chefs prepare their syrups ahead of time because it saves precious moments during service. You’ll feel like a culinary professional every time you drizzle this gorgeous syrup over your creations.