

A che thai recipe is your ticket to recreating one of Vietnam’s most beloved street desserts right in your own kitchen. This refreshing, naturally sweet treat combines tender tapioca pearls, silky coconut milk, and an array of colorful fruits in a lightly sweetened syrup that’ll transport you straight to the bustling markets of Ho Chi Minh City.
I first discovered che thai on a sweltering summer afternoon while exploring a local Vietnamese market. The vendor was ladling this gorgeous, jewel-toned dessert into cups, and one sip completely changed how I thought about cold desserts. It’s not overly sweet, not heavy, and somehow manages to be both sophisticated and utterly comforting at the same time.
Jump To Section
What makes this dessert so special is its simplicity. You’re working with just a handful of quality ingredients—fresh fruit, tapioca, coconut milk, and a delicate sugar syrup—yet the result feels like something from a fancy restaurant. The beauty lies in how each component maintains its own character while coming together in perfect harmony.
Why This Recipe Works
The genius of che thai is that it’s endlessly adaptable. While traditional versions feature banana, jackfruit, and taro, you can easily swap in whatever fruits you love or have on hand. The tapioca pearls provide that satisfying chewiness that makes the dessert feel substantial without being heavy.
The coconut milk base is absolutely crucial. It adds richness and a subtle sweetness that ties everything together. However, if you’re sensitive to coconut, you can thin it with more water or substitute with regular milk for a lighter version. Meanwhile, the sugar syrup acts as a gentle sweetener that enhances rather than masks the natural fruit flavors.
Additionally, the beauty of this recipe is that you can prepare most components ahead of time. Cook your tapioca, chill your syrup, and prep your fruits the morning of, then simply assemble when ready to serve. It’s perfect for entertaining because guests get that fresh, homemade experience without last-minute stress.
Ingredient Tips & Substitutions
For the tapioca pearls, pearl tapioca (not the quick-cooking kind) gives you that authentic chewy texture. Look for them in the Asian section of most grocery stores. If you can’t find them, check Serious Eats for tapioca guides—they have excellent resources on different varieties.
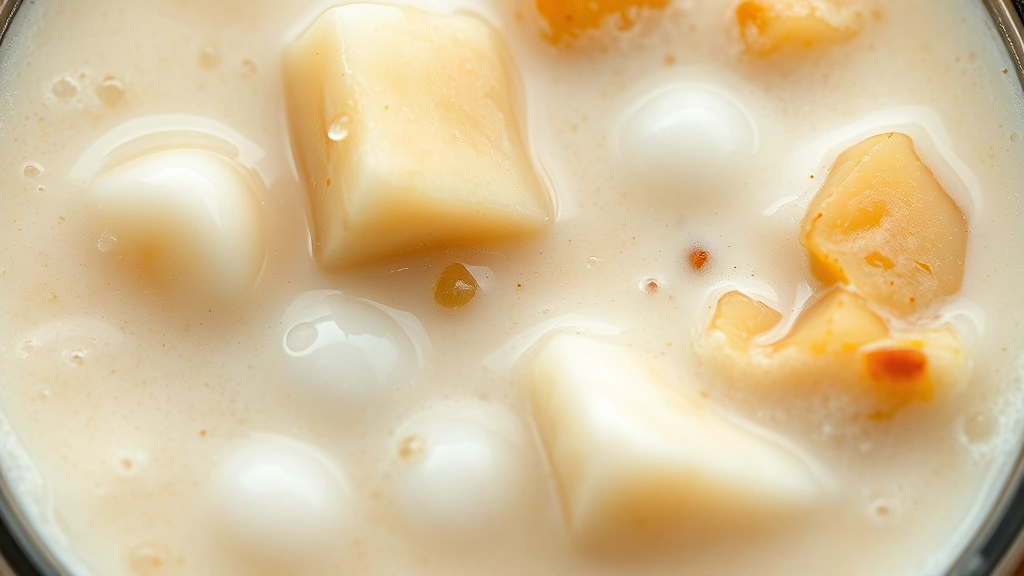
The fruit selection is where you can get creative. Traditional che thai uses banana (cut into chunks), canned jackfruit, and canned or fresh taro root. For instance, you might also add fresh mango, papaya, or pineapple for brightness. Canned fruits work beautifully here since they’re already cooked and won’t break apart when stirred into the cold syrup.
When it comes to coconut milk, use full-fat for the richest flavor. Some recipes call for evaporated milk mixed with regular milk—this creates a lighter version that’s perfect if you’re serving this to guests who prefer less richness. You can also experiment with coconut cream for an ultra-luxurious version.
Sugar quality matters more than you’d think. Use a light palm sugar or regular granulated sugar. Palm sugar adds a subtle floral note that’s distinctly Vietnamese, but it’s completely optional if you prefer the clean sweetness of white sugar.
The Cooking Process
Start by cooking your tapioca pearls according to package directions, usually about 30 minutes of simmering until they become translucent with just a tiny white center. Drain them well and toss with a tiny bit of oil to prevent sticking. This step is essential because undercooked tapioca is grainy and disappointing, while overcooked becomes mushy.
While the tapioca cooks, prepare your sugar syrup. Combine equal parts sugar and water in a saucepan, bring to a boil, then remove from heat immediately. You want a light, delicate syrup—not a heavy one. Let it cool completely before adding your fruit. The cooling step is non-negotiable because you’re about to add cold fruit to it.
Prepare your fruits while everything cools. Drain canned fruits thoroughly and cut fresh fruits into bite-sized pieces. The key here is uniformity—aim for pieces roughly the same size so you get a pleasant surprise with every spoonful. Then combine fruits with the cooled syrup and refrigerate for at least 30 minutes.
Serving Suggestions
When you’re ready to serve, chill your glasses and prepare your coconut milk mixture. Some recipes call for a 1:1 ratio of coconut milk to water, while others use pure coconut milk. I prefer a 1:3 ratio (coconut to water) for a balanced flavor that doesn’t overwhelm.
Layer the components in tall glasses: start with some cooled tapioca, add a generous portion of the fruit and syrup mixture, then pour in the coconut milk. The visual appeal of these layers is half the fun. Top with a few crushed ice cubes and maybe a mint leaf for a fresh garnish.
This dessert pairs beautifully after a big Vietnamese meal featuring best pork stir fry or perfect shoyu ramen. The lightness of che thai provides the perfect refreshing contrast to savory dishes. Similarly, it works wonderfully alongside easy Chinese salad recipes for a complete meal experience.
Storage & Make-Ahead Tips
Che thai is best enjoyed within a few hours of assembly, though the components keep well separately in the refrigerator for up to 3 days. Store the cooked tapioca in an airtight container, the fruit-syrup mixture in another, and the coconut milk mixture separately. This modular approach means you can quickly assemble fresh servings whenever you’d like.
If you’re making this for a party, prep everything the morning of and assemble just before serving. Your guests will be impressed by how fresh and vibrant it tastes. For freezing, tapioca and fruit syrup freeze okay for about a month, though the texture of the tapioca becomes slightly less perfect upon thawing.
The beauty of Vietnamese che thai is that it’s incredibly forgiving. You can adjust sweetness by adding more or less syrup, adjust richness by changing your coconut milk ratio, and adjust texture by using different fruits and tapioca amounts. Think of this recipe as a framework rather than rigid rules.
For additional inspiration on Asian desserts and flavor combinations, check out Bon Appétit’s Asian dessert collection or New York Times Cooking for more Vietnamese recipes. These resources have wonderful insights into authentic techniques and ingredient sourcing.
Making a che thai recipe at home connects you to generations of Vietnamese dessert traditions. It’s a dessert that celebrates simplicity, quality ingredients, and the joy of sharing something refreshing with people you care about. Once you master this basic version, you’ll find yourself experimenting with different fruit combinations and serving methods all summer long.
Ingredients
- 1 cup pearl tapioca
- 1 cup granulated sugar or palm sugar
- 1 cup water
- 1 can (13.5 oz) full-fat coconut milk
- 1.5 cups water for coconut milk mixture
- 2 cups fresh banana, cut into chunks
- 1 can (20 oz) jackfruit in syrup, drained and chopped
- 1 can (15 oz) taro root, drained and cubed
- 1 tablespoon vegetable oil
- 2 cups crushed ice
- Fresh mint leaves for garnish (optional)

Instructions
- Bring a large pot of water to a boil and add the pearl tapioca. Stir occasionally to prevent sticking and cook for approximately 30 minutes, until the pearls become mostly translucent with just a tiny white center remaining. Drain thoroughly in a fine-mesh strainer and toss with vegetable oil to prevent clumping.
- While the tapioca cooks, combine 1 cup sugar and 1 cup water in a saucepan over medium-high heat. Bring to a boil, stirring occasionally until the sugar dissolves completely. Remove from heat immediately and let the syrup cool to room temperature.
- Combine the drained jackfruit, taro root, and fresh banana chunks in a large bowl. Pour the cooled sugar syrup over the fruit and stir gently to combine. Refrigerate the fruit mixture for at least 30 minutes to allow flavors to meld.
- In a separate bowl, whisk together the coconut milk and 1.5 cups water until well combined and smooth. Taste and adjust the ratio if needed—add more water for a lighter flavor or more coconut milk for richness. Refrigerate until ready to serve.
- To serve, chill four tall glasses. Add approximately 1/4 cup of the cooked tapioca pearls to the bottom of each glass.
- Top the tapioca with about 1/3 cup of the fruit mixture, including some of the syrup.
- Pour approximately 3/4 cup of the coconut milk mixture over the fruit, filling most of the glass.
- Top with crushed ice and garnish with a fresh mint leaf if desired. Serve immediately with a long spoon and straw for mixing and eating all the delicious components together.
Pro Tips
The tapioca cooking time is crucial for achieving the right texture. Pearl tapioca should be mostly translucent but retain a tiny opaque center—this ensures a pleasant chewiness rather than mushiness. If you prefer softer tapioca, cook an additional 5 minutes. If you like it firmer, reduce cooking time by 5 minutes.
For a lighter version, substitute regular whole milk or evaporated milk mixed with water instead of coconut milk. This works beautifully and reduces the richness while maintaining the creamy element. Additionally, you can make this completely dairy-free by using full-fat canned coconut milk without diluting it.
Fruit substitutions are absolutely encouraged. Fresh mango, papaya, or pineapple chunks work wonderfully in place of or alongside the traditional fruits. Canned fruits are preferable to fresh in many cases because they won’t break down when sitting in the syrup. However, if using fresh fruits, add them just before serving to prevent them from becoming too soft.
The sugar syrup can be made with either white granulated sugar or palm sugar. Palm sugar adds a subtle floral, slightly caramel-like note that’s distinctly Vietnamese, but it’s entirely optional based on your preference and availability. The ratio of 1:1 sugar to water creates a light syrup; if you prefer something sweeter, use 1.5 cups sugar to 1 cup water.
Make-ahead planning: Cooked tapioca keeps refrigerated for 3 days. The fruit-syrup mixture also keeps for 3 days. The coconut milk mixture stays fresh for 5 days. This means you can prep everything in advance and simply assemble individual servings when guests arrive, which is perfect for entertaining.
Storage of assembled che thai: While this dessert is best enjoyed immediately after assembly, you can refrigerate it for up to 2 hours before the tapioca begins absorbing too much liquid and losing its ideal texture. The ice will melt, but you can add fresh ice just before serving. For longer storage, keep components separate and assemble as needed.
Flavor adjustments: Taste the assembled dessert and adjust sweetness by adding more syrup or adjusting the coconut milk ratio. If it’s too sweet, add more of the plain coconut milk mixture. If it needs more sweetness, add a bit more of the fruit syrup. The beauty of this recipe is its flexibility.