

Making a cheese curd recipe at home is easier than you might think, and honestly, there’s nothing quite like the satisfaction of creating those squeaky, delicious little bites from scratch. Whether you’re a seasoned home cook or just curious about cheese making, I’m here to walk you through five different methods that range from super simple to a bit more involved. The beauty of homemade cheese curds is that you control exactly what goes into them—no weird additives, just pure, wholesome cheese magic.
I still remember the first time I made cheese curds in my kitchen. My kids gathered around as the milk transformed into something completely different, and their faces when they tasted the final product? Pure joy. That’s what homemade cheese is all about. It’s not just food; it’s an experience, a memory, and honestly, a pretty cool party trick.
Jump To Section
Why This Recipe Works
These five methods work because they all follow the same basic cheese-making principle: you’re using heat, acid, and time to separate milk solids from whey. However, each method offers something different depending on your skill level and how much time you want to invest. The fastest version takes about 30 minutes, while the traditional method gives you that authentic, restaurant-quality texture that squeaks between your teeth.
What makes these recipes foolproof is that even if you’re not perfect with the temperature or timing, you’ll still end up with delicious cheese. The worst-case scenario is slightly softer curds, which honestly still taste amazing. I’ve had batches that weren’t picture-perfect but tasted absolutely incredible, so don’t stress about achieving perfection.
The key to success is using quality milk—whole milk works best because the fat content creates that rich, creamy texture we all crave. Additionally, having a reliable thermometer changes everything. I can’t stress this enough: invest in a good dairy thermometer because eyeballing temperatures just doesn’t cut it for cheese making.
Ingredient Tips & Substitutions
Milk is your star ingredient, so choose wisely. Ultra-pasteurized milk can be finicky because the heat treatment affects the protein structure, making it harder to form proper curds. Look for regular pasteurized milk at your local dairy or grocery store—it’s usually labeled as just “pasteurized” without the “ultra” prefix. If you can find non-homogenized milk, even better, but standard whole milk works beautifully.
The acid component—whether you’re using vinegar, citric acid, or lipase powder—is what makes the magic happen. White distilled vinegar is accessible and affordable, but some cheese makers swear by citric acid for more consistent results. Lipase powder, which you can order online, gives you that distinctive tangy cheese curd flavor that reminds you of authentic Wisconsin curds. Each acid creates slightly different results, so feel free to experiment once you’ve mastered the basics.
Salt matters too, though many of these recipes don’t include it in the curds themselves—you’ll typically add it as a finishing touch. Meanwhile, liquid rennet is your secret weapon for achieving that perfect texture. It’s available online or at cheese-making supply shops, and it’s worth having on hand if you plan to make cheese regularly.
For the mac and cheese recipes you might make with your fresh curds, these homemade versions will absolutely shine compared to store-bought alternatives.
The Five Methods Explained
Method one is the quickest—the 30-minute microwave version that uses vinegar and requires minimal equipment. It’s perfect for curious beginners who want to see if they even like making cheese before investing time and specialty ingredients. Method two uses the stovetop with citric acid and rennet, giving you more control and better texture. Method three is the traditional slow-heat method that produces authentic curds with that signature squeak.
Method four incorporates lipase powder for that tangy, complex flavor profile that serious cheese lovers adore. Finally, method five is the advanced technique using whey starter culture, which is for those ready to level up their cheese-making game. You don’t need to master all five at once—start with method one or two, then graduate to the others as your confidence grows.
Serving Suggestions
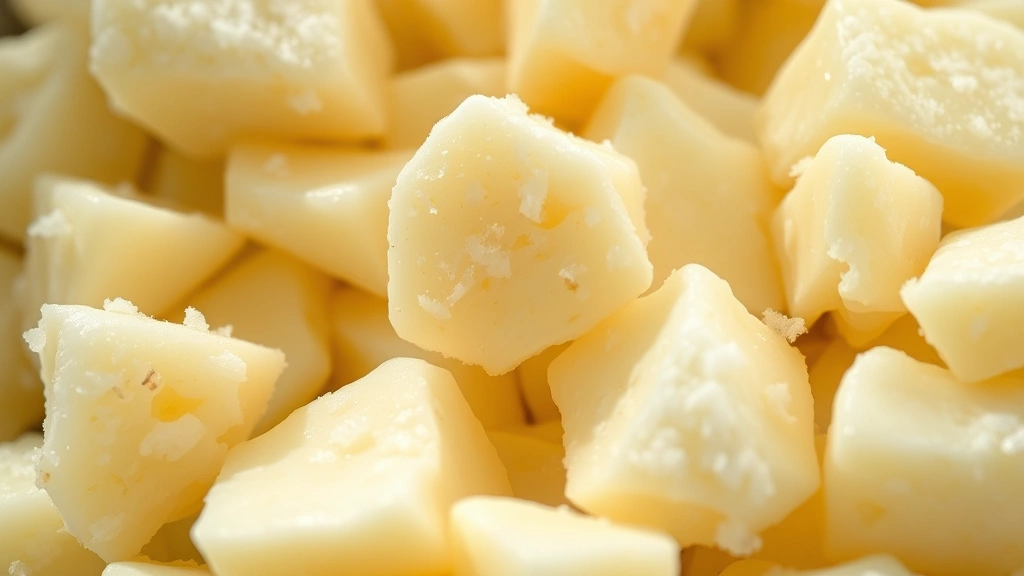
Fresh cheese curds are absolutely stunning on their own, served at room temperature or slightly warm with a sprinkle of sea salt. The texture is at its best within the first few hours of making them, when that squeak is most pronounced. However, they’re also incredible breaded and fried until golden and crispy—think of it as an elevated version of mozzarella sticks that actually tastes like real cheese.
Beyond the classic fried version, these curds work beautifully in the Panera bread mac and cheese recipe for extra richness and texture. Toss them into salads for a protein boost, add them to your feta pasta recipe, or use them as a topping for loaded nachos or poutine. They’re versatile little nuggets of deliciousness.
For a lighter approach, pair them with fresh vegetables like the ones in a Mexican corn salad recipe for a fun contrast of textures and flavors. Or incorporate them into a ricotta cheese lasagna recipe for extra cheesy layers. The possibilities are genuinely endless.
Storage & Reheating
Fresh cheese curds are best enjoyed within 24 hours of making them, while they still have that perfect squeaky texture. Store them in an airtight container in the refrigerator, and they’ll keep for about three to five days. Cold curds won’t squeak quite as much, but they’ll still taste fantastic.
To reheat them gently without drying them out, place them in a warm (not hot) pan with a tiny splash of milk for a few minutes. Alternatively, microwave them for 10-15 seconds—just enough to warm them through. If you’ve breaded and fried them, reheat in a 350°F oven for about five minutes until they’re warm and crispy again.
You can also freeze cheese curds for up to two months, though the texture will be slightly different when thawed. They’ll work better in cooked dishes like mac and cheese than eaten fresh, but they’re still absolutely worth saving. Thaw them slowly in the refrigerator rather than at room temperature for best results.
Pro tip: if you end up with more whey than you know what to do with, don’t throw it away. That whey is liquid gold for making ricotta cheese, which requires only heat and acid. It’s a fantastic way to use every part of your cheese-making process and create even more delicious dairy products.
The wonderful thing about making cheese at home is that there’s no shame in experimenting. Maybe your first batch doesn’t turn out perfect—that’s completely normal and honestly, part of the journey. Each attempt teaches you something valuable about how milk behaves, how temperature affects texture, and what your personal preferences are. Before you know it, you’ll be making batch after batch of beautiful, squeaky cheese curds that put store-bought versions to shame. It’s a skill that seems intimidating until you actually try it, and then you’ll wonder why you didn’t start sooner.
For more inspiration on cheese-based recipes and techniques, check out Bon Appétit’s cheese guides and New York Times Cooking for additional ideas. The cheese-making community is incredibly supportive, and there are amazing resources online to help you troubleshoot any issues. Happy cheese making!
Ingredients
- 1 gallon whole milk (not ultra-pasteurized)
- 1½ teaspoons liquid rennet dissolved in ¼ cup cool, non-chlorinated water
- ¼ teaspoon lipase powder (optional, for tangy flavor)
- 1 teaspoon salt, plus more for serving
- ¼ cup white distilled vinegar or ¼ teaspoon citric acid dissolved in ¼ cup water
- Equipment: dairy thermometer, large stainless steel pot, cheese cloth, slotted spoon, colander
Instructions
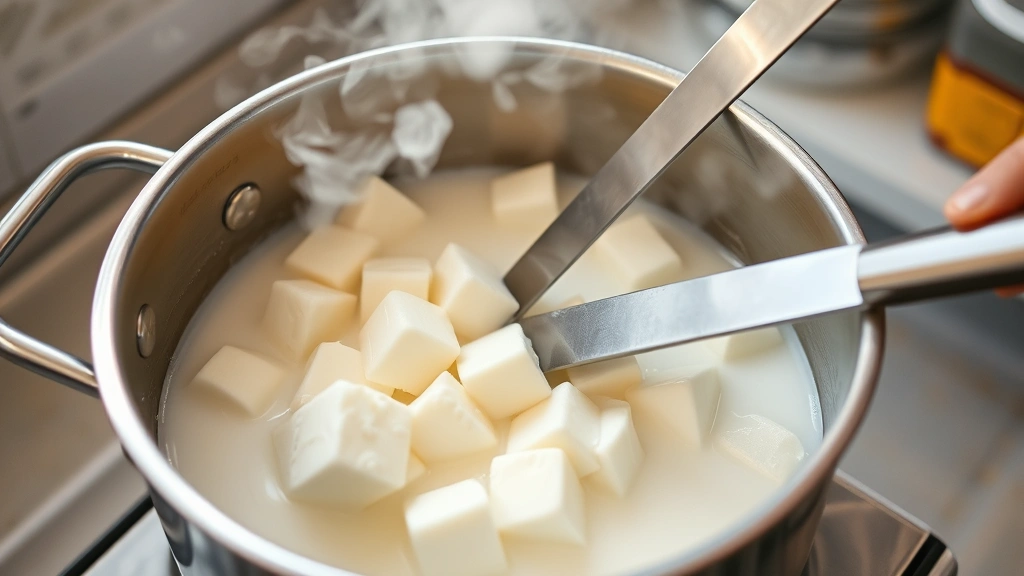
- Pour the gallon of whole milk into your large stainless steel pot. Slowly heat the milk to 90°F, stirring occasionally to ensure even heating. This should take about 10-15 minutes—patience here is key, as slow heating prevents the milk proteins from becoming shocked.
- Once you reach 90°F, add the diluted liquid rennet to the milk by pouring it in while stirring gently in an up-and-down motion for about one minute. This distributes the rennet evenly throughout the milk.
- Let the milk sit undisturbed for 10 minutes. During this time, the rennet is working its magic, coagulating the milk proteins and creating what will eventually become your cheese curds.
- After 10 minutes, check if you have a clean break by inserting a knife at a 45-degree angle and lifting gently. If the curds break cleanly and whey fills the gap, you’re ready to proceed. If it’s still too soft, wait another 2-3 minutes.
- Slowly increase the temperature to 104°F over the next 30 minutes while gently cutting the curds into small pieces (about the size of peas). Cut in one direction, let sit for 2 minutes, then cut perpendicular, and continue this pattern.
- Once you reach 104°F, maintain that temperature and gently stir the curds for another 5 minutes. The curds will become firmer and more defined as they cook.
- Pour the curds and whey through cheesecloth-lined colander. Save the whey if you’d like to make ricotta later. Rinse the curds gently with cool water while still in the cheesecloth.
- For fresh curds, simply place them in a bowl, sprinkle with salt to taste, and serve immediately while they’re still warm. The texture will be perfect—squeaky and tender.
- For fried curds, let them cool completely, then bread them in your favorite coating (flour and egg, panko, or seasoned breadcrumbs) and fry at 350°F until golden brown, about 2-3 minutes.
Pro Tips
The most important thing about making any cheese curd recipe is understanding that temperature control is everything. Your thermometer is your best friend here, so invest in a good one. Digital thermometers with a probe work wonderfully for cheese making because they give you precise readings without having to hold them in the pot constantly.
If your curds don’t form properly, it’s usually because the milk was ultra-pasteurized or the water temperature was off. Non-chlorinated water matters too—chlorine can interfere with rennet, so if your tap water is heavily chlorinated, use filtered or bottled water instead. These little details make a big difference in your success rate.
For the quickest method (method one mentioned in the headnote), you can make curds in a microwave using vinegar, which takes about 30 minutes total and requires no rennet. While the texture is slightly different from traditional curds, they’re still delicious and great for beginners. Alternatively, if you find the multi-step process intimidating, starting with that method builds your confidence before moving to the stovetop version.
The lipase powder addition is entirely optional but creates that characteristic tangy flavor you get from authentic Wisconsin cheese curds. If you use it, it needs to be dissolved in cool water and added before the rennet. The flavor develops as the curds age, so even a few hours in the fridge will intensify that tanginess.
Don’t stress if your curds are slightly softer or firmer than you expected. Every batch teaches you something about your specific milk, your kitchen temperature, and your equipment. Keep notes on what you did, what happened, and what you’d change next time. Before long, you’ll have a system that works perfectly for your situation.
Storage-wise, fresh curds are best within the first 24 hours but will keep refrigerated for up to five days in an airtight container. If you want to extend their life, freezing works, though the texture changes slightly. They’re perfect for cooking with after freezing—toss them into mac and cheese, soups, or anywhere you’d use regular cheese.
One last tip: save that whey! You can use it to make ricotta, which requires just heating the whey to 195°F and adding acid. It’s an incredible way to maximize what you get from your cheese-making process and reduce waste. Plus, you end up with two amazing cheeses from one batch of milk.