
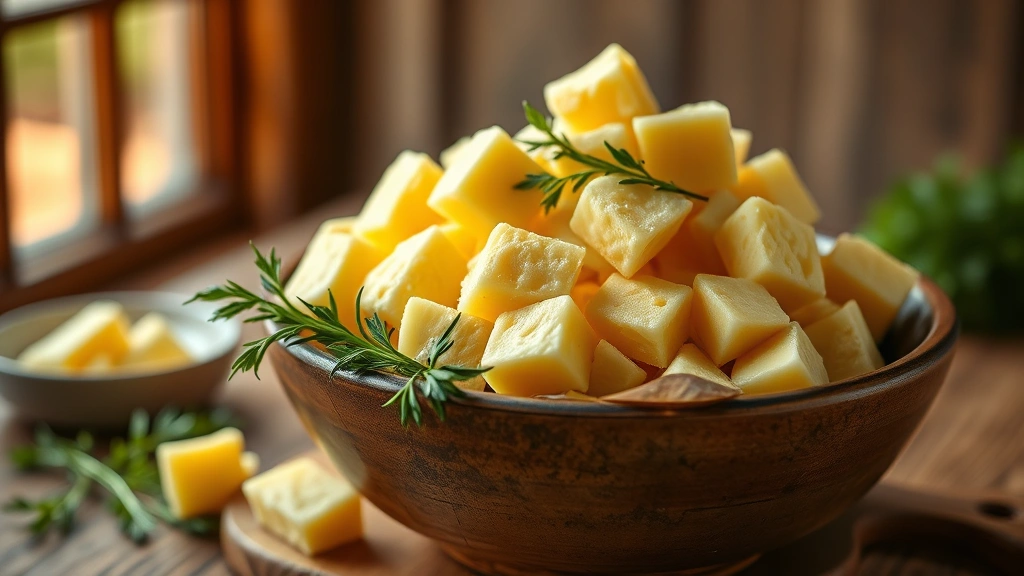
A cheese curds recipe is the key to creating those beloved squeaky, golden bites of pure comfort that Wisconsin made famous. If you’ve ever wondered how to make cheese curds at home, you’re about to discover that it’s entirely possible—and honestly, kind of magical—when you follow the right techniques.
I remember my first batch of homemade cheese curds. The moment those little pieces started squeaking between my teeth, I knew I’d unlocked something special. There’s just something about fresh, warm cheese curds straight from your own kitchen that store-bought versions can never quite capture. The texture is different. The flavor is brighter. And the satisfaction? Absolutely unbeatable.
Jump To Section
Why This Recipe Works
The secret to perfect cheese curds lies in understanding the science behind curd formation. When you add an acid (citric acid) to warm milk with the right rennet, the proteins coagulate and separate from the whey in the most predictable, controllable way. This isn’t complicated chemistry—it’s actually quite straightforward once you know what you’re doing.
What makes this particular recipe foolproof is the precise temperatures and timing. We’re talking about hitting specific heat points that encourage the curds to form with just the right firmness and squeakiness. Additionally, the careful draining process ensures you maintain that perfect texture that makes cheese curds so irresistible. Similar cheese-making techniques apply to many beloved dairy creations, though cheese curds have their own unique charm.
The beauty of making cheese curds at home is that you control every single variable. You know exactly what’s going into your curds, and you get to enjoy them at their absolute freshest. Fresh cheese curds are best served warm, when they still have that characteristic squeak against your teeth—a sign that the milk proteins haven’t yet bonded completely.
Ingredient Tips & Substitutions
Let’s talk about the ingredients, because they really matter here. You’ll need whole milk—specifically, milk that hasn’t been ultra-pasteurized, as those high-heat treatments can interfere with curd formation. Whole milk works better than skim because the fat content contributes to that creamy, satisfying texture you’re after.
Citric acid is non-negotiable for this recipe. While some recipes use vinegar, citric acid gives you more consistent, predictable results because its acidity level is standardized. You can find it in most grocery stores in the canning section, or order it online—it’s inexpensive and keeps indefinitely.
The rennet is equally important. Liquid animal rennet tends to work better than vegetable rennet for cheese curds, though vegetarian options are available if that’s your preference. The key is using actual rennet, not a substitute, because it contains enzymes that specifically break down milk proteins in the way we need for proper curd formation. Meanwhile, the salt you choose should be non-iodized—iodized salt can interfere with the process and create off-flavors.
However, if you can’t find liquid rennet, you can use rennet tablets (just dissolve them in cool, non-chlorinated water first). If citric acid proves elusive, fresh lemon juice can work in a pinch, though you’ll need to adjust quantities slightly. For instance, you’d use about 1/4 cup fresh lemon juice instead of one teaspoon of citric acid.
The Cheese-Making Process Explained
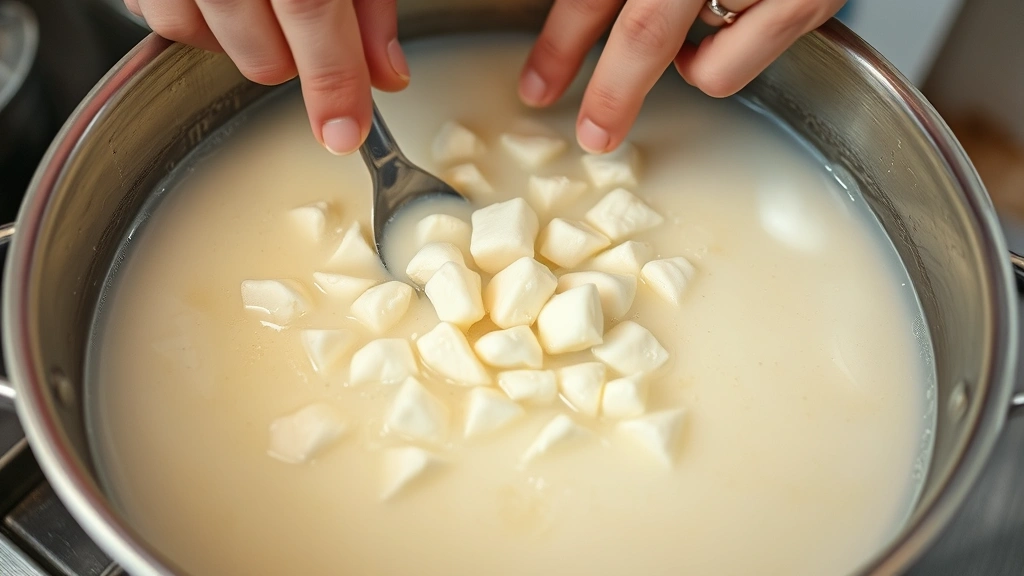
Making cheese curds involves heating milk to specific temperatures while adding ingredients at precise moments. The process takes about 30-40 minutes from start to finish, and every step matters. You’re essentially cooking the curds to the right firmness while allowing the whey to separate.
Once you’ve added the rennet and achieved the proper curd consistency (it should break cleanly when you cut it), you’ll slowly heat the curds while stirring gently. This process, called “cooking the curds,” firms them up and helps them release whey more effectively. The gentle stirring prevents them from matting together while ensuring even heat distribution.
After draining the whey, you’ll notice the curds are still quite soft and somewhat connected. Some recipes call for additional steps like pressing or aging, but for traditional fresh cheese curds, you simply want to rinse them gently with cool water, then enjoy them warm or at room temperature. The texture will be fresher and squeakier if served soon after making.
Serving Suggestions
Fresh cheese curds are absolutely perfect served on their own as an appetizer, but they’re also wonderful as part of a larger spread. Consider pairing them with mustard potato salad for a classic Wisconsin-inspired meal, or serve alongside lamb burgers for something more adventurous.
If you’re feeling creative, try deep-frying your cheese curds for that indulgent poutine experience. The exterior crisps up beautifully while the interior stays creamy and warm. Alternatively, you could incorporate them into mac and cheese or even ricotta cheese lasagna for unique flavor twists.
For a casual gathering, serve them warm with various dipping sauces—ranch dressing, BBQ sauce, or spicy sriracha mayo all work beautifully. Pair with creamy mayo pasta salad and loose meat sandwiches for an authentic Midwestern feast that’ll have everyone asking for your secrets.
Storage & Reheating
Fresh cheese curds are best enjoyed within 24 hours of making, though they’ll keep in an airtight container in the refrigerator for up to 5 days. However, the squeaky texture diminishes over time as the curds continue to age and the proteins bond further together. This isn’t bad—it just means they become slightly firmer and less squeaky.
To restore some of that fresh-cheese-curd experience, gently warm them in a low oven (around 300°F) for 5-10 minutes. The warmth can partially restore the squeaky texture, though it won’t be quite as pronounced as when they’re freshly made. Additionally, you can reheat them in a skillet with a tiny bit of butter for a crispy exterior.
Freezing cheese curds is possible but not ideal, as the freezing process can damage the delicate protein structure and affect the squeaky texture. If you must freeze them, do so for no longer than 2-3 months in an airtight freezer container. Thaw them slowly in the refrigerator and reheat gently before serving.
Want to know more about cheese-making at home? Serious Eats has excellent resources on dairy techniques, while Bon Appétit offers creative serving ideas for homemade cheese products. The New York Times Cooking section also features wonderful cheese-based recipes that pair perfectly with fresh curds.
Making homemade cheese curds transforms you from a simple cook into someone who actually understands dairy chemistry. It’s exciting, rewarding, and honestly, kind of fun. Once you’ve made your first batch, you’ll understand why people get so passionate about this humble Wisconsin staple. The squeaky, creamy, fresh-cheese-curd experience is something you’ve got to taste to truly appreciate.
Ingredients
- 1 gallon whole milk (not ultra-pasteurized)
- 1 teaspoon citric acid
- ¼ teaspoon liquid animal rennet
- ¼ cup cool non-chlorinated water
- ½ teaspoon non-iodized salt, plus more to taste
- Optional: butter or oil for frying
Instructions
- Pour the milk into a large stainless steel pot. Dissolve the citric acid in ¼ cup of cool, non-chlorinated water, then stir this mixture into the cold milk. Let it sit for 5 minutes so the citric acid can work its magic on the milk proteins.
- Slowly heat the milk to 86°F, stirring occasionally to ensure even heating. Use a reliable dairy thermometer to monitor the temperature—this precision matters. Once you reach 86°F, remove from heat and let sit for 5 minutes.
- Dilute the liquid rennet in ¼ cup of cool non-chlorinated water (use fresh water, not the citric acid water). Stir the diluted rennet into the milk using an up-and-down motion for about 1 minute to distribute it evenly throughout.
- Let the milk sit undisturbed for 5 minutes so the rennet can begin coagulating the milk proteins. You’re looking for the milk to transition from liquid to a custard-like consistency.
- Check for a clean break: insert a long knife at a 45-degree angle and lift gently. If the curd breaks cleanly and whey fills the break, you’re ready to cut. If it’s still too soft, wait another minute or two.
- Using a long knife, cut the curds into small cubes about the size of a grain of rice. Make vertical cuts first, then horizontal cuts, then angled cuts to create roughly uniform pieces. This takes patience, but it’s worth it.
- Let the cut curds rest for 5 minutes, stirring gently and occasionally with your fingers to prevent them from matting together. You’ll notice they’re still quite soft at this point.
- Slowly raise the temperature to 104°F over the next 30 minutes, stirring gently every few minutes. This slow temperature increase firms up the curds gradually while allowing whey to release. The whole process should take about 30 minutes to go from 86°F to 104°F.
- Once you’ve reached 104°F, maintain that temperature for 5 minutes while continuing to stir gently. The curds should now feel slightly firm but still tender—like little pebbles.
- Line a colander with butter muslin or fine cheesecloth. Carefully pour the curds and whey through the cloth, reserving the whey that drains out (you might use it later if needed).
- Gather the corners of the cloth and hang the bundle to drain for 5-10 minutes. You want the curds to drain well but not dry out completely.
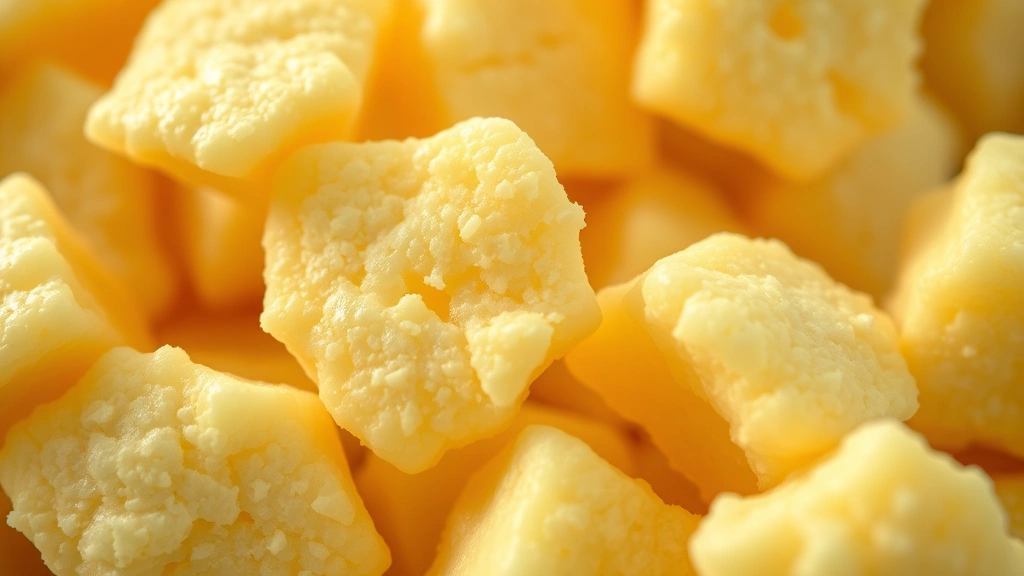
- Transfer the drained curds to a bowl and gently break them apart with your fingers if they’ve stuck together. Sprinkle with ½ teaspoon of non-iodized salt and toss gently to distribute evenly. Taste and add more salt if desired.
- Serve the cheese curds warm or at room temperature. If you prefer them fried, heat oil to 350°F and carefully fry small batches for 1-2 minutes until golden and crispy on the outside while remaining creamy inside.
Pro Tips
The most important factor in making successful cheese curds is using the right milk. Ultra-pasteurized milk simply won’t work because the high-heat treatment damages the protein structure that rennet relies on. Call ahead to your local dairy or grocery store to confirm they carry non-ultra-pasteurized whole milk—it’s worth the effort.
Temperature control cannot be overstated. Invest in a good dairy thermometer that reads accurately in the 80-110°F range. Digital thermometers work wonderfully, though you can use a traditional glass thermometer if it’s reliable. Even a few degrees off can affect your results significantly.
The water you use matters too—if your tap water is heavily chlorinated, you might want to use filtered or bottled water. Chlorine can interfere with both the citric acid and rennet. Additionally, make sure any equipment that touches the milk is impeccably clean, as bacteria can affect curd formation.
If your curds don’t form properly, the most common culprit is the milk itself. Non-ultra-pasteurized whole milk is absolutely essential. However, if the curds form but feel too soft, you might not have reached the proper temperature or maintained it long enough. If they’re too firm or rubbery, you likely overcooked them or used milk that’s past its prime.
Fresh cheese curds will squeak between your teeth when they’re at their optimal freshness. This squeaky quality comes from the curds being warm and the proteins not yet having bonded extensively. As they cool and age, this characteristic diminishes—which is natural and not a problem, just a change in texture.
For frying, make sure your oil is at exactly 350°F. If it’s too cool, the exterior will absorb oil and become greasy rather than crispy. If it’s too hot, the outside will brown before the interior has time to warm through. Pat the curds dry with paper towels before frying for the crispiest exterior.
You can make larger batches by proportionally increasing all ingredients, but stick with the same temperatures and timing. Meanwhile, the leftover whey from this recipe can be used in baking or fed to animals—it’s too valuable to waste. Store it in the refrigerator for up to 5 days.
If you want to experiment further, try adding fresh herbs like chives or dill to the curds before serving, or create flavored varieties by adding a pinch of smoked paprika or cayenne pepper for subtle heat. The basic technique remains the same, but these additions let you personalize your homemade cheese curds.