

This cherry delight recipe is the answer to your dessert prayers when you want something impressive but don’t have time to bake. It’s a no-bake sensation that comes together in minutes and tastes like you spent hours in the kitchen—the kind of dessert that makes people ask for your secret.
I discovered this gem years ago when a friend brought it to a summer potluck, and honestly, it stole the show. Everyone was so convinced it required baking that I had to convince them otherwise. The beauty of this cherry delight recipe lies in its simplicity: creamy, dreamy layers that let the tart-sweet cherries shine without any fussing around with ovens or timing.
Jump To Section
Why This Recipe Works
What makes this dessert so magical? It’s all about the contrast between the cool, fluffy cream layers and those bright, juicy cherries. The graham cracker crust gives you that satisfying crunch, while the whipped topping keeps everything light and airy. You’re basically building flavor and texture in perfect harmony.
Additionally, the no-bake aspect means you can make this on the hottest days without heating up your kitchen. There’s zero stress involved—no worrying about oven temperature or whether your cake layers are even. Just layer, chill, and enjoy. This is the kind of recipe that works whether you’re a confident baker or someone who avoids the oven entirely.
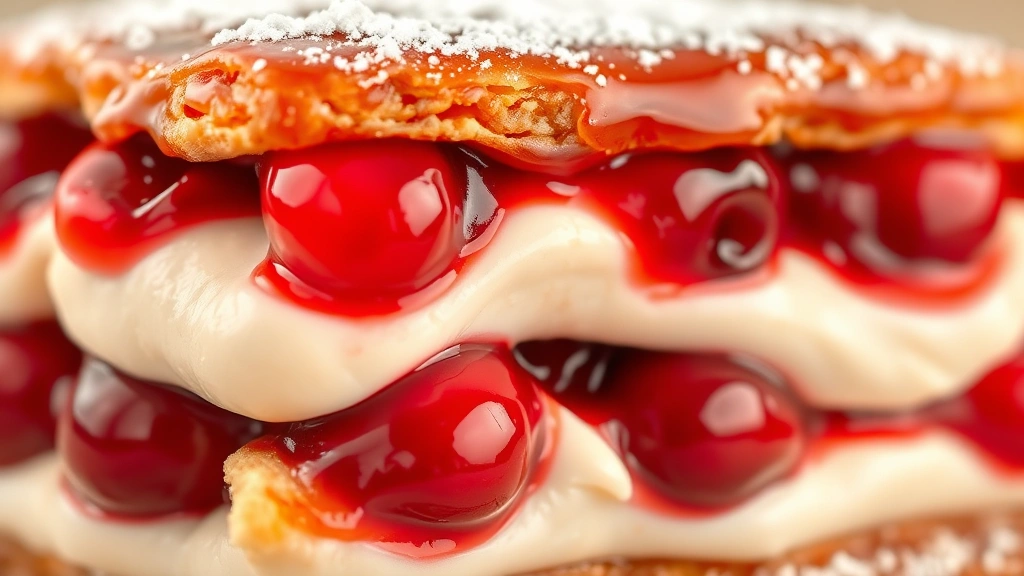
The cherry topping is where the real magic happens. Those jewel-toned fruits create a stunning presentation and add a natural tartness that balances the sweetness of the cream. For instance, you could even try quick spring salad recipes as a light pairing before serving this decadent dessert.
Ingredient Tips & Substitutions
When selecting your cherries, fresh is ideal if you can find them, but honestly, canned works beautifully too. If using canned, drain them well and pat dry to prevent extra moisture. The cherry pie filling from a can is also a time-saving option that tastes fantastic.
For the cream layer, you could swap out the whipped topping with freshly whipped heavy cream and a touch of powdered sugar—it adds a more homemade feel. Alternatively, try a combination of cream cheese and whipped topping for extra richness and tang. The graham cracker crust can be swapped for vanilla wafers or even crushed gingersnaps if you want something with more personality.
Meanwhile, if you’re working with dietary restrictions, there are plenty of options available. Use dairy-free whipped topping and cream cheese alternatives for a vegan version. For a gluten-free twist, substitute regular graham crackers with gluten-free ones—they work just as well.
Assembly & Layering Technique
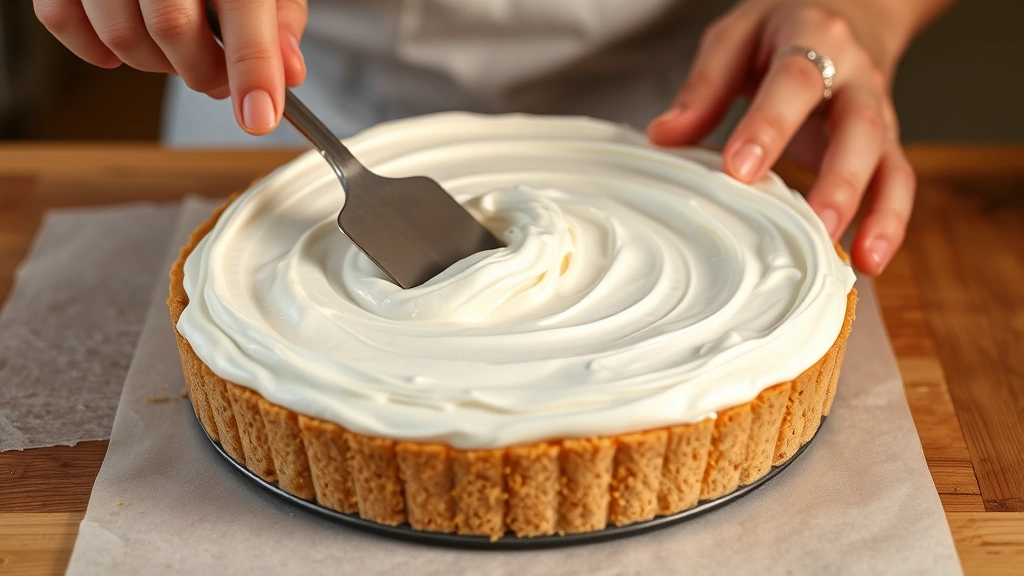
The key to a beautiful presentation is taking your time with the layers. Start with your crust mixture firmly pressed into the bottom of your dish—don’t skip this step. A sturdy base keeps everything from sliding around when you serve it.
Next comes the cream layer, which should be spread evenly but gently. Think of it like you’re floating the topping on rather than pressing it down. The final cherry layer is your showstopper, so arrange those berries artfully on top. Some people like to reserve a few cherries for garnish—a nice touch for presentation.
Pro tip: if you want distinct layers, you can chill between each layer for 15-20 minutes. However, if you’re short on time, you can assemble everything at once and chill for at least 2 hours before serving. The longer chill time actually helps the flavors meld together beautifully.
Serving Suggestions
This dessert shines on its own, but here are some ways to elevate it further. A dollop of extra whipped cream on the side adds luxury. Fresh mint leaves scattered on top provide a pop of color and a subtle freshness that complements the cherries perfectly.
Consider pairing this with a light meal beforehand. Something like the best Caesar salad recipe would balance beautifully before this rich dessert. You could even serve it alongside the best tomato bisque soup recipe for a complete dinner party spread.
For summer gatherings, this cherry delight recipe is perfect because it can be made a day ahead, and you don’t need to worry about keeping it warm. It’s equally wonderful for potlucks, family dinners, or just treating yourself on a regular Tuesday night.
Storage & Make-Ahead Tips
This dessert actually improves with time in the refrigerator. Make it up to 24 hours ahead, and the flavors will deepen. Store it covered in the refrigerator to prevent it from absorbing other flavors. A plastic wrap or cake dome works perfectly for this.
The assembled dessert doesn’t freeze particularly well because the whipped topping gets icy and separates. However, you can prepare the crust and cream layers separately, freeze them, then add the cherry topping fresh when you’re ready to serve. This strategy is helpful for advanced meal prep.
If you have leftovers (though honestly, that’s rare), they’ll keep for about 3 days in the fridge. The texture becomes slightly softer, but the flavor remains delicious. Some people actually prefer it this way—less firm, more mousse-like.
You might also enjoy exploring the best pistachio salad recipe as another no-bake dessert option, or the best Waldorf salad recipe for a fruity side dish.
According to Serious Eats, no-bake desserts are having a major moment in home cooking. The appeal is obvious: they’re stress-free and deliver restaurant-quality results. This easy no-bake dessert trend has made entertaining at home more accessible than ever.
If you’re looking for inspiration on cherry-based recipes, Bon Appétit’s cherry collection offers endless ideas. Additionally, New York Times Cooking has wonderful cherry dessert variations if you want to expand your repertoire.
The beauty of this cherry delight recipe is its versatility and reliability. Whether you’re cooking for a crowd or just yourself, it delivers every single time. Guests will be amazed, and you’ll have more time to enjoy the party instead of being stuck in the kitchen. That’s the real delight right there.
Ingredients
- 2 cups graham cracker crumbs (about 14-16 full crackers)
- 1/2 cup melted butter
- 3 tablespoons granulated sugar
- 8 oz cream cheese, softened to room temperature
- 1/2 cup powdered sugar
- 1 teaspoon vanilla extract
- 2 cups heavy whipping cream, chilled
- 2 tablespoons granulated sugar (for whipped cream)
- 1 can (21 oz) cherry pie filling, or 2 cups fresh cherries with 1/4 cup cherry syrup
- Pinch of salt
- Fresh mint leaves for garnish (optional)
Instructions
- In a medium bowl, combine graham cracker crumbs, melted butter, and 3 tablespoons granulated sugar until the mixture resembles wet sand. Press this mixture firmly into the bottom of a 9×13 inch baking dish or springform pan, creating an even layer. Use the bottom of a measuring cup to pack it down nicely.
- In a large mixing bowl, beat the softened cream cheese with powdered sugar and vanilla extract until smooth and fluffy, about 2-3 minutes. Make sure there are no lumps remaining in the mixture.
- In a separate bowl, whip the chilled heavy cream with 2 tablespoons granulated sugar and a pinch of salt until stiff peaks form. This should take about 3-4 minutes with an electric mixer.
- Gently fold the whipped cream into the cream cheese mixture in two additions, being careful not to deflate the whipped cream. Use a rubber spatula and fold gently until no white streaks remain.
- Spread the cream mixture evenly over the graham cracker crust, smoothing the top with a spatula. This creates your second layer.
- Top the cream layer with the cherry pie filling, distributing the cherries and their syrup evenly across the surface. If using fresh cherries, scatter them on top and drizzle with the cherry syrup.
- Cover the dessert with plastic wrap and refrigerate for at least 2 hours, or up to 24 hours. The longer chilling time allows flavors to meld and the texture to set properly.
- Before serving, garnish with fresh mint leaves if desired. Scoop into individual serving dishes, making sure each portion includes some of the crust, cream, and cherry layers.
- Serve chilled. Store any leftovers covered in the refrigerator for up to 3 days.
Pro Tips
When selecting cream cheese, make sure it’s truly softened to room temperature. Cold cream cheese will create lumps and won’t blend smoothly with the sugar and vanilla. Leave it on the counter for 30-45 minutes before you start, or cut it into small cubes and it’ll soften faster.
For the whipped cream, keep your bowl and beaters chilled before you start. Cold equipment whips cream much faster and creates better peaks. However, be careful not to over-whip—you’re looking for stiff peaks, not butter. Stop as soon as the cream holds firm peaks.
If you don’t have cherry pie filling available, you can make a quick cherry topping by combining fresh or frozen cherries with a bit of sugar, lemon juice, and cornstarch. Heat gently until the cherries release their juices and the mixture thickens slightly. Let it cool before topping your dessert.
The graham cracker crust needs to be packed down firmly, or it can separate and become crumbly when you cut into the dessert. Take an extra minute here—it makes a real difference in the final presentation. Some people add a tablespoon of honey to the crust mixture for extra sweetness and binding.
For a dairy-free version, substitute the cream cheese with dairy-free cream cheese and use coconut whipped cream or another dairy-free whipped topping. The results are surprisingly delicious and work just as well as the traditional version.
If you’re making this ahead for an event, assemble it the morning of and add the cherry topping 2-3 hours before serving. This timing keeps the crust from getting too soft while ensuring the flavors have time to meld together beautifully.
Leftover cherry pie filling can be used on ice cream, yogurt, or even mixed into smoothies. Nothing goes to waste with this recipe. Additionally, you can customize the amount of cherry topping based on how much you love cherries—some people double it for extra fruitiness.