
A chess bars recipe is the ultimate Southern dessert that deserves a permanent spot in your baking rotation. These irresistible little squares combine a buttery shortbread crust with a gooey, custardy filling that’s almost too good to be true—and the best part? They’re incredibly easy to make.
I first encountered chess bars at a church potluck years ago, and I was completely smitten. The name alone intrigued me (seriously, where does the name come from?), but it was the flavor that made me a believer. That sweet, tangy filling with hints of vanilla and a slightly crispy top? Pure magic. Now I make them for every gathering, and they disappear faster than I can plate them.
Jump To Section
What makes this chess bars recipe so special is its simplicity. You don’t need fancy ingredients or complicated techniques—just a few pantry staples and about 45 minutes of your time. The result is a dessert that looks impressive but feels totally doable, even for beginner bakers.
Why This Recipe Works
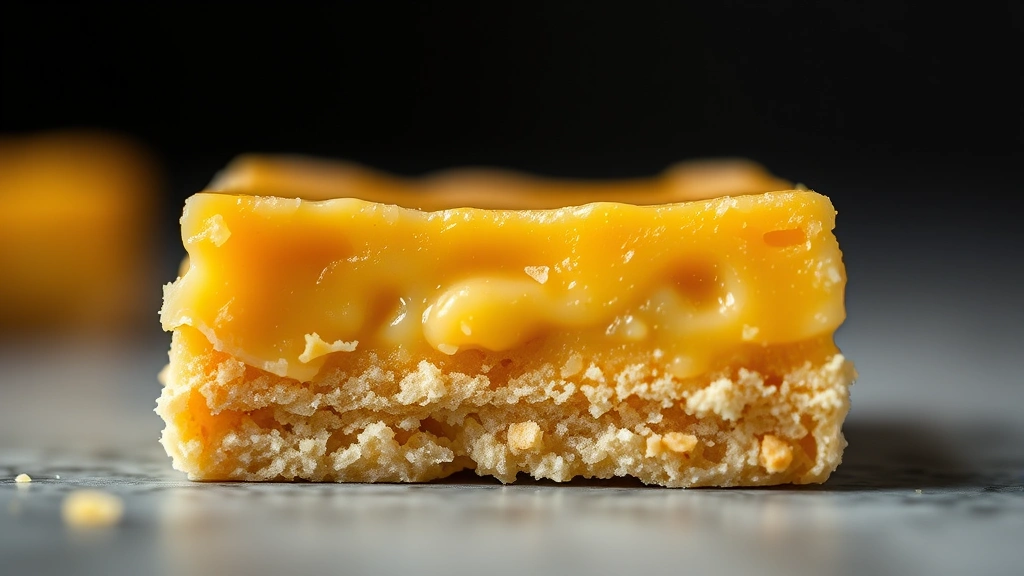
The magic of chess bars lies in the contrast of textures. The bottom layer is a crisp, buttery shortbread crust that provides the perfect foundation. Meanwhile, the filling creates this custard-like center that’s creamy, slightly tangy, and absolutely addictive.
The filling itself is where the real genius happens. Eggs, sugar, butter, and a touch of vinegar or lemon juice create an almost impossible-to-mess-up custard that bakes up thick and gooey. Some versions use evaporated milk for extra richness, while others keep it simple with just eggs and butter. Each approach yields delicious results.
Additionally, the one-bowl nature of this recipe makes cleanup a breeze. You’re not juggling multiple mixing bowls or dealing with fancy equipment—just honest baking at its finest. That’s why chess bars have remained a beloved staple in Southern kitchens for generations.
Ingredient Tips & Substitutions
For the crust, you’ll want unsalted butter softened to room temperature. This ensures even mixing and a tender, flaky base. If you only have salted butter on hand, reduce the salt in the recipe by half to maintain balance.
The filling typically calls for evaporated milk, which adds richness without making the bars too wet. However, you can substitute regular whole milk in a pinch—just know that the texture might be slightly less custardy. Some bakers prefer using a bit of sour cream or even cream cheese for a tangier result.
Vanilla extract is essential here, but make sure you’re using real vanilla, not imitation. The quality difference is noticeable in the final product. For the acid component (usually vinegar or lemon juice), white vinegar works perfectly, though fresh lemon juice adds a brighter note if you prefer.
If you’re looking for complementary recipes to serve alongside these bars, consider pairing them with a best Waldorf salad recipe for a nice contrast, or keep things sweet by exploring other classic Southern treats.
Step-by-Step Success
Start by preheating your oven to 350°F and preparing a 9×13-inch baking pan. Line it with parchment paper or lightly grease it—this prevents sticking and makes removal easier. The crust comes together quickly with just flour, butter, and a pinch of salt.
For instance, when creaming the butter and sugar for the crust, you’re looking for a pale, fluffy mixture—this usually takes about 2-3 minutes with an electric mixer. Then fold in the flour gently until just combined. Press this mixture firmly into your prepared pan, creating an even layer.
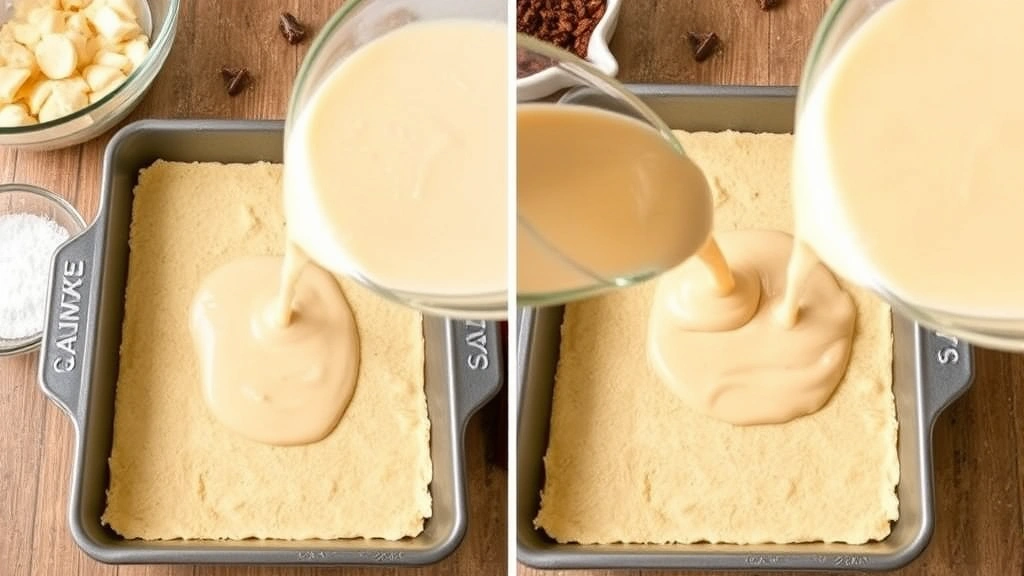
The filling is where you want to take your time. Whisk the eggs with sugar until well combined, then add the butter, evaporated milk, flour, vanilla, and your acid of choice. Some bakers prefer to sift the dry ingredients first for a smoother filling, while others mix everything together—both methods work beautifully.
Pour the filling over your prepared crust and bake for about 30-35 minutes, until the top is set but still slightly jiggly in the very center. This is crucial—you want it to be custardy, not completely firm. The bars will continue to set as they cool, so don’t overbake them.
Serving Suggestions
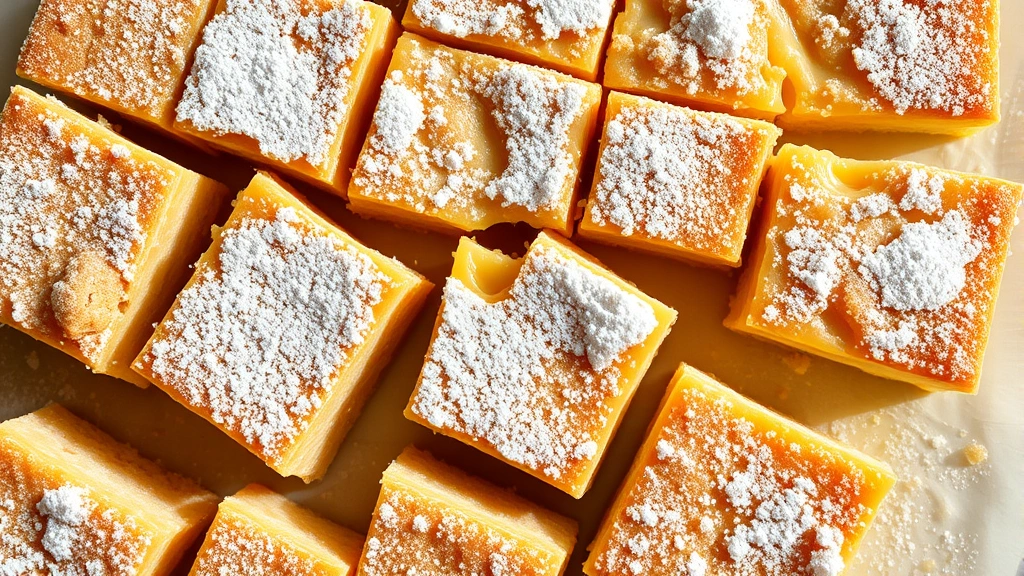
Chess bars are best served at room temperature, though some people enjoy them slightly chilled on a warm day. A dusting of powdered sugar on top adds a lovely finishing touch and makes them look extra special. A dollop of whipped cream or vanilla ice cream elevates them even further.
For a complete dessert spread, consider pairing these with other baked goods. You might enjoy exploring tasty salad in a jar recipe options for a lighter menu component, or focus on building a dessert board with chess bars as the star.
These bars work wonderfully for potlucks, church gatherings, holiday parties, or simply satisfying an afternoon sweet craving. They’re portable, hold up well in warm weather, and taste just as good the next day (if they last that long).
Storage & Reheating
Store your chess bars in an airtight container at room temperature for up to 5 days. They keep even longer in the refrigerator—up to a week—though the texture does become slightly firmer when chilled. Simply let them come to room temperature before serving for the best flavor.
You can also freeze chess bars for up to 2 months. Wrap them individually in plastic wrap, then place them in a freezer bag to prevent freezer burn. Thaw them at room temperature for about an hour before enjoying. This makes them perfect for batch baking ahead of time.
If you want to reheat them, a gentle 10-minute warm-up in a 300°F oven brings back that just-baked texture. However, most people enjoy them perfectly fine at room temperature, so reheating isn’t necessary.
According to Serious Eats, understanding proper dessert storage extends the life of your baked goods significantly. The chess bars recipe benefits from airtight storage since the filling can absorb moisture and flavors from the air.
For more inspiration on crowd-pleasing desserts, New York Times Cooking offers excellent guidance on perfecting your baking techniques. Additionally, Bon Appétit regularly features Southern dessert traditions that include variations on classic recipes like chess bars.
These easy gooey chess bars represent everything wonderful about Southern baking—straightforward ingredients, impressive results, and pure comfort in every bite. Whether you’re a seasoned baker or picking up a wooden spoon for the first time, this recipe welcomes you with open arms and delivers deliciousness every single time.
Ingredients
- 1 cup unsalted butter, softened
- 1/2 cup granulated sugar
- 1 3/4 cups all-purpose flour
- 1/4 teaspoon salt
- 4 large eggs
- 1 1/2 cups granulated sugar
- 1 can (12 oz) evaporated milk
- 3 tablespoons all-purpose flour
- 2 teaspoons vanilla extract
- 1 tablespoon white vinegar
- 1/4 teaspoon salt
- Powdered sugar for dusting (optional)
Instructions
- Preheat your oven to 350°F. Line a 9×13-inch baking pan with parchment paper or lightly grease it. This prevents sticking and makes cleanup a breeze.
- In a large bowl, cream together 1 cup softened butter and 1/2 cup sugar until the mixture is pale and fluffy, about 2-3 minutes. You should be able to see the difference in color and texture.
- Gently fold in 1 3/4 cups flour and 1/4 teaspoon salt until just combined. Don’t overmix—you want a tender crust, not a tough one.
- Press the crust mixture firmly and evenly into your prepared pan, creating an even layer. Use the bottom of a measuring cup to help press it down. Bake the crust for 12-15 minutes until it’s just barely golden.
- While the crust bakes, prepare the filling. In a large bowl, whisk together 4 eggs and 1 1/2 cups sugar until well combined and slightly lighter in color.
- Add 1 can evaporated milk, 3 tablespoons flour, 2 teaspoons vanilla extract, 1 tablespoon vinegar, and 1/4 teaspoon salt to the egg mixture. Whisk until smooth and well combined. Some lumps are okay.
- Remove the crust from the oven and carefully pour the filling over it. The filling will look thin—don’t worry, it bakes up beautifully.
- Bake for 30-35 minutes, until the top is set but still slightly jiggly in the very center. The edges should look firm and slightly golden. The center will continue to set as it cools.
- Remove from the oven and let cool completely to room temperature before cutting. This takes about 1-2 hours. Cooling is important—cutting too early will result in a messy filling.
- Once cooled, cut into squares using a sharp knife. A light dusting of powdered sugar adds a lovely finish. Store in an airtight container at room temperature or in the refrigerator.
Pro Tips
Chess bars are forgiving, but here are some tips to guarantee success every time.
If your filling looks separated or curdled, don’t panic. Simply strain it through a fine-mesh sieve before pouring it onto the crust. This removes any lumps and ensures a smooth, creamy texture.
The name “chess bars” remains somewhat mysterious, though some food historians believe it comes from the way the custard filling looks when baked—almost like the checkered pattern of a chessboard. Others suggest the name derives from “chest,” referring to a pie chest or box. Regardless of the origin, the flavor speaks for itself.
For extra richness, some bakers add 2-3 tablespoons of butter melted into the filling. This creates an even more luxurious, gooey center. Similarly, using half evaporated milk and half heavy cream intensifies the custardy quality.
If you prefer a tangier filling, increase the vinegar to 1.5 tablespoons or use fresh lemon juice instead. You can also add a pinch of nutmeg or a teaspoon of lemon zest for subtle flavor variations.
The crust thickness matters—don’t make it too thin or it won’t support the filling properly. Press it firmly into the pan and bake it slightly so it sets before the filling goes in.
Room temperature is the ideal serving temperature for chess bars. The filling achieves the perfect custard-like consistency, and the flavors shine brightest. If they’ve been refrigerated, let them sit on the counter for 30 minutes before serving.
For gift-giving, wrap individual bars in cellophane bags and tie with ribbon. They make wonderful hostess gifts or party favors. Include a note about storage so recipients can keep them fresh.
If your bars seem too thick or cakey, you likely overbaked them. Next time, check them at the 30-minute mark. If they seem too thin or custardy, you might have underbaked them slightly—that’s actually the better mistake to make, as they’ll continue to set as they cool.