
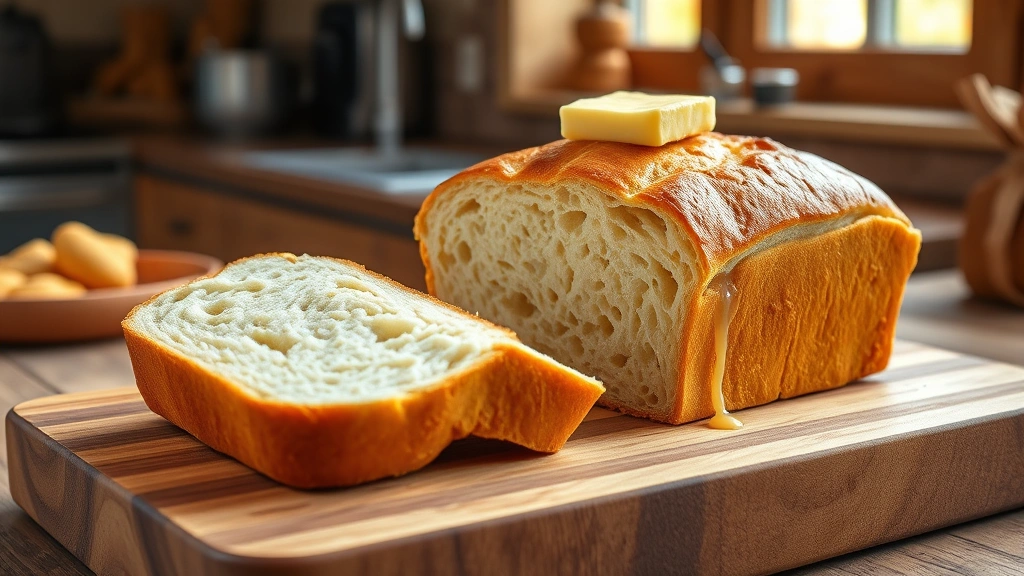
This cottage cheese bread recipe is an absolute game-changer for anyone looking to bake something truly special. It’s fluffy, tender, packed with protein, and honestly? It tastes nothing like cottage cheese—in the best possible way. I stumbled upon this gem while searching for ways to add more nutrition to my morning toast, and now I make it at least twice a week.
The magic happens when cottage cheese blends into the dough, creating an incredibly moist crumb that stays soft for days. Unlike regular bread that goes stale by day two, this loaf maintains that fresh-baked texture thanks to the moisture from the cottage cheese. Plus, you’re sneaking in extra protein without any weird texture or aftertaste.
Jump To Section
Why This Recipe Works
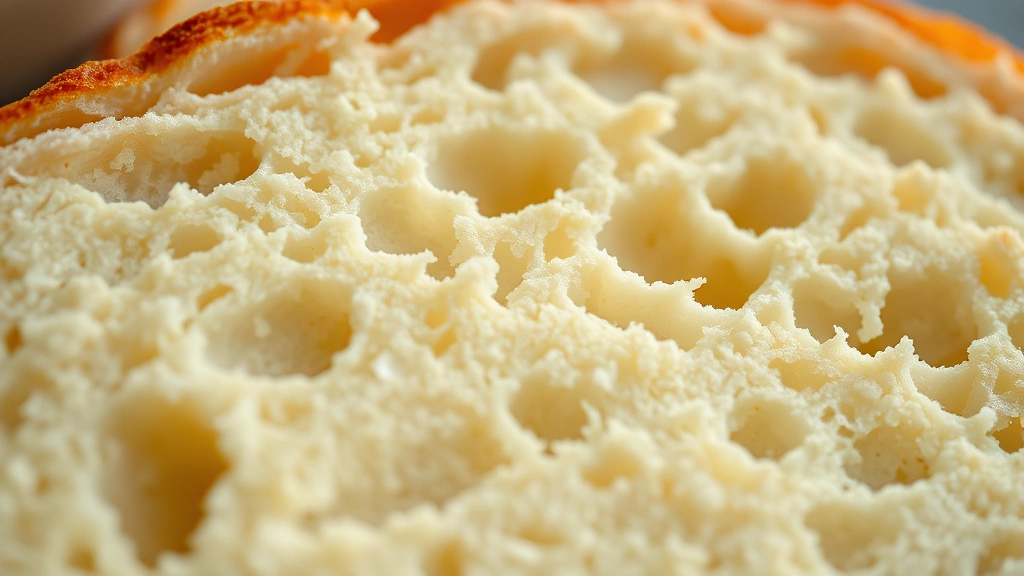
The secret behind this cottage cheese bread lies in the science of moisture retention. Cottage cheese contains both water and casein protein, which work together to keep the gluten network hydrated long after baking. This means your bread stays tender and doesn’t dry out as quickly as traditional loaves.
Additionally, the proteins in cottage cheese strengthen the dough structure, allowing for better rise and a more consistent crumb. You’ll notice the bread rises beautifully and develops a golden-brown crust while staying pillowy soft inside. It’s the kind of bread that makes you want to skip the toaster and just eat thick slices plain with butter.
What really sets this apart is the subtle richness it brings to the table. There’s a slight tanginess that plays beautifully with both sweet and savory applications. Pair it with jam for breakfast, use it for slider sandwiches, or serve it alongside fresh tomato soup for a cozy meal.
Ingredient Tips & Substitutions
Using full-fat cottage cheese gives you the best results—it creates richer flavor and better texture than low-fat versions. However, if you only have low-fat on hand, it’ll still work beautifully; just expect a slightly less tender crumb. Make sure to blend the cottage cheese until completely smooth; lumps will create uneven texture in your finished loaf.
For the flour, bread flour works wonderfully here because of its higher protein content, but all-purpose flour is perfectly fine too. The difference is minimal, though bread flour will give you slightly more chew and a taller rise. Meanwhile, if you’re dairy-free or need alternatives, Greek yogurt works as an excellent substitute at a 1:1 ratio.
The yeast timing matters more than you might think. Active dry yeast and instant yeast are interchangeable in equal amounts. However, if you’re using fresh yeast, use about 25% more by weight. Additionally, don’t skip the salt—it’s not just for flavor, it actually regulates yeast fermentation and strengthens gluten development.
The Baking Process Explained
The first rise is crucial and typically takes 1 to 2 hours depending on your kitchen temperature. You want the dough to roughly double in size and spring back slowly when poked. This is where patience pays off; rushing this step results in dense bread that won’t impress anyone.
Once shaped and placed in your loaf pan, the second rise usually takes 45 minutes to an hour. The dough should rise just above the rim of the pan—not too much, or it’ll dome awkwardly during baking. For instance, on a warm day, this might happen faster, so keep an eye on it rather than strictly following timing.
Baking at 375°F creates that perfect golden crust while keeping the inside tender. The internal temperature should reach 190°F when fully baked. You’ll know it’s done when tapping the bottom sounds hollow and the crust is a beautiful golden-brown color.
Serving Suggestions & Pairings
This bread shines brightest when served warm with good butter and your favorite jam or honey. The natural tanginess of the cottage cheese complements fruit preserves beautifully. However, it’s equally delicious in sandwiches—try it with turkey and avocado for a protein-packed lunch.
For a more elevated experience, make tea sandwiches using thin slices with herbed cream cheese. The subtle richness of this bread pairs wonderfully with delicate fillings. You could also use it for gourmet sandwich creations that go way beyond basic lunch fare.
For something different, cube the bread and make panzanella salad with fresh tomatoes and basil. Or serve it alongside a bowl of soup—the hearty texture holds up beautifully to dipping. According to Serious Eats, bread pairing is underrated in home cooking, and this loaf deserves a place at your dinner table.
Storage & Reheating
Room temperature storage works best for this bread. Wrap it in a kitchen towel or place it in a bread bag once it’s completely cooled. This prevents moisture loss while allowing the crust to stay crispy. Properly stored, it stays fresh for 4 to 5 days—though it rarely lasts that long in my kitchen.
For longer storage, slice the bread and freeze it for up to 3 months. Frozen slices toast beautifully straight from the freezer. Meanwhile, if you want to revive a day-old loaf, wrap it loosely in foil and warm it in a 300°F oven for about 10 minutes.
Don’t refrigerate this bread—cold temperatures actually speed up staling. The high-protein dough keeps moisture in, but refrigeration reverses that benefit. Instead, keep it on the counter in a sealed container or wrapped well at room temperature.
This cottage cheese bread recipe delivers restaurant-quality results with minimal effort. The combination of tender crumb, golden crust, and subtle tangy flavor makes it worthy of any bread basket. Whether you’re a seasoned baker or just starting your baking journey, this loaf will impress. For more bread inspiration, check out New York Times Cooking for additional techniques. The best part? Once you master this one, you’ll find yourself baking it constantly.
Ingredients
- 1 cup (240 ml) full-fat cottage cheese, blended smooth
- 1 3/4 teaspoons active dry yeast (one 1/4-ounce packet)
- 1 1/4 cups warm water (110°F)
- 3 1/2 cups (420g) all-purpose flour or bread flour
- 2 teaspoons salt
- 1 tablespoon honey or granulated sugar
- 2 tablespoons unsalted butter, melted
Instructions
- Blend the cottage cheese in a food processor or blender until completely smooth, about 1-2 minutes. Small lumps will create uneven texture, so take your time here.
- In a large mixing bowl, combine warm water and yeast. Let it sit for 2 minutes until foamy, which indicates the yeast is active and alive.
- Add the blended cottage cheese, honey, and melted butter to the yeast mixture. Stir well to combine.
- In another bowl, whisk together flour and salt. Gradually add the flour mixture to the wet ingredients, stirring with a wooden spoon until a shaggy dough forms.
- Turn the dough onto a lightly floured surface and knead for 8-10 minutes until smooth and elastic. The dough should be slightly tacky but not sticky.
- Place the kneaded dough in a lightly oiled bowl, cover with a damp kitchen towel, and let it rise in a warm place for 1 to 2 hours until doubled in size.
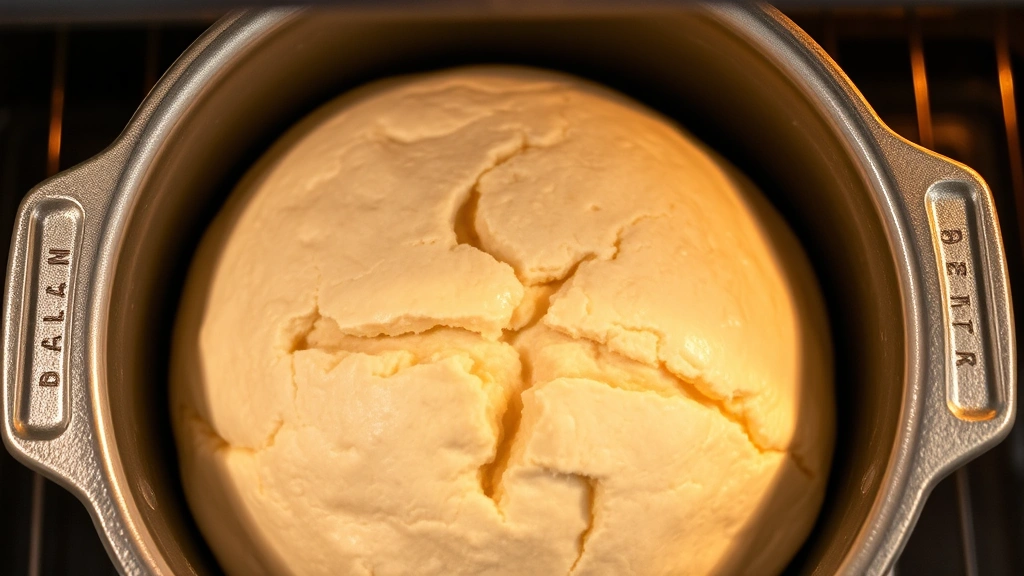
- Preheat your oven to 375°F. Gently punch down the dough and shape it into a round or oval loaf.
- Place the shaped dough into a greased 9×5 inch loaf pan. Cover loosely and let it rise for 45 minutes to 1 hour until it rises just above the rim.
- Score the top of the loaf with a sharp knife, making a single diagonal cut about 1/4 inch deep.
- Bake for 35-40 minutes until the top is golden brown and the internal temperature reaches 190°F on a meat thermometer.
- Remove from the oven and let the bread cool in the pan for 10 minutes, then turn out onto a wire rack to cool completely before slicing.
Pro Tips
The cottage cheese must be blended completely smooth before mixing into the dough. Lumpy cottage cheese creates uneven texture and pockets of moisture throughout the bread. A food processor takes about 90 seconds; if using a blender, you might need 2-3 minutes.
Water temperature matters significantly for yeast activation. Too hot (over 120°F) kills the yeast; too cold doesn’t activate it properly. A kitchen thermometer takes the guesswork out and guarantees success every time. Additionally, if your kitchen is cold, consider warming the mixing bowl first by rinsing it with hot water.
During the first rise, watch for the dough to roughly double rather than following strict timing. Warmer kitchens speed fermentation; cooler ones slow it down. Poke the dough gently—it should spring back slowly but not immediately snap back. This indicates proper fermentation.
The second rise in the loaf pan is equally important for final texture. Letting it rise above the rim creates a taller loaf with better oven spring. However, if it rises too much, it may dome awkwardly. For instance, if you notice overproofing (dough doesn’t spring back when poked), bake it immediately rather than waiting longer.
For a crispier crust, place a shallow pan of hot water on the bottom oven rack while baking. The steam creates a more developed crust. Meanwhile, if you prefer a softer crust, skip this step and cover the baked loaf loosely with a kitchen towel while cooling.
Greek yogurt works beautifully as a substitute at a 1:1 ratio if you don’t have cottage cheese on hand. Ricotta cheese is another option, though it creates a slightly denser crumb. Experiment with ricotta-based recipes for other dairy-forward baking adventures.
Storage is straightforward—keep the cooled loaf wrapped in a clean kitchen towel on your counter. This prevents moisture loss while allowing proper air circulation. Properly stored, the bread stays fresh for 4-5 days. For longer storage, slice it first, then freeze individual slices in an airtight container for up to 3 months.
If your bread doesn’t rise properly, the yeast might be expired or the water temperature was incorrect. Always check yeast expiration dates and invest in a kitchen thermometer. These two factors account for most bread-baking disappointments.