
Dessert bar recipes are the ultimate secret weapon for anyone who wants to impress a crowd without spending hours in the kitchen. These aren’t just simple treats—they’re sophisticated, make-ahead desserts that transform any gathering into something truly special. Whether you’re hosting a dinner party, planning a wedding reception, or simply want to treat your family to something wonderful, a well-curated dessert bar gives you endless possibilities.
I’ve always believed that the best desserts are the ones people actually want to eat. You know that moment when someone’s eyes light up because they see something delicious they can’t resist? That’s what we’re creating here. The beauty of dessert bar recipes is that they allow your guests to choose their own adventure—mini brownies, elegant tarts, creamy cheesecake bites, or fruity bars all arranged beautifully together.
Jump To Section
Planning a menu around dessert bars takes the pressure off. Instead of mastering one complicated dessert, you’re offering variety. This approach actually makes entertaining easier because you can prepare most items days in advance. It’s like having a backup plan that’s also incredibly delicious.
Why This Recipe Works
Dessert bar recipes work because they combine convenience with impressive presentation. Each bar sits at a perfect size for eating while mingling—not too big, not too small. They’re portable, shareable, and photograph beautifully for social media moments. Plus, you can easily increase or decrease quantities based on your crowd size.
Additionally, bars offer remarkable flexibility. You can make them chocolate-forward, fruit-based, nutty, or boozy depending on your preferences and your guests’ tastes. The structure of bars also means they’re forgiving—slightly underbaked or overbaked? Nobody will know because they’re still absolutely delicious. The best part? Most dessert bar recipes require just one bowl, one pan, and straightforward technique.
These treats also have exceptional staying power. Unlike delicate pastries or cakes that demand perfect timing, bars actually improve after a day or two in the refrigerator as flavors meld together. This means you can prep your entire dessert bar three days ahead, which is a game-changer for stress-free entertaining.
Ingredient Tips & Substitutions
The foundation of any great dessert bar recipe starts with quality ingredients. Butter should always be unsalted so you control the salt level. Brown sugar adds moisture and richness that white sugar can’t quite match. For chocolate bars, use real chocolate—not chocolate chips if you can help it, though chips work in a pinch.
However, don’t stress about having everything perfect. If you’re out of brown sugar, mix white sugar with molasses. No buttermilk? Mix regular milk with a splash of lemon juice and let it sit for five minutes. These small substitutions won’t derail your dessert bar success. For nuts, feel free to swap almonds for pecans, walnuts for hazelnuts—just match the quantity.
When it comes to extracts and flavorings, vanilla is essential but almond extract adds sophisticated depth to many bars. Citrus zest brightens chocolate-based recipes beautifully. Spices like cinnamon, nutmeg, and cardamom deserve a place in your pantry because they elevate basic bars into something memorable.
Serving & Presentation Ideas
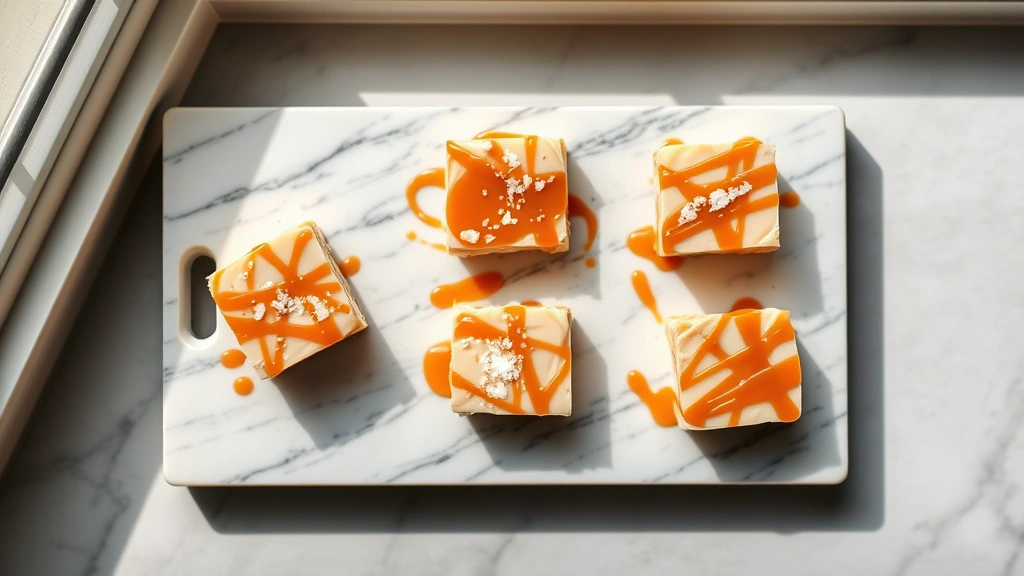
The magic of dessert bar recipes truly shines in presentation. Arrange bars on white marble, wood boards, or tiered cake stands for visual impact. Cut squares into uniform sizes—this creates a polished, intentional look that makes guests feel special. Consider offering small appetizer forks or dessert picks to make eating these treats less messy.
For an elegant touch, dust some bars with powdered sugar, drizzle others with chocolate, or garnish with fresh berries and mint. Label each variety with small tent cards so guests know what they’re enjoying. This is especially helpful for identifying allergens or surprise ingredients like alcohol.
Meanwhile, lighting matters more than people realize. Soft, warm lighting makes dessert bars look inviting and delicious. Harsh overhead lights can make even the most beautiful treats look unappetizing. If you’re serving outdoors, time your dessert bar for late afternoon when golden hour light is most flattering.
Storage & Make-Ahead Tips
Planning ahead is where dessert bar recipes really shine. Most bars keep beautifully for three to five days when stored properly in airtight containers at room temperature. Chocolate-based bars benefit from refrigeration and actually taste better cold. Fruit-filled bars stay fresher longer in the fridge.
For ultimate make-ahead convenience, most dessert bar recipes freeze exceptionally well. Layer bars between parchment paper in freezer-safe containers and they’ll keep for up to three months. Thaw at room temperature for thirty to sixty minutes before serving. This means you can make your entire dessert bar spread a month before your event if needed.
Additionally, you can often freeze the unbaked bars in their pans, then bake directly from frozen—just add five to ten minutes to baking time. This technique is particularly useful when you’re juggling multiple dessert bar recipes simultaneously. It’s practically foolproof planning.
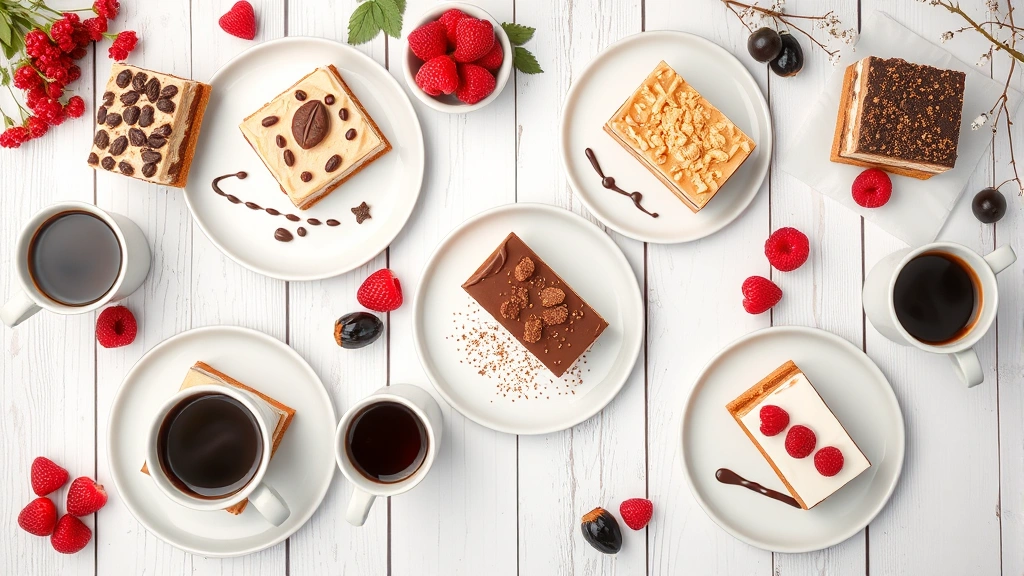
Popular Dessert Bar Recipe Variations
The range of possibilities with dessert bar recipes is genuinely endless. Classic chocolate brownies topped with caramel and sea salt offer decadent indulgence. Lemon bars provide bright, refreshing contrast to rich chocolate options. Then there are the nutty options—butter pecan bars, almond tortes, walnut fudge squares—that appeal to texture-lovers.
For something more adventurous, consider matcha white chocolate bars, espresso-chocolate combinations, or lavender-honey shortbread. Fruit-forward bars featuring berries, stone fruits, or citrus appeal to guests wanting something lighter. Boozy options like bourbon-chocolate bars or whiskey-caramel squares add sophistication to adult gatherings.
If you’re looking for complementary savory-sweet options to round out your spread, you might consider incorporating Best Slider Sandwiches Recipe for a unique dessert bar experience. The key is offering enough variety that everyone finds something they love.
Expert Tips for Success
Temperature control is crucial when making dessert bar recipes. Use an oven thermometer because many home ovens run hot or cold. Room temperature ingredients mix more evenly than cold ones, resulting in better texture. Let your bars cool completely before cutting—patience here prevents crumbly disasters.
Invest in quality parchment paper or silicone baking mats. They prevent sticking, ensure even browning, and make cleanup effortless. When cutting bars, use a hot, wet knife and wipe it clean between cuts for clean edges that look professionally made.
For inspiration and detailed techniques, check out resources like Serious Eats baking guides and New York Times Cooking for advanced baking methods. These sites offer scientific approaches that help you understand why dessert bar recipes work the way they do.
Don’t forget about your guests with dietary restrictions. Include at least one gluten-free option, one vegan bar, and clearly label anything containing nuts or dairy. This inclusive approach to dessert bar recipes ensures everyone at your gathering feels welcomed and celebrated.
Finally, remember that homemade dessert bars always beat store-bought alternatives. The aroma alone—butter, chocolate, vanilla, caramel—fills your home with warmth and signals that something special is happening. Your effort and care shine through in every single bite, making your dessert bar the most memorable part of any meal.
Ingredients
- 2 cups all-purpose flour
- 1 teaspoon baking powder
- 1/2 teaspoon salt
- 1 cup unsalted butter, softened
- 1 cup granulated sugar
- 3/4 cup packed brown sugar
- 2 large eggs
- 2 teaspoons vanilla extract
- 1 1/2 cups semi-sweet chocolate chips
- 1 cup chopped pecans or walnuts
- 1/2 cup caramel bits or chopped caramel candies
- 1/4 cup heavy cream
- 2 tablespoons salted butter (for caramel drizzle)
- 1 teaspoon fleur de sel or sea salt for topping
Instructions
- Preheat your oven to 350°F and line a 9×13 inch baking pan with parchment paper, leaving slight overhang on two sides for easy removal.
- In a small bowl, whisk together flour, baking powder, and salt, then set aside.
- In a large mixing bowl, cream together softened butter with granulated sugar and brown sugar until light and fluffy, about 3 minutes of beating.
- Add eggs one at a time, beating well after each addition, then stir in vanilla extract until fully combined.
- Gently fold the flour mixture into the wet ingredients using a spatula, mixing until just combined—don’t overmix.
- Fold in chocolate chips and chopped nuts, being careful not to crush the nuts.
- Spread the batter evenly into your prepared baking pan, smoothing the top with an offset spatula.
- Scatter caramel bits across the top of the batter in an even layer.
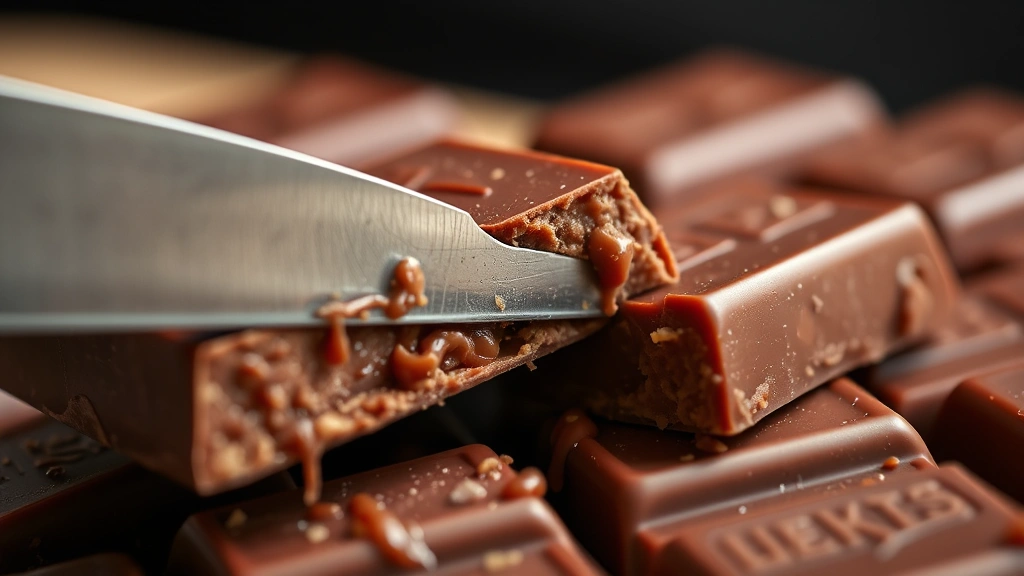
- Bake for 25 to 30 minutes, until a toothpick inserted in the center comes out with just a few moist crumbs—these bars are best slightly underbaked.
- Remove from oven and immediately drizzle with melted salted butter mixed with heavy cream while still warm.
- Sprinkle fleur de sel across the top for that perfect sweet-salty finish.
- Let bars cool completely in the pan on a wire rack for at least 2 hours, preferably 4 hours.
- Once cool, use the parchment overhang to lift the entire batch from the pan onto a cutting board.
- Cut into 24 uniform squares using a sharp knife—wipe the blade between cuts for clean edges.
- Serve at room temperature or slightly chilled, storing extras in an airtight container.
Pro Tips
These caramel-chocolate bars are just the beginning of your dessert bar recipe journey. The slight underbaking technique is intentional—it keeps them fudgy and tender rather than cake-like. If you prefer firmer bars, bake an additional three to five minutes, though I find the softer texture more irresistible.
For ingredient flexibility, swap the pecans for almonds, macadamia nuts, or even leave them out entirely if you prefer. The caramel bits can be replaced with toffee bits, butterscotch chips, or even chopped dark chocolate for a different flavor profile. Brown butter takes these bars to another level—melt your butter, let it cool slightly, and use it in place of regular softened butter for deeper, nuttier flavor.
Storage is wonderfully simple with these dessert bar recipes. Keep bars in an airtight container at room temperature for up to four days, or refrigerate for up to a week. For freezing, layer bars between parchment paper in a freezer-safe container for up to three months. Thaw at room temperature for about an hour before serving. The cold temperature actually intensifies the chocolate flavor and makes the caramel taste even more luxurious.
If you’re making multiple dessert bar recipes for a gathering, consider baking these a full day ahead. The flavors develop beautifully overnight, and the bars become easier to cut cleanly after sitting. Meanwhile, this make-ahead quality is exactly why dessert bars are so popular for entertaining—the stress disappears when you know your desserts are already complete.
For a more elegant presentation, dust some bars with edible gold leaf or cocoa powder before serving. Drizzle additional caramel sauce on the serving board for visual drama. These small touches transform simple dessert bar recipes into something that looks like it came from a professional bakery, yet you made it yourself in your home kitchen.