
Boiled groundnuts are one of the simplest yet most satisfying snacks you can make at home. This classic preparation requires minimal ingredients and effort, making it perfect for busy weekdays or casual entertaining. Whether you’re looking for a healthy protein-packed snack or a nostalgic treat from your childhood, this easy boiled groundnut recipe delivers incredible flavor with virtually no fuss.
The beauty of boiled groundnuts lies in their versatility and wholesome appeal. Unlike roasted varieties, boiling preserves the natural moisture and creates a tender, almost creamy texture that’s absolutely addictive. With just raw peanuts, water, and salt, you can create something truly magical that rivals any store-bought snack. This recipe is naturally vegan, gluten-free, and packed with protein and healthy fats that keep you satisfied for hours.
What makes this method so special is how it transforms humble peanuts into a restaurant-quality snack. The long, slow simmer allows the flavors to meld beautifully while the salt penetrates each kernel. You’ll find yourself reaching for handful after handful, and your guests will be amazed at how such a simple recipe can taste so incredibly good. The best part? Once you master this basic technique, you can experiment with different seasonings and flavor combinations to keep things interesting.
Boiled groundnuts are perfect served warm or at room temperature, making them ideal for meal prep, snacking, or serving at gatherings. They pair beautifully with cold beverages and make an excellent addition to appetizer spreads. I’ve included detailed instructions and helpful tips to ensure your boiled groundnuts turn out perfectly every single time. This is comfort food at its finest—no complicated techniques, no fancy equipment required.
According to Serious Eats, the key to perfect boiled legumes is maintaining a consistent simmer and using the right ratio of water to solids. This recipe follows those principles precisely, ensuring tender groundnuts with optimal texture. Whether you’re a seasoned cook or kitchen novice, you’ll have no trouble executing this recipe flawlessly. The rewards are absolutely worth the minimal effort involved.
I love serving boiled groundnuts as a wholesome snack option that satisfies cravings without any guilt. They’re infinitely better than processed alternatives and cost just pennies to make. Once you experience the difference homemade boiled groundnuts make, you’ll never go back to store-bought varieties. This recipe has become a staple in my kitchen, and I’m thrilled to share it with you.
Ingredients
- 2 pounds raw groundnuts (peanuts in shell)
- 8 cups water
- 3 tablespoons sea salt
- 1 tablespoon paprika (optional)
- 1 teaspoon garlic powder (optional)
- ½ teaspoon cayenne pepper (optional)
- Fresh herbs for garnish (optional)
Instructions
- Begin by thoroughly rinsing your raw groundnuts under cold running water. Place them in a large colander and rinse until the water runs clear, removing any dirt or debris. This step is crucial for food safety and ensures a clean final product.
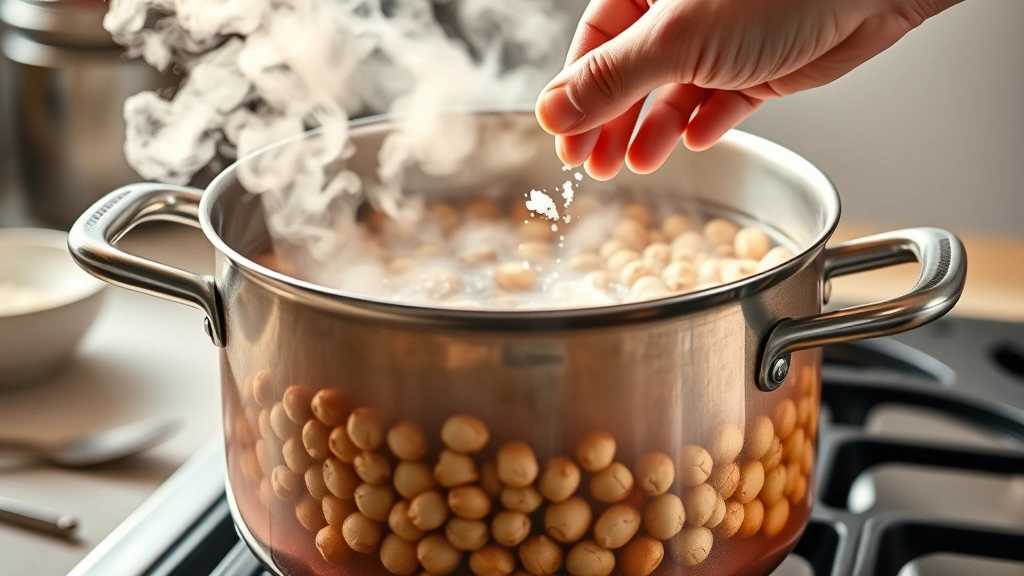
- Place the rinsed groundnuts into a large stockpot or Dutch oven and cover with 8 cups of fresh cold water. The groundnuts should be submerged completely with about 2 inches of water covering them.
- Add 3 tablespoons of sea salt to the water and stir well to dissolve. The salt is essential for flavoring the groundnuts as they cook and helps season them evenly throughout.
- Bring the water to a rolling boil over high heat. Once boiling, reduce the heat to medium-low and maintain a gentle simmer throughout the cooking process.
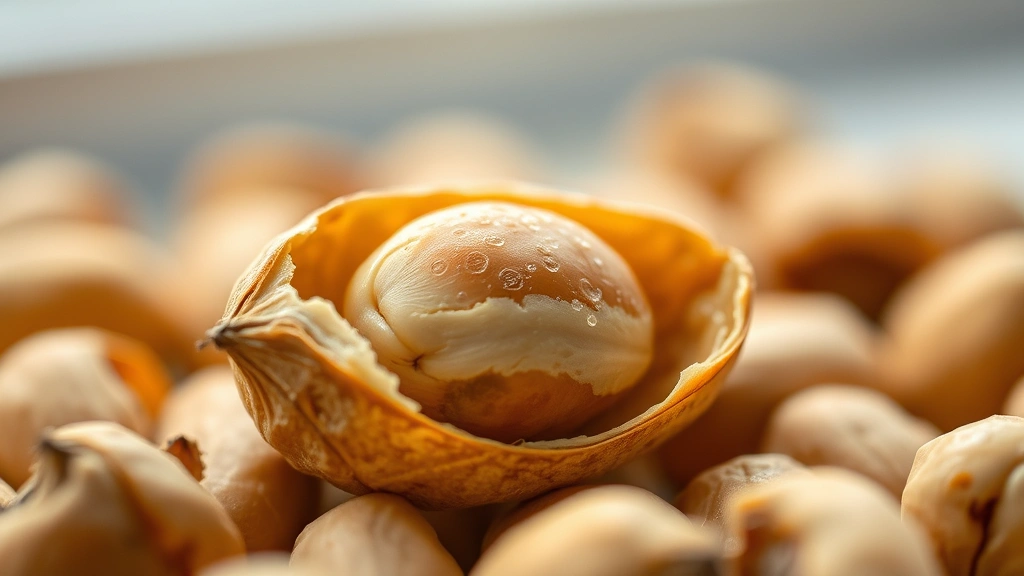
- Simmer the groundnuts for 2 to 2.5 hours, depending on their size and freshness. Older nuts may require the full time, while fresher ones might be tender sooner. Check for doneness by removing one groundnut, cracking it open, and tasting the kernel—it should be completely soft and tender.
- About halfway through cooking (around the 1 hour 15 minute mark), stir the groundnuts occasionally and check water levels. Add more water if needed to keep them covered, as evaporation occurs during the long simmer.
- If you’re using optional seasonings like paprika, garlic powder, or cayenne pepper, add them during the last 15 minutes of cooking to preserve their fresh flavors.
- Once the groundnuts are completely tender, drain them carefully in a colander. Reserve some of the cooking liquid if desired for keeping them moist.
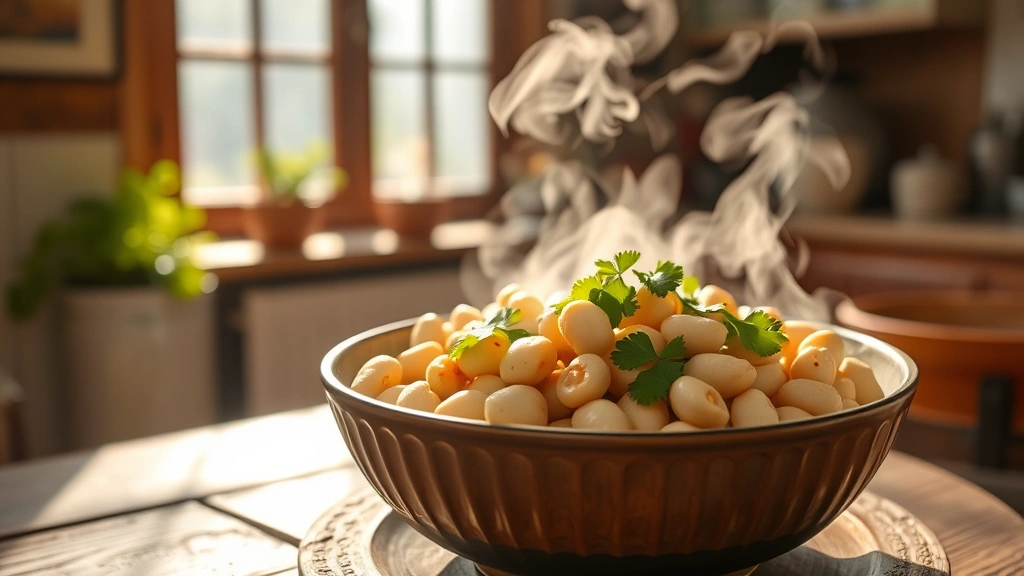
- Transfer the boiled groundnuts to a serving bowl or platter. They can be served immediately while still warm or cooled to room temperature, depending on your preference.
- Taste and adjust seasonings as needed, adding extra salt or spices if desired. Garnish with fresh herbs such as cilantro or parsley if serving for a special occasion.
- Allow the groundnuts to cool slightly before serving, as they’ll retain heat and the shells will be very hot. Serve with small bowls for discarded shells and enjoy as a snack or appetizer.
Pro Tips
- **Choosing Your Groundnuts**: Select raw, in-shell groundnuts from specialty markets, farmers markets, or online retailers. Avoid pre-roasted or salted varieties, as they won’t achieve the same tender texture during boiling. Fresh groundnuts from the current harvest will cook faster and taste superior.
- **Water Quality Matters**: Use filtered or spring water if possible, as chlorinated tap water can affect the final flavor. The quality of water directly influences the taste of your finished boiled groundnuts.
- **Salt Ratios**: The 3 tablespoons per 8 cups of water ratio creates perfectly seasoned groundnuts. However, you can adjust based on personal preference. Start with less and add more during the last 15 minutes if needed.
- **Cooking Time Variables**: Altitude, pot size, burner type, and groundnut age all affect cooking time. Start checking for doneness around 2 hours, but don’t rush the process. Undercooked groundnuts will be hard and unpleasant; fully cooked ones should be almost creamy.
- **Flavor Variations**: Once you master the basic recipe, experiment with different seasonings. Try Cajun spices, Old Bay seasoning, curry powder, or Italian herbs. Add these in the final 15 minutes to prevent flavor degradation from the long cooking time.
- **Storage Instructions**: Store cooled boiled groundnuts in an airtight container in the refrigerator for up to 5 days. You can also freeze them in freezer bags for up to 3 months. Reheat gently in simmering water or the oven.
- **Make-Ahead Friendly**: Boiled groundnuts are excellent for meal prep. Make a large batch on the weekend and portion into containers for grab-and-go snacking throughout the week.
- **Serving Suggestions**: Serve as a snack with cold beverages, add to appetizer platters, or incorporate into creative dishes. They pair beautifully with simple dishes and won’t overpower delicate flavors.
- **Nutritional Benefits**: According to New York Times Cooking, boiled peanuts retain excellent nutritional profiles including plant-based protein, healthy monounsaturated fats, and important minerals. The boiling process makes nutrients more bioavailable.
- **Troubleshooting**: If groundnuts remain hard after 2.5 hours, they may be too old. If they become mushy, reduce cooking time next batch. If they taste bland, increase salt or add seasonings earlier in the process.