

There’s something absolutely magical about a perfectly made lox and cream cheese bagel, and I’m thrilled to share how easy it is to create this classic at home! While traditional lox is cured salmon that requires time and technique, this simple recipe gives you that luxurious, restaurant-quality result without the fuss. Whether you’re hosting a brunch or treating yourself to an elegant breakfast, this lox recipe is the ultimate crowd-pleaser.
Lox has such a sophisticated reputation, but honestly, making it at home is simpler than you’d think. The key is using quality salmon and understanding the curing process—it’s really just salt, sugar, and time doing the heavy lifting. I love how this recipe comes together because it requires minimal hands-on work while delivering maximum flavor. The silky texture and delicate cure are absolutely divine.
What makes this lox recipe so special is its versatility. Serve it on fresh bagels with cream cheese, atop pickled red onions, or even on cucumber rounds for an elegant appetizer. I’ve also paired it with salads for a protein boost, and the results are always stunning.
The beauty of homemade lox is that you control every element—the salt level, the cure time, and the final flavor profile. Some people prefer a delicate cure, while others love a more intense salmon flavor. This recipe strikes the perfect balance, giving you that buttery, melt-in-your-mouth quality that makes lox so irresistible. Plus, it’s significantly more economical than buying pre-made lox from the market.
I recommend using sushi-grade or high-quality Atlantic salmon for this recipe. The fresher your salmon, the better your lox will be. You’ll also need kosher salt, sugar, and optional flavorings like dill and lemon zest. Many people ask about the difference between lox and smoked salmon, and while they’re often confused, lox is cured but not smoked, which is what we’re making here.
One thing I absolutely love about this lox recipe is how it teaches you a fundamental cooking technique—curing. Once you master this method, you can apply it to other proteins like gravlax or even vegetables. It’s a skill that elevates your home cooking and impresses everyone at your table.
For the best results, give yourself at least 24 hours for the curing process, though 48 hours is ideal for a more developed flavor. The salmon will transform before your eyes, developing that signature translucent quality and silky texture. Store it in the refrigerator, and it will keep for up to two weeks, making it perfect for meal prep or entertaining.
I’m so excited for you to try this homemade lox recipe. It’s elegant enough for a special breakfast but simple enough for a regular Sunday morning. Pair it with fresh dill, capers, thinly sliced red onions, and toasted bagels for the ultimate lox and cream cheese experience. Your family and friends will be amazed when you tell them you made it yourself!
For more inspiration on curing techniques and seafood preparation, check out Serious Eats and Bon Appétit for their excellent guides. You can also explore New York Times Cooking for additional salmon recipes and techniques.
Ingredients
- 2 pounds sushi-grade Atlantic salmon fillet, skin-on
- 1/3 cup kosher salt
- 1/3 cup granulated sugar
- 2 tablespoons fresh dill, finely chopped
- Zest of 2 lemons
- 1 tablespoon black peppercorns, crushed
- 1 teaspoon granulated garlic (optional)
- Paper towels
- Plastic wrap
- Fresh dill for garnish
- Capers for serving
- Thinly sliced red onion for serving
- Bagels and cream cheese for serving
- Lemon wedges for serving

Instructions
- Pat the salmon fillet completely dry using paper towels, pressing gently but firmly to remove all moisture from both the skin side and flesh side. This is crucial for proper curing.
- In a small bowl, combine the kosher salt, granulated sugar, fresh dill, lemon zest, crushed black peppercorns, and garlic powder if using. Mix these ingredients together until well combined.
- Place the salmon fillet skin-side down on a cutting board lined with plastic wrap. The skin will help protect the salmon during the curing process.
- Generously rub the cure mixture all over the flesh side of the salmon, making sure to coat every inch evenly. Use approximately two-thirds of the mixture for this initial coating.
- Wrap the salmon tightly in plastic wrap, then place it on a baking sheet or in a shallow dish to catch any liquid that may escape during curing.
- Place the wrapped salmon in the refrigerator for 24 hours for a lighter cure, or up to 48 hours for a more developed, deeper flavor. The longer curing time will result in firmer, more translucent lox.
- After the curing time is complete, unwrap the salmon and rinse it thoroughly under cold water to remove the cure mixture. Pat it completely dry with paper towels.
- Place the cured salmon skin-side down on a clean cutting board. Using a very sharp, thin-bladed knife, slice the salmon at a 45-degree angle against the grain, creating thin, delicate slices.
- Start slicing from the tail end toward the head, using a gentle sawing motion and letting the knife do the work rather than applying pressure. Each slice should be paper-thin and translucent.
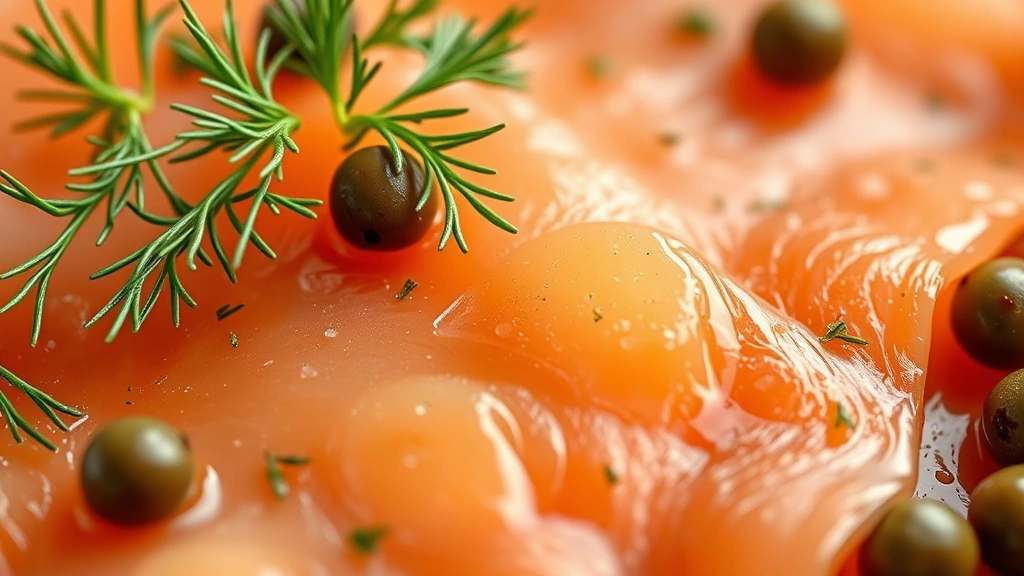
- Arrange the sliced lox on a serving platter, slightly overlapping the slices. Garnish with fresh dill, capers, thinly sliced red onion, and lemon wedges.
- Serve immediately on toasted bagels with cream cheese, or store in an airtight container in the refrigerator for up to two weeks, separating layers with parchment paper to prevent sticking.
Pro Tips
- **Quality salmon matters**: Use sushi-grade Atlantic salmon from a reputable fishmonger. Ask them to remove any pin bones and provide a skin-on fillet. The quality of your salmon directly impacts the final product.
- **The drying step is essential**: Moisture is the enemy of proper curing. Take time to thoroughly pat the salmon dry before applying the cure mixture. This ensures even curing and proper texture development.
- **Customize your cure**: Feel free to experiment with the flavoring. Some people add juniper berries, fennel seeds, or even a touch of bourbon. The salt-to-sugar ratio should remain consistent for proper curing chemistry.
- **Curing time variations**: For a delicate, subtle cure, use 24 hours. For traditional lox with deeper flavor and firmer texture, cure for 48 hours. Don’t exceed 72 hours as the salmon can become too salty.
- **Slicing technique**: A sharp knife is absolutely crucial. Dull knives will tear the delicate cured salmon. Consider investing in a good filleting knife or using a sushi knife. The 45-degree angle creates those beautiful, elegant slices.
- **Storage tips**: Wrap cooled lox in parchment paper, then place in an airtight container. It will keep for up to two weeks in the refrigerator. You can also freeze lox for up to three months, though the texture may change slightly.
- **Serving suggestions**: Beyond bagels and cream cheese, serve lox on cucumber rounds with crème fraîche for appetizers, atop salads for a protein boost, or on toast points with capers and red onion for elegant brunch fare.
- **Make-ahead friendly**: Since lox requires curing time anyway, it’s perfect for meal prep. Make it several days before entertaining, and you’ll have one less thing to worry about on the day of your event.
- **Flavor pairings**: Lox pairs beautifully with tangy flavors like capers, pickled onions, and lemon. Fresh dill is the classic herb choice, but chives and tarragon also work wonderfully.
- **Why homemade is better**: Homemade lox costs significantly less than store-bought versions while tasting fresher and more delicious. Plus, you know exactly what’s going into it—no preservatives or additives.