
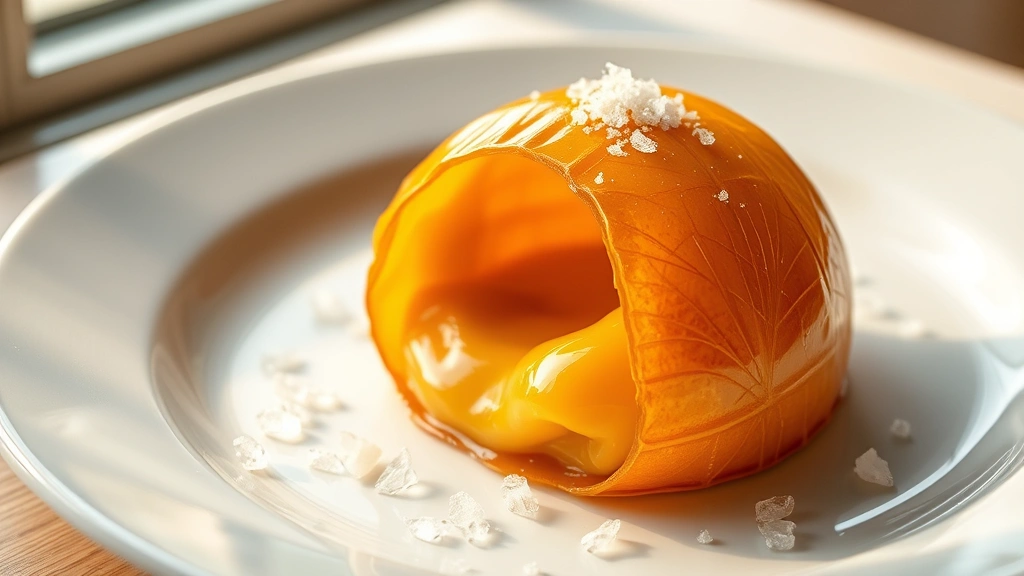
A Sea Lantern is a stunning and elegant dessert that combines delicate layers of light sponge cake, silky pastry cream, and a beautiful caramelized sugar shell that crackles when you break into it. This classic French-inspired treat might sound complicated, but it’s surprisingly achievable in your own kitchen! The magic happens when you create that gorgeous amber dome of caramelized sugar that catches the light like a glowing lantern—hence the enchanting name.
What makes this dessert so special is the contrast of textures: the crispy, glass-like caramel exterior gives way to clouds of delicate sponge cake and rich, velvety pastry cream. It’s the kind of showstopper dessert that looks like it came straight from a Michelin-starred patisserie, yet the individual components are quite straightforward to master. Don’t let the elegance intimidate you—this recipe breaks down into manageable steps that even home bakers can execute beautifully.
The beauty of a Sea Lantern recipe lies in its versatility. While the classic version features vanilla pastry cream, you can easily customize it with different flavors. Try a rich cream base infused with lavender, or add a hint of almond extract for sophistication. You might even incorporate fresh fruit layers or a touch of liqueur for an adults-only version. The creamy filling is forgiving and adaptable, making this recipe perfect for experimenting.
I absolutely love serving these at dinner parties because they can be assembled several hours ahead of time, allowing you to focus on other dishes or simply enjoying your guests’ company. The caramel shell is best applied just before serving to maintain its spectacular crackle, but even if you prepare it an hour or two in advance, it remains impressive and delicious. This is the kind of dessert that earns compliments and makes you look like a pastry professional without requiring professional-level stress.
If you’re looking for other elegant yet achievable desserts, you might enjoy exploring complementary elegant recipes that showcase your culinary skills. The techniques you’ll learn making a Sea Lantern—working with caramel, creating pastry cream, and assembling delicate layers—are foundational skills that will elevate your entire dessert repertoire. Whether you’re planning an intimate dinner for two or impressing a crowd at a special occasion, this sophisticated dessert delivers restaurant-quality results that taste as magnificent as they look.
For more inspiration on creating beautiful, layered desserts, check out resources from Bon Appétit’s pastry collection, which features other stunning French-inspired treats. You can also explore Serious Eats’ dessert guides for science-backed baking tips, or reference New York Times Cooking’s caramel recipes for variations on the sugar work.
Ingredients
- 3 large eggs, separated
- 75 grams (3/4 cup) granulated sugar, divided
- 1 teaspoon vanilla extract
- 75 grams (3/4 cup) cake flour or all-purpose flour
- 1/4 teaspoon salt
- 2 tablespoons unsalted butter, melted
- 250 milliliters (1 cup) whole milk
- 1 vanilla bean, split and seeds scraped, or 1 teaspoon vanilla extract
- 4 large egg yolks
- 35 grams (3 tablespoons) cornstarch
- 100 grams (7 tablespoons) unsalted butter, at room temperature
- 200 milliliters (3/4 cup) heavy whipping cream, cold
- 2 tablespoons powdered sugar
- 200 grams (1 cup) granulated sugar, for caramel
- 60 milliliters (1/4 cup) water
- Pinch of sea salt, for finishing
Instructions
- Preheat your oven to 350°F (175°C). Line a 9-inch (23 cm) round cake pan with parchment paper and lightly butter the sides.
- Separate your eggs carefully, ensuring no yolk gets into the whites, as even a tiny bit of yolk will prevent the whites from whipping properly. Place egg whites in a large, very clean mixing bowl.
- In another bowl, whisk together the 4 egg yolks (for the sponge cake), 50 grams of sugar, and 1 teaspoon vanilla extract until the mixture becomes pale and slightly thickened, about 2 minutes of whisking.
- Sift the cake flour and salt together over the yolk mixture. Gently fold the flour into the eggs using a rubber spatula, being careful not to deflate the mixture. Fold in the melted butter until just combined.
- Using an electric mixer, beat the egg whites on medium-high speed until foamy, about 1 minute. Gradually add the remaining 25 grams of sugar while continuing to beat, until stiff peaks form and the mixture is glossy and smooth, about 3 to 4 minutes total.
- Gently fold one-third of the beaten egg whites into the yolk mixture to lighten it. Then fold in the remaining whites in two additions, being very gentle to preserve the airiness.
- Pour the batter into your prepared pan and smooth the top. Bake for 20 to 25 minutes, until a toothpick inserted in the center comes out clean and the cake is golden brown.
- Remove the cake from the oven and let it cool in the pan for 10 minutes. Turn it out onto a wire rack and cool completely.
- While the cake cools, prepare the pastry cream. Heat the milk with the vanilla bean (or extract) in a saucepan over medium heat, stirring occasionally, until it reaches a simmer. Do not boil.
- In a bowl, whisk together the 4 egg yolks and 75 grams of sugar until pale and thick, about 2 minutes. Sift the cornstarch over the mixture and whisk until fully incorporated.
- Slowly pour the hot milk into the egg mixture while whisking constantly to temper the eggs and prevent scrambling. Pour the mixture back into the saucepan.
- Cook over medium heat, stirring constantly with a whisk, until the pastry cream comes to a gentle simmer and thickens, about 3 to 4 minutes. It should coat the back of a spoon.
- Remove from heat and strain the pastry cream through a fine-mesh sieve into a bowl to remove any lumps. Stir in the softened butter until completely incorporated and smooth.
- Press plastic wrap directly onto the surface of the pastry cream to prevent a skin from forming. Refrigerate until completely cool, at least 1 hour.
- Once the pastry cream is cooled, whip the cold heavy cream with the powdered sugar until stiff peaks form using an electric mixer, about 2 to 3 minutes.
- Gently fold the whipped cream into the cooled pastry cream in two additions until no white streaks remain. This creates a light, mousse-like filling.
- Carefully slice the cooled cake horizontally into two even layers using a serrated knife or cake leveler. Place the bottom layer on a serving plate or cake stand.
- Spread or pipe half of the pastry cream mixture onto the bottom cake layer, creating an even layer about 1/2 inch thick.
- Place the top cake layer on the cream and top with the remaining pastry cream, spreading it evenly across the top and slightly down the sides to create a dome shape.
- Refrigerate the assembled dessert for at least 30 minutes while you prepare the caramel, or up to 4 hours.
- When ready to finish, prepare the caramel for the sugar shell. Combine 200 grams of sugar and 60 milliliters of water in a heavy-bottomed saucepan. Do not stir; instead, gently swirl the pan occasionally as the sugar melts and cooks.
- Watch carefully as the sugar caramelizes, about 8 to 12 minutes, until it reaches a deep amber color. The mixture should be completely liquid and free of crystals.
- Immediately remove the caramel from heat and let it cool for about 30 seconds, until it’s slightly thickened but still pourable—it should coat a spoon but not be completely set.
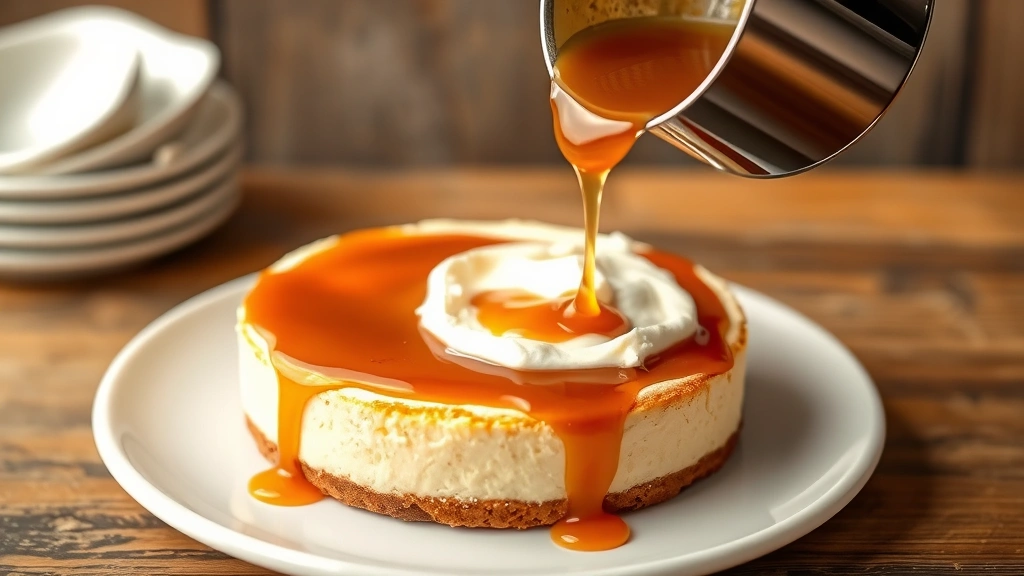
- Working quickly, drizzle the warm caramel over the top of the chilled dessert in a decorative pattern, allowing it to drip down the sides. You can create a crosshatch pattern or simple stripes.
- If you’d like to create a more dramatic effect, carefully reheat the remaining caramel and pour it over the cake in a thin layer to create a complete shell, working very quickly before it sets.
- Sprinkle the caramel with a tiny pinch of sea salt for contrast and sophistication. The caramel will set and harden as it cools, creating that beautiful glass-like shell.
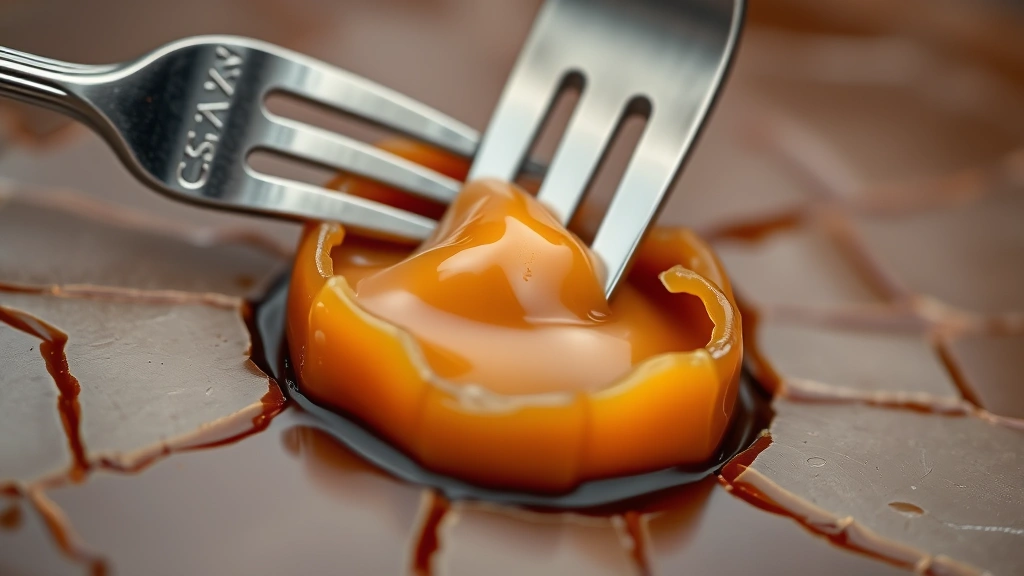
- Allow the caramel to set for at least 15 to 20 minutes before serving. Slice with a hot, wet knife, wiping between cuts to keep the caramel clean and beautiful.
Pro Tips
- The key to perfect pastry cream is avoiding lumps—always strain it through a fine-mesh sieve, and be patient when tempering the eggs by slowly whisking in the hot milk.
- Make sure your egg whites are completely free of any yolk, as even a tiny bit of fat will prevent them from whipping to stiff peaks. Use very clean bowls and beaters.
- The sponge cake can be baked a day ahead and stored wrapped at room temperature, making this dessert excellent for advance preparation.
- Working with caramel requires attention and respect for heat safety. Keep a bowl of ice water nearby while making caramel in case of accidental burns, and never touch hot caramel.
- If your caramel crystallizes during cooking (turns grainy), add a tablespoon of lemon juice or corn syrup and start again. This prevents recrystallization.
- The pastry cream can be made up to 2 days ahead and stored, covered, in the refrigerator. Fold in the whipped cream no more than 4 hours before serving.
- For a less intense caramel flavor, stop cooking at a lighter amber color. For deeper, more complex flavors, cook until darker, but watch carefully as it can burn quickly.
- Room temperature is crucial for the butter in pastry cream—if it’s too cold, it won’t incorporate smoothly; if too warm, the cream will be greasy.
- This dessert is best served the same day it’s assembled, as the caramel begins to soften over time and the cake layers can become soggy.
- For a flavor variation, infuse the milk with a cinnamon stick, star anise, or lavender before heating. You can also add a tablespoon of liqueur like Grand Marnier or Frangelico to the pastry cream.
- If you’re nervous about caramelizing sugar, practice with a small batch first or watch a video tutorial to see the color stages.
- A hot, wet knife is essential for slicing through the caramel cleanly without shattering it—dip the knife in hot water and wipe it dry between each cut.