
There’s something absolutely magical about homemade fudge, especially when it comes together in mere minutes with just a handful of ingredients. This easy fudge recipe with condensed milk is the kind of dessert that feels fancy enough to gift to friends but simple enough that even beginners can master it. I’ve been making this since my grandmother taught me the trick years ago, and it never fails to impress.
The beauty of using condensed milk is that it eliminates the need for a candy thermometer or any complicated boiling techniques. Sweetened condensed milk already contains the perfect ratio of sugar and milk solids, so all you need to do is combine it with butter, cocoa powder, and vanilla extract, then let it set in the refrigerator. The result is silky, melt-in-your-mouth fudge that tastes like it came from a fancy candy shop.
What I love most about this recipe is its versatility. You can customize it with different mix-ins like nuts, sprinkles, or even a swirl of peanut butter. It’s also incredibly forgiving—if you’re worried about texture, don’t be. The condensed milk does all the heavy lifting for you. Whether you’re making fudge for the holidays, a bake sale, or just because you’re craving something sweet, this recipe will become your go-to.
I’ve found that the key to perfect fudge every time is using good quality cocoa powder and not skipping the butter. The butter creates that luxurious, creamy texture that makes this fudge so addictive. You can also check out my Best Heavy Cream Alfredo Sauce Recipe for other easy recipes that rely on simple pantry staples, or explore more quick desserts like my Delicious Heavy Cream Pasta Recipe for inspiration.
One of my favorite parts about making this fudge is how customizable it is. You can add a pinch of sea salt on top for a sweet and salty combination, or press crushed candy canes into the top for a festive holiday treat. Some people love adding espresso powder to deepen the chocolate flavor, while others prefer to keep it simple and classic. The condensed milk base is so forgiving that you can experiment with different flavor combinations without worrying about ruining the recipe.
The beauty of this recipe is that it comes together in under 10 minutes of active time. Most of the waiting happens in the refrigerator, which means you can prepare this ahead of time and have fudge ready whenever you need it. I often make a batch on Sunday and have treats ready for the week. It also makes an excellent gift when wrapped in parchment paper and tied with a pretty ribbon. For more easy, impressive recipes, check out my Easy Chicken Alfredo Recipe that showcases how simple ingredients can create restaurant-quality results.
There’s also something deeply satisfying about making candy at home. Store-bought fudge often contains additives and preservatives, but when you make it yourself, you know exactly what’s going into each piece. This recipe uses just five simple ingredients—condensed milk, butter, cocoa powder, vanilla extract, and salt—and nothing else. It’s a reminder that the best desserts don’t need to be complicated; they just need quality ingredients and a little bit of care.
If you’re new to candy making, this is truly the perfect starting point. Unlike traditional fudge recipes that require you to boil sugar to a specific temperature and then beat it until it reaches the right consistency, this method takes all the guesswork out of the equation. The condensed milk does the work for you, which means you can focus on getting the flavors just right and enjoying the process. You might also enjoy exploring complementary treats like my Best Pickled Red Onion Recipe for adding complexity to your dessert spread.
When it comes to storage, this fudge keeps beautifully in an airtight container in the refrigerator for up to two weeks, though it rarely lasts that long in my house. You can also freeze it for up to three months if you want to make a larger batch ahead of time. Just cut it into pieces, layer it with parchment paper in a freezer-safe container, and thaw at room temperature for about 30 minutes when you’re ready to enjoy it.
I encourage you to make this recipe exactly as written the first time, and then feel free to experiment. Try adding almond extract instead of vanilla, or swirl in some peanut butter before the fudge sets. You could even try making chocolate-peppermint fudge by adding peppermint extract and crushing candy canes on top. The possibilities are endless, and that’s what makes this such a fun recipe to have in your repertoire. For other creative recipes that showcase ingredient flexibility, explore my Best Shishito Peppers Recipe which demonstrates how simple techniques can yield impressive results.
Ingredients
- 1 can (14 ounces) sweetened condensed milk
- 1/2 cup unsalted butter
- 3/4 cup unsweetened cocoa powder
- 1 teaspoon vanilla extract
- 1/4 teaspoon sea salt, plus more for topping if desired
Instructions
- Line an 8×8 inch square baking pan with parchment paper, leaving some overhang on two sides so you can easily lift the fudge out later.
- In a medium saucepan over low heat, combine the sweetened condensed milk and butter, stirring frequently until the butter is completely melted and the mixture is smooth.
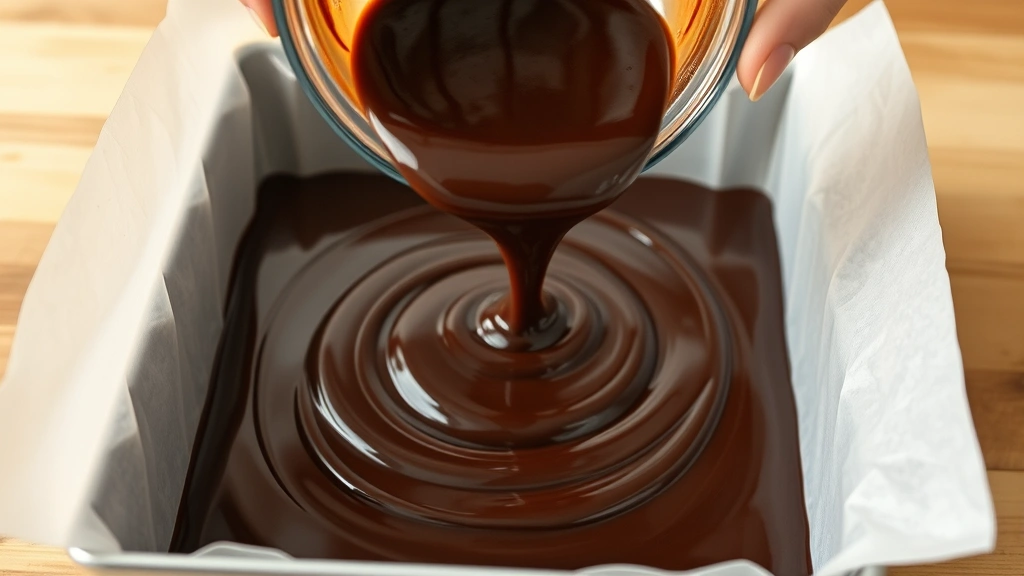
- Remove the pan from heat and add the unsweetened cocoa powder, stirring well to combine and ensure there are no lumps remaining in the mixture.
- Stir in the vanilla extract and sea salt, mixing until everything is fully incorporated and the fudge mixture is smooth and glossy.
- Pour the fudge mixture into the prepared baking pan, using a spatula to spread it evenly into all corners and smooth the top surface.
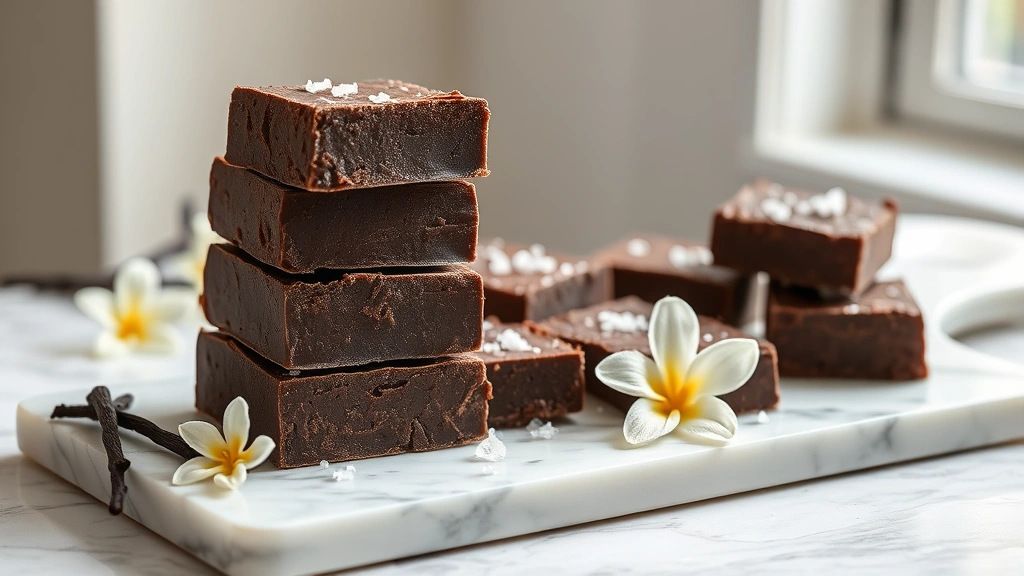
- If desired, sprinkle additional sea salt on top or add your choice of toppings such as crushed nuts, sprinkles, or pressed candy pieces before the fudge sets.
- Place the pan in the refrigerator and allow the fudge to set for at least 2 hours, or until it is firm to the touch and no longer sticky.
- Once fully set, use the parchment paper overhang to lift the fudge block out of the pan and place it on a cutting board.
- Cut the fudge into 24 equal pieces using a sharp knife, wiping the blade clean between cuts for neat edges.
- Store the finished fudge in an airtight container in the refrigerator for up to two weeks, or freeze for up to three months.
Pro Tips
Butter quality matters in this recipe. Use real butter, not margarine or butter substitutes, for the best flavor and texture. The butter should be at room temperature or just slightly cool when you add it to the condensed milk.
Unsweetened cocoa powder is essential here. Dutch-processed or natural cocoa powder both work beautifully, though they’ll give slightly different flavor profiles. Dutch-processed creates a smoother, more mellow chocolate taste, while natural cocoa powder offers a deeper, more intense chocolate flavor.
This recipe is incredibly forgiving and works with various add-ins. Try adding crushed pretzels for a sweet and salty combination, or mix in chopped pecans, walnuts, or almonds for extra texture and richness.
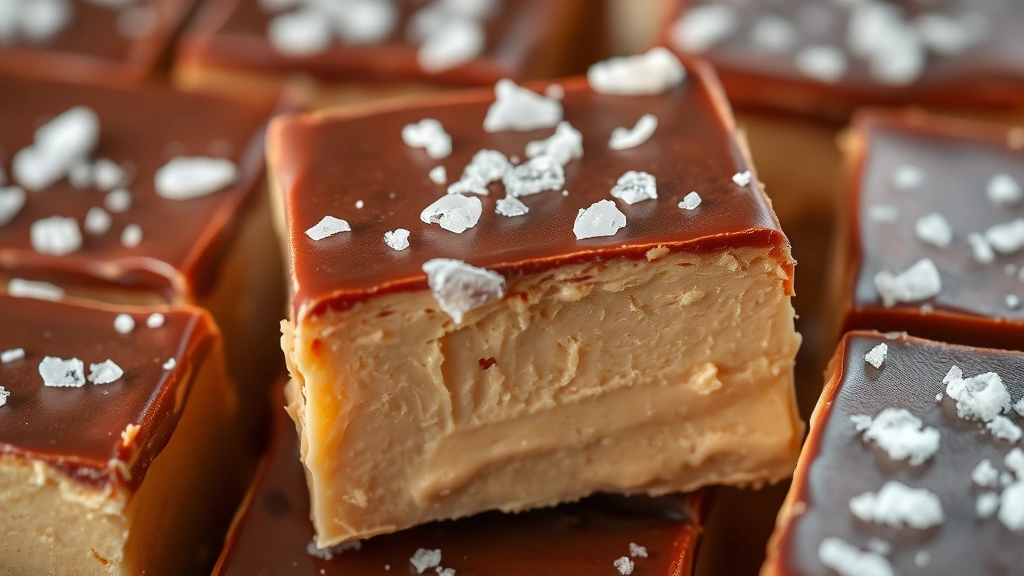
For a peppermint version, replace the vanilla extract with peppermint extract and sprinkle crushed candy canes on top before the fudge sets. For a salted caramel version, drizzle the fudge with caramel sauce before refrigerating.
The parchment paper lining makes removal incredibly easy and prevents the fudge from sticking to the pan. Don’t skip this step, as it makes cutting and serving so much simpler.
When cutting the fudge, a sharp knife and warm water help achieve clean cuts. Dip your knife in warm water and wipe it dry between each cut for the neatest appearance.
This fudge makes an excellent gift. Wrap pieces individually in wax paper or parchment paper and place them in a decorated box or jar for a homemade present that looks store-bought.
If the fudge seems too soft after chilling, refrigerate it longer. If it’s too hard and brittle, you may have refrigerated it too long or your kitchen is very cold. Room temperature storage for 10-15 minutes before serving will soften it slightly if needed.
You can double or triple this recipe using the same proportions. Simply multiply all ingredients and use a larger baking pan, adjusting chilling time as needed for thicker fudge.
For a shinier top, you can temper the fudge mixture before pouring, but this is optional. The fudge will taste equally delicious with or without this extra step.