
There’s nothing quite like homemade fudge, and this Easy Jet-Puffed Fudge Recipe proves that you don’t need fancy ingredients or complicated techniques to create something absolutely delicious. This classic recipe combines the fluffy goodness of Jet-Puffed marshmallows with rich chocolate, butter, and a touch of vanilla to create fudgy, melt-in-your-mouth squares that rival any bakery treat.
I absolutely love making this fudge during the holiday season—it’s perfect for gift-giving, holiday parties, or simply satisfying those chocolate cravings. The beauty of this recipe is its simplicity. You likely have most of these ingredients in your pantry right now, and the whole process takes less than thirty minutes from start to finish. The marshmallows add an incredible texture that makes this fudge uniquely fluffy and delightful, setting it apart from traditional fudge recipes.
What makes this Jet-Puffed fudge so special is how the marshmallows create pockets of sweetness throughout each bite. The combination of chocolate and marshmallow is timeless—think of your favorite s’mores or hot chocolate toppings—but in fudge form, it’s elevated to something truly special. This recipe has been a family favorite for years, and I’m thrilled to share it with you today.
Whether you’re a seasoned candy maker or someone who’s intimidated by homemade sweets, this recipe is foolproof. No candy thermometer required, no complicated techniques—just straightforward ingredients combined in a saucepan and set in the refrigerator. I’ve included helpful tips throughout to ensure your fudge turns out perfectly every single time. You’ll want to make decadent treats like this regularly once you see how easy it is!
This fudge also makes an excellent base for variations. Once you master the basic recipe, you can add nuts, swirls of peanut butter, or even a sprinkle of sea salt on top. I’ve included several variations in the notes section to inspire your creativity. The recipe yields about 36 pieces, which is perfect for sharing or storing in an airtight container for up to two weeks—though I guarantee they won’t last that long!
The key to perfect fudge is using quality ingredients and not skipping the cooling time. Room-temperature ingredients mix more smoothly, and a proper chill time ensures your fudge sets to the ideal consistency. For more indulgent treat inspiration, check out this creamy recipe guide for other decadent options.
I recommend using full-fat butter and good-quality chocolate for the best results. The marshmallows are the star here, so don’t substitute them with store-brand versions—Jet-Puffed really does make a difference in the final texture and flavor. Once you’ve made this recipe, you’ll understand why it’s been a beloved classic for generations. Your friends and family will be asking you for the recipe, and you’ll love telling them how simple it really is.
Ingredients
- 1 cup (2 sticks) unsalted butter
- 2/3 cup unsweetened cocoa powder
- 1/3 cup milk
- 4 cups powdered sugar
- 1 teaspoon vanilla extract
- 1/4 teaspoon salt
- 2 cups Jet-Puffed marshmallows, cut into small pieces
- 1/2 cup chopped nuts (optional)
- Powdered sugar for dusting (optional)
Instructions
- Line an 8×8 inch baking pan with parchment paper, leaving some overhang on the sides for easy removal later. This prevents sticking and makes cleanup incredibly easy.
- In a medium saucepan, melt the butter over medium heat, stirring occasionally until completely melted and foamy, about 2-3 minutes.
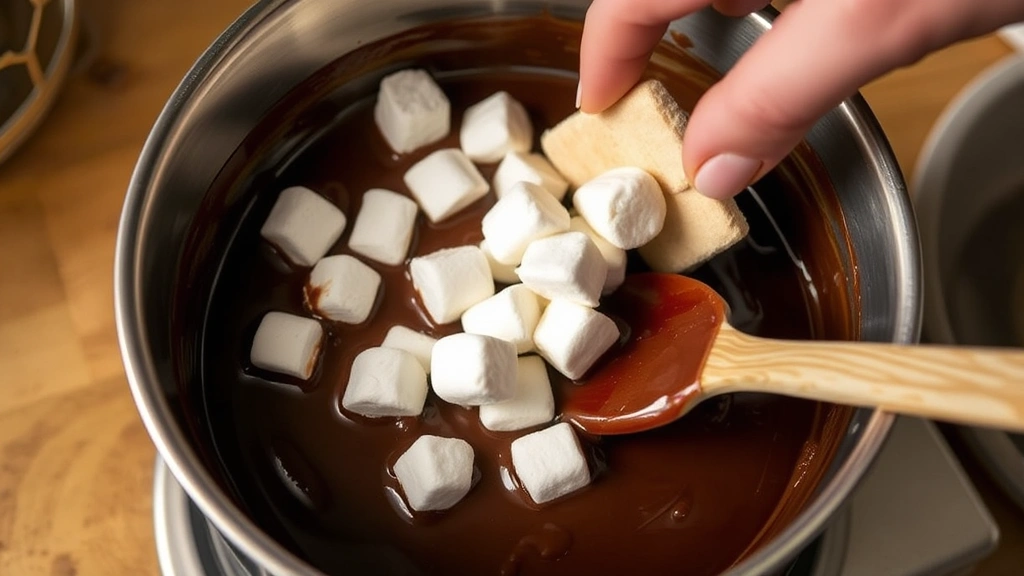
- Add the cocoa powder to the melted butter and whisk constantly for about 1 minute until well combined and smooth, creating a chocolate paste.
- Pour in the milk slowly while whisking continuously to avoid lumps. Continue whisking for another minute until the mixture is completely smooth.
- Remove the saucepan from heat and let the mixture cool for about 2 minutes before proceeding to the next step.
- Add the powdered sugar, vanilla extract, and salt to the chocolate mixture. Whisk vigorously for 2-3 minutes until everything is well combined and smooth, making sure there are no lumps of powdered sugar.
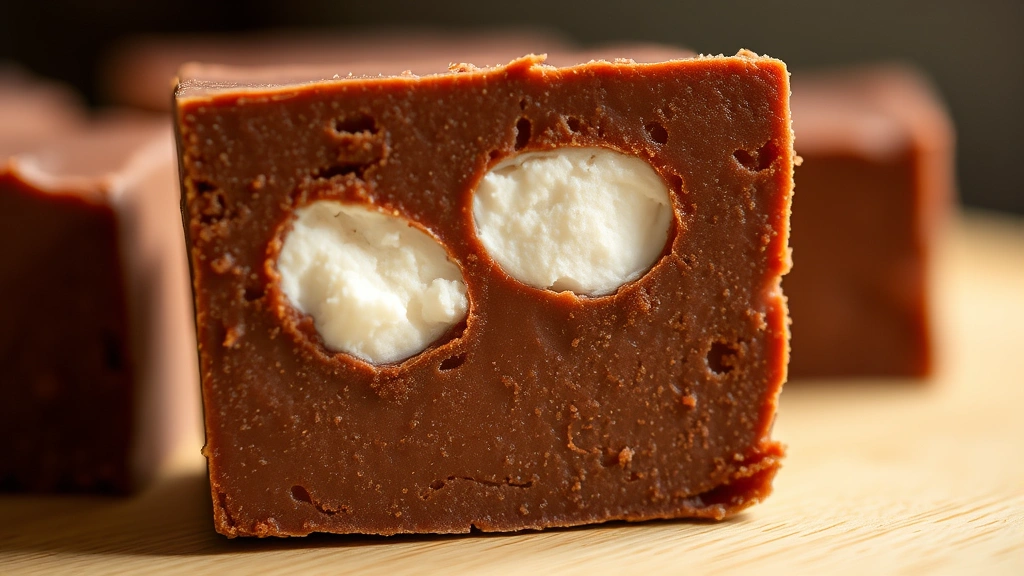
- Gently fold in the cut Jet-Puffed marshmallows using a rubber spatula, being careful not to overmix. The marshmallows should remain visible throughout the fudge rather than being completely mixed in.
- If using nuts, fold them in gently at this point, distributing them evenly throughout the mixture.
- Pour the fudge mixture into the prepared baking pan, spreading it evenly with a spatula. The mixture should be about 1 inch thick.
- Let the fudge sit at room temperature for 15 minutes to begin setting slightly.
- Transfer the baking pan to the refrigerator and chill for at least 4 hours, or preferably overnight, until the fudge is completely firm and set.
- Remove the fudge from the refrigerator and let it sit at room temperature for 5 minutes to soften slightly.
- Using the parchment paper overhang, carefully lift the fudge block out of the pan onto a cutting board.
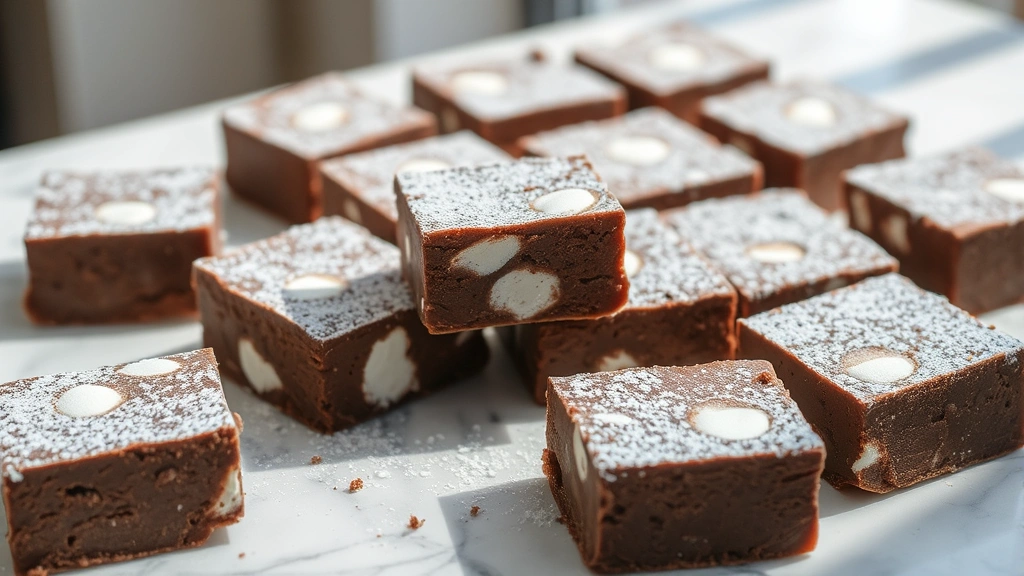
- Using a sharp knife dipped in hot water and wiped between cuts, cut the fudge into 36 equal squares (6 cuts one direction, 6 cuts the other direction).
- If desired, dust each piece lightly with additional powdered sugar for a professional appearance.
- Store the finished fudge in an airtight container in the refrigerator for up to two weeks, or at room temperature in a cool place for up to one week.
Pro Tips
Temperature Matters: Make sure all your ingredients are at room temperature before starting, especially the butter. This helps everything combine smoothly without creating lumps. If your fudge mixture seems too thick to pour, you can microwave it for 10-15 seconds to loosen it slightly.
Cutting Technique: The secret to neat fudge squares is a sharp knife and hot water. Dip your knife in hot water, wipe it clean on a towel, then make one cut. Repeat this process for each cut to prevent the mixture from sticking to the blade and tearing.
Storage Solutions: Keep your finished fudge in an airtight container separated by parchment paper to prevent sticking. Room temperature storage works in cool climates, but refrigeration is best in warm weather. Fudge can also be frozen for up to three months if you’d like to make it ahead.
Variation Ideas: Try adding 1/2 teaspoon of espresso powder to intensify the chocolate flavor. Swirl in 2-3 tablespoons of peanut butter before chilling for a peanut butter version. Sprinkle fleur de sel on top immediately after pouring for a sweet and salty twist. Add 1/2 teaspoon of peppermint extract for holiday fudge.
Troubleshooting: If your fudge is too soft after chilling, it likely didn’t cool long enough—return it to the refrigerator for another hour. If it’s too hard and crumbly, you may have overcooked the chocolate mixture—next time, remove it from heat a bit earlier. If you notice crystals forming, ensure you’re using powdered sugar and whisking thoroughly to dissolve it completely.
Marshmallow Magic: The marshmallows are what make this recipe special, so don’t skip them or substitute them. They create a unique texture that regular fudge doesn’t have. Cut them into small pieces (about pea-sized) for the best distribution throughout your fudge.
Gift-Giving: Package this fudge in decorative boxes lined with parchment paper for beautiful homemade gifts. Include a card with storage instructions so recipients know how to keep their fudge fresh and delicious.