
Clarified butter is one of those kitchen staples that seems intimidating but is absolutely foolproof once you understand the process. Unlike regular butter, clarified butter has had all the water and milk solids removed, leaving behind pure golden butterfat with a higher smoke point and longer shelf life. This makes it perfect for high-heat cooking, drizzling over creamy sauces, or using in pasta dishes.
I’ve been making clarified butter for years, and I’m excited to share my foolproof method that works every single time. The beauty of this recipe is that it requires just one ingredient—butter—and about 20 minutes of your time. Whether you’re preparing for a special dinner, making chicken alfredo, or simply want to elevate your everyday cooking, homemade clarified butter is the answer.
The process is simple: you gently melt butter over low heat, allow the milk solids to sink to the bottom, and carefully pour off the clear golden liquid. What you’re left with is liquid gold that will transform your cooking. I love keeping a jar of clarified butter in my fridge at all times—it’s useful for sautéing vegetables, making hollandaise sauce, or creating the perfect sear on a steak.
One of my favorite ways to use clarified butter is drizzling it over roasted pickled red onions and shishito peppers for a restaurant-quality side dish. The nutty, rich flavor of clarified butter really shines through in simple preparations.
Many people ask me about the difference between clarified butter and ghee. While they’re similar, ghee is clarified butter that’s been cooked a bit longer until those milk solids turn golden brown and give the butter a deeper, more complex flavor. For this recipe, we’re stopping before that point to keep the butter pure and neutral. However, if you prefer a more robust flavor, you can easily extend the cooking time to create ghee instead.
I’ve tested this method with everything from European butter to grass-fed varieties, and it works beautifully every time. The key is patience and low heat—rushing the process or using high heat can cause the milk solids to burn, which will affect the color and flavor of your finished clarified butter. This recipe yields approximately one cup of clarified butter from one pound of unsalted butter, though the exact amount can vary slightly depending on the brand and water content of your butter.
If you’re looking for a versatile ingredient that will upgrade your cooking game, clarified butter is it. From brown butter techniques to ghee variations, this simple ingredient opens up a world of culinary possibilities. I’m thrilled to share this essential technique with you today.
Ingredients
- 1 pound (4 sticks) unsalted butter, cut into cubes
Instructions
- Cut your unsalted butter into cubes and place them in a heavy-bottomed saucepan or small Dutch oven. Using a heavy-bottomed pan is important because it distributes heat evenly and prevents hot spots that could cause the butter to brown unevenly.
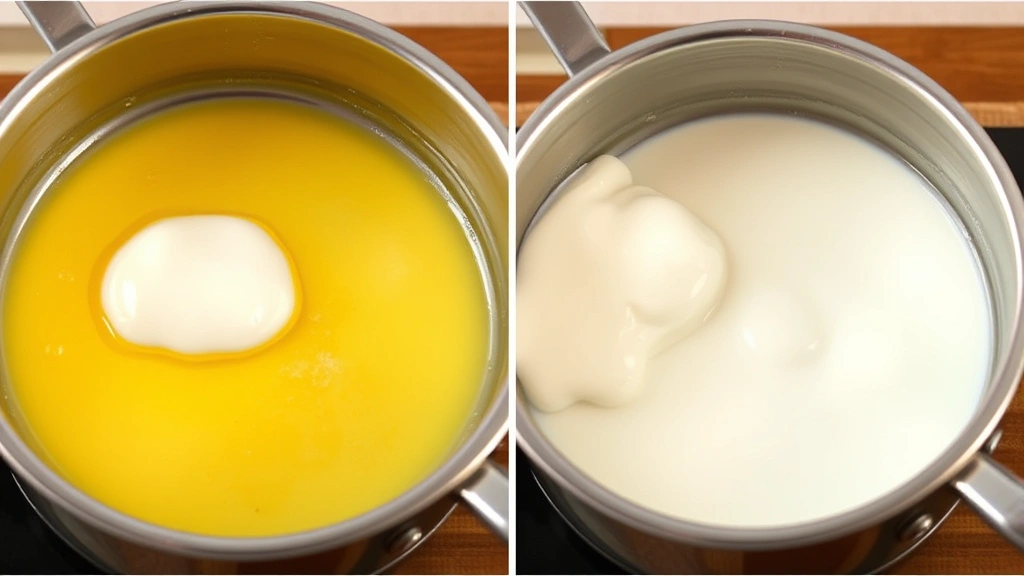
- Turn the heat to medium-low and allow the butter to melt slowly and gently. Do not stir or rush this process—we want the butter to melt at its own pace so the milk solids can separate properly.
- Once the butter is completely melted, you’ll notice it has three distinct layers: a layer of foam on top, clear golden liquid in the middle, and white milk solids settling at the bottom. This is exactly what we want to see.
- Let the butter simmer gently for about 10-15 minutes without stirring. You may see the foam on top continue to develop and shift slightly. Keep the heat low and steady—if the butter starts to brown or smell nutty, your heat is too high.
- After 10-15 minutes, the foam will have settled somewhat and the milk solids will have compacted at the bottom of the pan. Skim off any remaining foam from the top using a clean spoon or small ladle, discarding it.
- Carefully and slowly pour the clear golden liquid (the clarified butter) into a clean glass jar or container, leaving the white milk solids at the bottom of the pan. You can also use cheesecloth or a fine-mesh strainer lined with coffee filters for extra insurance against any particles making it through.
- Stop pouring when you reach the white solids at the bottom—do not pour those into your final product. It’s better to leave a little clarified butter behind than to include any of the milk solids.
- Allow your clarified butter to cool to room temperature before sealing the jar. As it cools, it will solidify into a pale yellow, spreadable consistency at room temperature, though it will remain liquid when warmed.
- Store your clarified butter in an airtight glass jar in the refrigerator for up to 3 months, or at room temperature in a cool, dark pantry for up to 2 weeks. Clarified butter has a much longer shelf life than regular butter because the milk solids (which spoil quickly) have been removed.

Pro Tips
- The exact yield of clarified butter depends on the brand of butter you use and its water content. European-style butter typically has higher fat content and will yield slightly more clarified butter than standard American butter.
- If you want to make ghee instead, simply continue cooking the clarified butter after the milk solids have sunk to the bottom for an additional 5-10 minutes until those solids turn golden brown and smell nutty. Strain carefully and store the same way.
- Don’t discard those milk solids! You can save them and use them in baking, cooking, or as a flavoring agent. Some people love adding them to vegetables or using them in brown butter recipes.
- For the clearest, most pristine clarified butter, you can strain it through cheesecloth or a fine-mesh strainer lined with coffee filters after pouring. This removes any tiny particles that might cloud the butter.
- Clarified butter has a smoke point of approximately 450°F (232°C), making it ideal for high-heat cooking, sautéing, and pan-frying. Regular butter only has a smoke point of around 350°F (177°C).
- You can make clarified butter in larger batches if you have multiple pounds of butter on hand. Simply scale up the recipe and allow extra time for the milk solids to settle.
- If your clarified butter appears cloudy or has white specks in it, you likely included some milk solids. Reheat gently and strain again through cheesecloth for a clearer result.
- Store clarified butter in glass containers rather than plastic, as the fat can absorb odors and flavors from plastic over time.
- Grass-fed or cultured butter will produce clarified butter with a slightly deeper color and richer flavor, which some people prefer for cooking and drizzling.