

Making homemade ice cream with a Cuisinart machine is easier than you might think, and the results are absolutely delicious! This simple recipe requires just a few quality ingredients and about 20 minutes of churning time. The beauty of using a Cuisinart ice cream maker is that it does most of the work for you, transforming a basic custard base into creamy, scoopable perfection.
I’ve been making ice cream at home for years, and I can honestly say that investing in a good ice cream machine was one of the best kitchen decisions I ever made. There’s something magical about watching the mixture go from liquid to soft-serve consistency right before your eyes. Plus, when you make ice cream yourself, you control exactly what goes into it—no mysterious additives or stabilizers you can’t pronounce.
This particular recipe is my go-to vanilla base that I’ve perfected over countless batches. It’s rich, creamy, and has that authentic homemade texture that store-bought versions just can’t replicate. The secret is in the quality of your ingredients and understanding how your specific Cuisinart model works. Every machine is a little different, so I’ll walk you through the process step-by-step.
The custard base is where all the magic happens. By tempering the eggs properly, you’ll create a silky foundation that freezes into the most luxurious ice cream. I always recommend making your base the day before you plan to churn it—this allows the flavors to meld together and the mixture to get perfectly cold, which helps achieve that ideal texture.
Whether you’re planning a summer dinner party or just want to treat yourself on a Tuesday night, this heavy cream pasta recipe base methodology applies beautifully to ice cream making. The cream is the star ingredient here, so don’t skimp on quality. Look for heavy cream with a high fat content for the richest results.
One of my favorite things about making ice cream at home is experimenting with flavors. Once you master this basic vanilla version, you can easily adapt it by adding extracts, liqueurs, or even incorporating mix-ins during the final minutes of churning. I like to think of this as your foundation recipe—the classic that everything else builds upon.
Making ice cream with your Cuisinart is also surprisingly economical. When you calculate the cost per serving compared to premium ice cream from the store, you’re saving money while also getting superior quality. Plus, there’s an undeniable satisfaction in serving homemade ice cream to guests and watching their faces light up when they taste it.
The texture you achieve depends on several factors: the fat content of your cream, how cold your base is when you start churning, and how long you let it churn. I always aim for that perfect soft-serve consistency, which usually takes about 20-25 minutes in my Cuisinart. From there, you can serve it immediately for soft-serve style, or transfer it to the freezer for a firmer scoop.
I recommend keeping detailed notes on your churning time and final texture, especially if you’re using a new machine. This helps you dial in the perfect results for your specific model. Some Cuisinart machines have different speeds or settings, so understanding your particular model will help you achieve consistent results every time.
This recipe also works beautifully as a base for creating mix-in variations. Think about folding in crushed cookies, fresh fruit compote, or even brownie chunks during the last few minutes of churning. The possibilities are truly endless once you understand the fundamentals.
One last tip: don’t forget to freeze your Cuisinart bowl for at least 8 hours before churning. This is non-negotiable for achieving proper freezing. I usually pop mine in the freezer the night before I plan to make ice cream. You can also keep it in your freezer permanently if you’re an ice cream enthusiast like me.
Now, let me share my tried-and-true method that delivers consistent, restaurant-quality results every single time.
Ingredients
- 2 cups heavy cream, cold
- 1 cup whole milk, cold
- 3/4 cup granulated sugar
- 1 tablespoon vanilla extract
- 5 large egg yolks, room temperature
- 1/4 teaspoon sea salt
- 1 teaspoon cornstarch (optional, for extra creaminess)
Instructions
- Pour the heavy cream and whole milk into a large mixing bowl and refrigerate while you prepare the custard base.
- In a separate medium saucepan, whisk together the egg yolks and sugar until the mixture becomes pale and thick, about 2-3 minutes of whisking.
- Place the saucepan over medium-low heat and continue whisking constantly while slowly adding the milk mixture to the egg yolks.
Stir continuously and do not let the mixture come to a boil.
- Once the mixture reaches 160°F on an instant-read thermometer (or until it coats the back of a spoon), remove it from heat immediately.
- Pour the hot custard through a fine-mesh strainer into a clean bowl to remove any cooked egg bits.
- Stir in the vanilla extract, sea salt, and cornstarch if using.
Mix until completely smooth and combined.
- Cover the custard with plastic wrap, pressing it directly onto the surface to prevent a skin from forming.
- Refrigerate the custard for at least 4 hours, preferably overnight, until it reaches 40°F or colder.
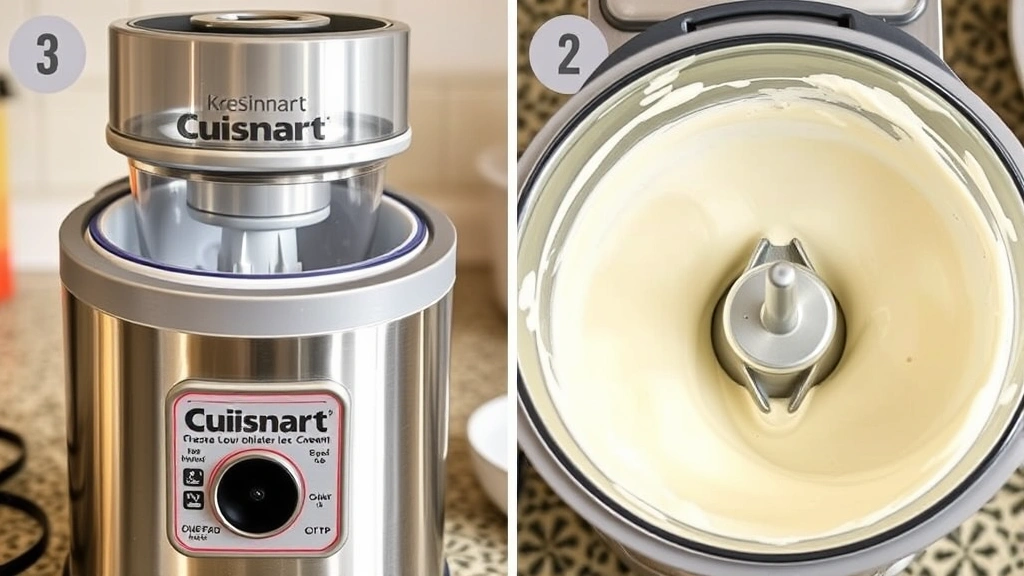
- Remove your Cuisinart ice cream maker bowl from the freezer and verify it’s completely frozen and ready to use.
- Pour the chilled custard mixture into your Cuisinart ice cream maker and turn it on according to your machine’s instructions.
- Let the machine churn for 20-25 minutes, watching as the mixture gradually thickens and transforms from liquid to soft-serve consistency.
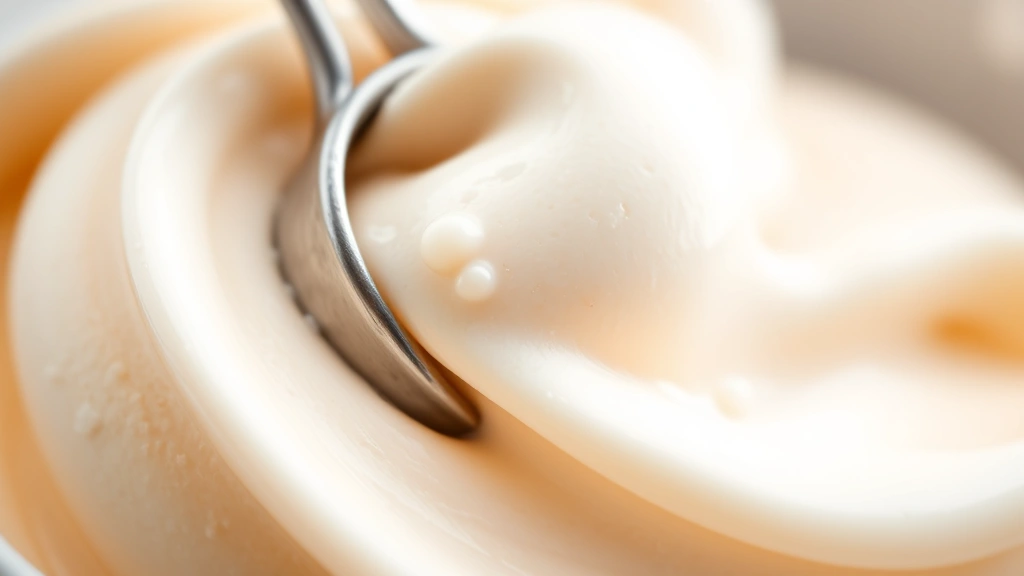
- The ice cream is ready when it reaches a soft-serve texture and pulls away slightly from the sides of the bowl.
- For soft-serve style ice cream, serve immediately directly from the machine.
- For firmer ice cream, transfer the churned mixture to a freezer-safe container and freeze for at least 4 hours until firm enough to scoop.
Pro Tips
- Egg Safety: Make sure to bring your eggs to 160°F to ensure they’re pasteurized and safe to eat. Use an instant-read thermometer for accuracy, and don’t skip this step.
- Cuisinart Model Variations: Different Cuisinart ice cream maker models may have slightly different churning times. Check your specific machine’s manual for guidance, but generally 20-25 minutes is the sweet spot.
- Make-Ahead Instructions: The custard base can be made up to 2 days in advance. Keep it covered in the refrigerator until you’re ready to churn. This actually improves the flavor as the ingredients meld together.
- Freezer Bowl Prep: Your Cuisinart freezer bowl must be completely frozen before use. Set a reminder to freeze it at least 8 hours in advance. I keep mine in my freezer permanently for spontaneous ice cream making.
- Texture Tips: If your ice cream comes out too soft, your custard base wasn’t cold enough or your machine’s bowl wasn’t frozen solid enough. If it’s too hard and icy, you may have overchurned it or added too much sugar.
- Flavor Variations: Once you master this base, try adding almond extract, maple syrup, or espresso powder. You can also create a rich cream sauce technique by caramelizing sugar separately and folding it in before churning.
- Storage: Homemade ice cream is best enjoyed within 2 weeks. Store it in an airtight freezer-safe container with plastic wrap pressed against the surface to prevent ice crystals from forming.
- Mix-Ins: Add cookies, candy, or fruit during the last 2-3 minutes of churning. Don’t add them too early or they’ll break apart excessively from the paddle.
- Dairy Substitutes: While this recipe is designed for traditional dairy, some people have success substituting Greek yogurt for half the milk for extra richness and tang.
- Serving Temperature: Remove ice cream from the freezer 5 minutes before serving for the easiest scooping and best flavor release. Ice cream is actually more flavorful at temperatures slightly warmer than frozen solid.