

This gluten-free chicken recipe is an absolute game-changer for weeknight dinners! Whether you’re cooking for someone with celiac disease, following a gluten-free lifestyle, or simply looking to cut back on gluten, this super easy chicken dish delivers restaurant-quality results in under thirty minutes. The beauty of this recipe lies in its simplicity and versatility—it comes together quickly with minimal fuss, yet tastes incredibly impressive.
I’ve been making gluten-free versions of my favorite recipes for years now, and this chicken has become a staple in my kitchen rotation. What I love most is that it doesn’t feel like a compromise at all. The chicken comes out incredibly tender and flavorful, with a gorgeous golden exterior that rivals any traditional version. The secret is using quality gluten-free flour alternatives and not being afraid to season generously.
This recipe works beautifully on its own, served with a simple salad or roasted vegetables. However, if you’re looking to dress it up, you could pair it with Quick Tasty Bacon Carbonara Recipe or Best Heavy Cream Alfredo Sauce Recipe for a more indulgent meal.
What makes this gluten-free chicken recipe truly special is how adaptable it is. You can customize it based on what you have on hand and your dietary preferences. I often add Perfect Pickled Red Onions Recipe on top for a bright, acidic contrast, or serve it alongside Best Shishito Peppers Recipe for extra flavor and color.
For more inspiration on gluten-free cooking techniques, check out Serious Eats or New York Times Cooking. Bon Appétit also has wonderful gluten-free chicken recipes that can inspire variations on this classic dish.
The prep work is minimal—just pound out your chicken breasts to an even thickness, set up your breading station, and you’re ready to go. This recipe yields perfectly moist chicken every single time, and it’s forgiving enough that even if you’re new to gluten-free cooking, you’ll have amazing results. It’s the kind of recipe that becomes a weeknight staple in your household.
Ingredients
- 4 boneless, skinless chicken breasts (about 6-8 oz each)
- 1 cup gluten-free all-purpose flour blend
- 1 teaspoon garlic powder
- 1 teaspoon onion powder
- 1 teaspoon paprika
- 1/2 teaspoon cayenne pepper (optional)
- 1 teaspoon kosher salt
- 1/2 teaspoon black pepper
- 2 large eggs
- 2 tablespoons water or milk
- 3 tablespoons olive oil or butter
- 2 tablespoons fresh lemon juice
- 2 cloves garlic, minced
- Fresh parsley for garnish (optional)
- Lemon wedges for serving
Instructions
- Pat the chicken breasts dry with paper towels. This step is crucial for achieving a crispy exterior and helps the gluten-free breading adhere properly.
- Place each chicken breast between two pieces of plastic wrap or parchment paper. Using a meat mallet or the bottom of a heavy pan, gently pound the chicken to an even thickness of about 3/4 inch. This ensures even cooking throughout.
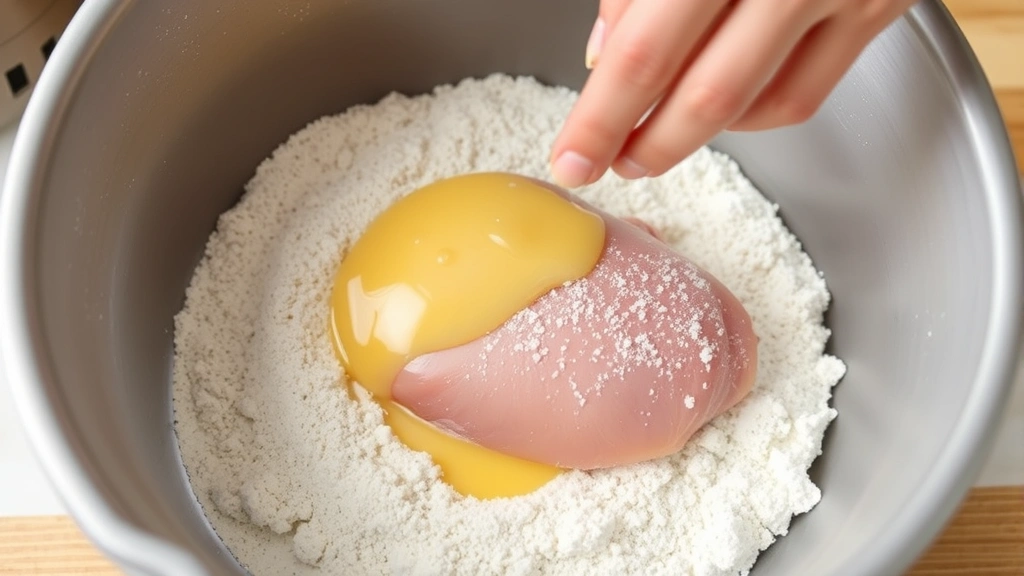
- In a shallow bowl, whisk together the gluten-free flour, garlic powder, onion powder, paprika, cayenne pepper if using, salt, and black pepper. Mix well to distribute the seasonings evenly.
- In another shallow bowl, whisk together the eggs and water or milk until well combined. This egg wash will help the gluten-free breading stick to the chicken.
- Set up your breading station with the seasoned flour on one side and the egg mixture on the other. Have a clean plate ready for the breaded chicken.
- Working with one chicken breast at a time, dip it into the egg mixture, coating both sides and letting excess drip off.
- Transfer the egg-coated chicken to the flour mixture and press gently, making sure to coat both sides thoroughly. The gluten-free flour blend will create a delicate crust.
- Place the breaded chicken on the clean plate and repeat with the remaining chicken breasts.
- Heat the olive oil or butter in a large skillet over medium-high heat. You want the pan to be hot but not smoking—this is key for achieving a golden crust without burning the gluten-free coating.
- Once the oil is shimmering, carefully add the breaded chicken breasts to the skillet. Be gentle to avoid disturbing the breading.
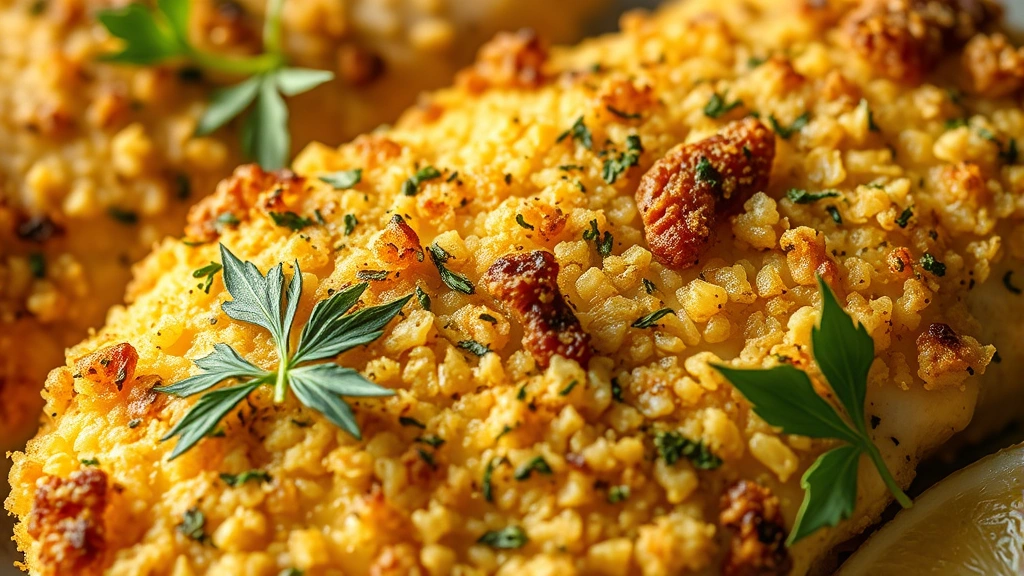
- Cook for 5-6 minutes on the first side without moving the chicken. This allows the gluten-free crust to set and turn golden brown.
- Flip the chicken breasts carefully and cook for another 5-6 minutes on the second side until the internal temperature reaches 165°F when measured with a meat thermometer at the thickest part.
- While the chicken finishes cooking, add the minced garlic to the skillet in the spaces between the chicken pieces. Let it cook for about 30 seconds until fragrant.
- Remove the skillet from heat and squeeze the fresh lemon juice over the chicken. The acidity will brighten the flavors beautifully.
- Transfer the chicken to a serving platter and garnish with fresh parsley if desired. Serve immediately with lemon wedges on the side.
Pro Tips
o For the gluten-free flour blend, I recommend using a high-quality brand like Bob’s Red Mill or King Arthur. These blends are formulated to mimic regular flour’s binding properties and create a superior crust.
o If you don’t have a gluten-free flour blend, you can substitute with a combination of rice flour, tapioca starch, and cornstarch in equal parts. This combination creates an exceptionally crispy coating.
o Make sure your chicken breasts are pounded to an even thickness. Thin spots will cook too quickly and become dry, while thick spots won’t cook through properly.
o Don’t skip the resting step after breading. Letting the breaded chicken sit for 5-10 minutes in the refrigerator before cooking helps the coating adhere better and creates a crispier crust.
o For extra flavor, add grated Parmesan cheese to your flour mixture. This adds a savory depth that elevates the entire dish.
o This recipe pairs beautifully with roasted vegetables like asparagus, green beans, or Brussels sprouts. You can roast them simultaneously in a 425°F oven for about 20 minutes.
o Leftover chicken makes an excellent addition to salads, grain bowls, or can be shredded for tacos. Simply slice or shred after cooking and store in an airtight container.
o For a dairy-free version, use olive oil instead of butter and substitute any dairy-based additions with their plant-based equivalents.
o The internal temperature is the most important indicator of doneness. Use a meat thermometer to ensure food safety, especially with chicken.
o If your coating seems to be browning too quickly before the chicken is cooked through, reduce the heat to medium and cover the skillet loosely with foil to slow the browning process while the chicken finishes cooking.