
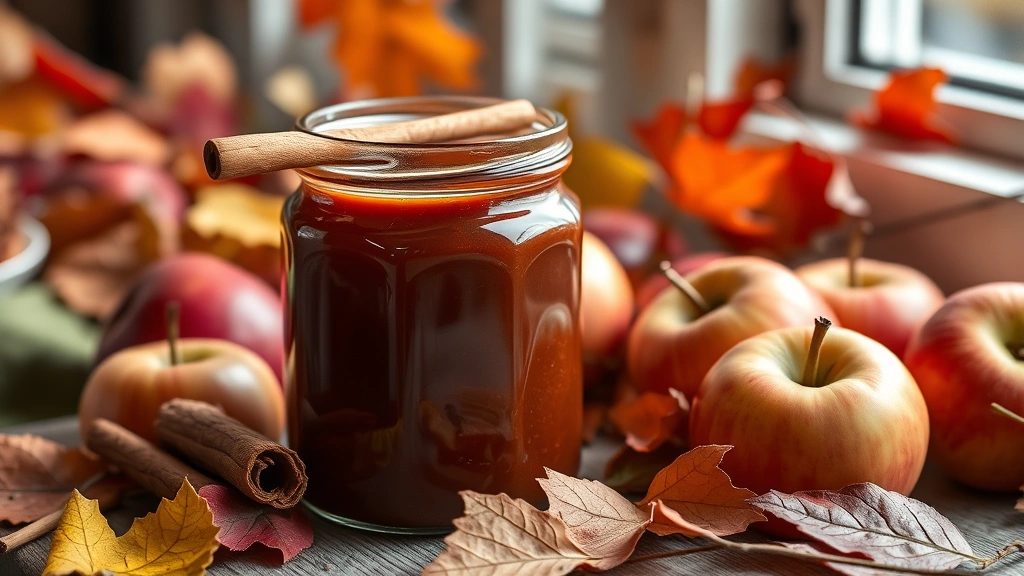
There’s something absolutely magical about making apple butter at home, especially when you’re canning it for later! This classic preserve is the perfect way to capture the essence of fall in a jar. With its rich, deep flavor and silky smooth texture, homemade apple butter is far superior to anything you’ll find on store shelves. It’s wonderful spread on toast, swirled into yogurt, or used as a filling for pastries and cakes.
Making apple butter is actually quite simple, though it does require patience as the apples slowly cook down into that gorgeous caramelized spread. The key is using the right combination of apples—I recommend a mix of tart and sweet varieties like Granny Smith and Honeycrisp to achieve the perfect balance of flavor. Once you master this basic technique, you’ll find yourself making batch after batch!
The beauty of this recipe is that it’s incredibly forgiving. You can adjust the spices to your preference, add a splash of bourbon or apple cider vinegar for complexity, or keep it simple and pure. This straightforward approach to preserving means you’ll have delicious apple butter ready to gift to friends and family all year long.
If you’re new to canning, don’t worry! This recipe is perfect for beginners. The high sugar content and acidity of apples make apple butter one of the safest preserves to can at home. You’ll find detailed canning instructions below, but I always recommend consulting the Serious Eats canning guide for additional safety information.
Once you’ve mastered apple butter, you might want to explore other preserved recipes like pickled vegetables or jams. The skills you learn here will serve you well in your preserving journey. Homemade apple butter also makes an excellent base for glazes and sauces—try brushing it on roasted ham or mixing it into barbecue sauce for incredible depth of flavor.
The aroma of apple butter cooking on the stove is absolutely heavenly. Your kitchen will smell like a cozy autumn day, and the transformation of whole apples into silky butter is genuinely satisfying. Plus, there’s the added benefit of knowing exactly what goes into your preserve—no mysterious additives or preservatives, just pure apple goodness.
Whether you’re a seasoned canner or picking up a jar lifter for the first time, this recipe will guide you through every step. From selecting your apples to processing your jars, I’ve included all the tips and tricks I’ve learned over years of making this beloved preserve. So grab your apples, dust off your canning equipment, and let’s make some delicious apple butter together!
Ingredients
- 5 pounds fresh apples (a mix of Granny Smith, Honeycrisp, and Gala varieties)
- 1 cup apple cider or apple juice
- 2 cups granulated sugar
- 1 tablespoon ground cinnamon
- 1/2 teaspoon ground cloves
- 1/4 teaspoon ground nutmeg
- 1/4 teaspoon ground allspice
- 1/4 teaspoon sea salt
- 2 tablespoons apple cider vinegar
- 1 tablespoon vanilla extract (optional but recommended)
- Water for canning process
Instructions
- Wash your apples thoroughly under cool running water and pat dry with a clean kitchen towel.
- Using a sharp knife or apple corer, remove the stems and blossom ends from each apple. Cut apples into quarters, leaving the skin and seeds intact as these contain pectin that will help your butter set.
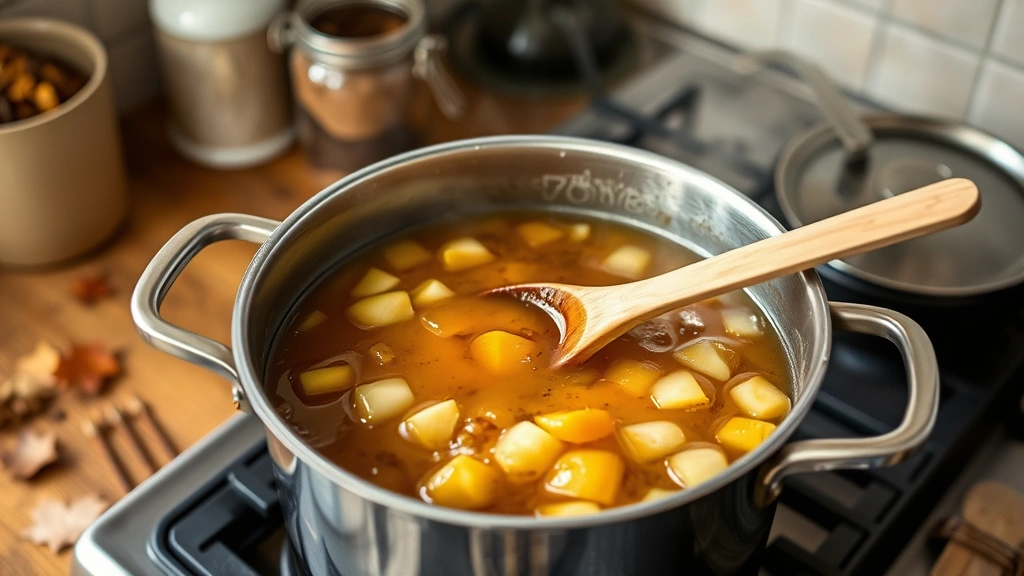
- Place the apple quarters into a large, heavy-bottomed pot or Dutch oven and pour in the apple cider. You don’t need to peel or core the apples—the skins add beautiful color and the whole fruit will be strained later.
- Bring the mixture to a boil over medium-high heat, stirring occasionally. Once boiling, reduce heat to medium-low and simmer for about 20-25 minutes, until the apples are very soft and easily fall apart when pressed with a wooden spoon.
- Working in batches, carefully transfer the cooked apples and liquid to a fine-mesh strainer set over a large bowl. Push the apples through using the back of a wooden spoon, extracting as much of the smooth pulp as possible. Discard the skins and seeds remaining in the strainer.
- Measure your apple pulp—you should have approximately 6-7 cups. Return this to your cleaned pot.
- Add the sugar, cinnamon, cloves, nutmeg, allspice, and sea salt to the apple pulp. Stir well to combine, making sure the sugar is fully incorporated.
- Bring the mixture to a gentle boil over medium heat, stirring frequently to prevent sticking and scorching on the bottom. This is important—apple butter can burn easily once it starts to thicken.
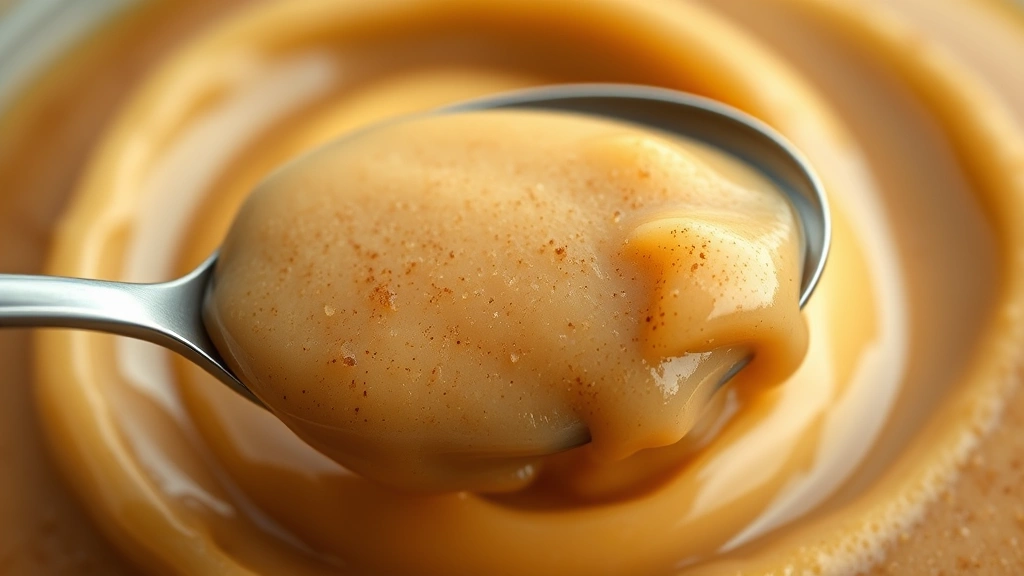
- Reduce heat to medium-low and continue cooking, stirring frequently (every 5-10 minutes), for about 1.5 to 2 hours. The mixture should gradually darken from a light tan to a deep mahogany color.
- To test for doneness, place a small spoonful of apple butter on a cold plate. If it holds its shape and doesn’t run when you push it with your finger, it’s ready. Alternatively, use a candy or instant-read thermometer—apple butter is done when it reaches 220°F (104°C).
- Stir in the apple cider vinegar and vanilla extract about 10 minutes before the end of cooking. Taste and adjust spices as desired.
- While your apple butter finishes cooking, prepare your canning equipment. Wash half-pint jars, lids, and bands in hot soapy water or run them through the dishwasher.
- Bring a large pot of water to a boil and keep jars, lids, and bands submerged to sterilize them (at least 10 minutes of boiling).
- Remove jars from the hot water one at a time using jar tongs, allowing them to drain. Place on a clean, dry kitchen towel.
- Carefully ladle the hot apple butter into the prepared jars, leaving 1/4 inch headspace at the top. Use a damp cloth to wipe the rim of each jar to remove any spilled apple butter.
- Place a sterilized lid on top of each jar and screw the band on until just finger-tight—don’t over-tighten as the jar needs to allow steam to escape during processing.
- Using jar tongs, carefully place the filled jars into a boiling water bath canner (the water should cover jars by at least 1 inch). If you don’t have a canning pot, you can use a large stockpot with a rack on the bottom.
- Once all jars are in the water bath and the water returns to a rolling boil, set a timer for 10 minutes (this is the standard processing time for apple butter at sea level).
- After 10 minutes of processing, carefully remove jars from the water bath using jar tongs and place on a clean kitchen towel, leaving at least 1 inch of space between each jar.
- Allow jars to cool completely at room temperature, undisturbed, for at least 12 hours. You should hear a satisfying ‘ping’ sound as each jar seals.
- Once cooled, check the seals by pressing down on the center of each lid—it should not flex or pop back. Any jars that didn’t seal can be refrigerated and used within 3 weeks.
- Store sealed jars in a cool, dark place for up to one year. Once opened, store in the refrigerator and use within 3-4 weeks.
Pro Tips
- **Choosing Your Apples**: The variety of apples you use dramatically affects the final flavor. Granny Smith apples provide tartness, Honeycrisp adds sweetness and complexity, and Gala brings a mild flavor that balances the blend. Avoid using only one variety—the mix is what creates that exceptional depth of flavor.
- **Spice Adjustments**: These spice measurements are a starting point. If you prefer a more pronounced cinnamon flavor, add an extra 1/2 teaspoon. Love clove? Bump it up to 3/4 teaspoon. Remember that spice flavors intensify as the butter cools, so taste as you go.
- **Preventing Scorching**: Apple butter scorches easily, especially near the end of cooking when it’s thick. Stir frequently and reduce heat if you notice the bottom browning too quickly. A heat diffuser under your pot can help distribute heat more evenly.
- **Yield Variations**: The exact yield depends on how much moisture your apples contained and how long you cook the butter. Don’t worry if you end up with slightly more or fewer jars—just make sure all jars are filled and processed the same way.
- **Altitude Adjustments**: If you live above 1,000 feet elevation, you may need to adjust your water bath processing time. Check the New York Times cooking guide for altitude-specific instructions.
- **Make It Your Own**: Add a tablespoon of bourbon, rum, or brandy to your finished butter for a sophisticated twist. Some people love adding a pinch of cayenne pepper for subtle heat, or a splash of maple syrup for extra richness.
- **Storage Tips**: While sealed jars keep for up to one year in the pantry, the flavor actually improves after a few weeks as the spices meld. Make your butter in the fall and enjoy it through the following summer.
- **Gift-Giving Ideas**: Homemade apple butter makes an exceptional gift. Tie a pretty ribbon around the jar, create custom labels, and include serving suggestions like pairing with cheese or swirling into oatmeal.
- **Equipment Notes**: A slow cooker can be used for the initial cooking phase—place apples and cider in a slow cooker on low for 6-8 hours, then proceed with straining and the stovetop cooking. An immersion blender ensures a perfectly smooth texture if your apple butter isn’t as velvety as you’d like.
- **Troubleshooting**: If your apple butter is too thin after processing, simply reheat and cook longer until it reaches the proper consistency. If it’s too thick, stir in small amounts of apple juice. If jars didn’t seal, refrigerate and use within 3 weeks or reprocess with new lids.
Pingback: How to make the BEST Chopped Italian Sandwich Recipe! – Simple Recipe Finder