
There’s nothing quite like a warm slice of apple crisp pie fresh from the oven—it’s the perfect dessert that combines the comfort of a classic pie with the irresistible crunch of a crisp topping. This apple crisp pie recipe is incredibly simple to make, yet it delivers restaurant-quality results that will have everyone asking for seconds. The beauty of this dessert lies in its versatility and ease; you don’t need fancy techniques or hard-to-find ingredients to create something truly spectacular.
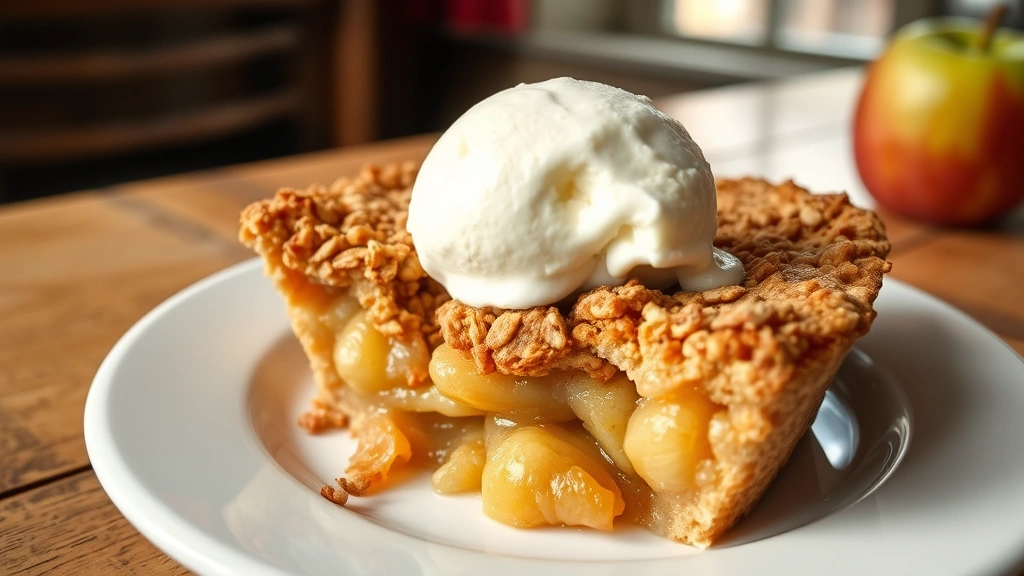
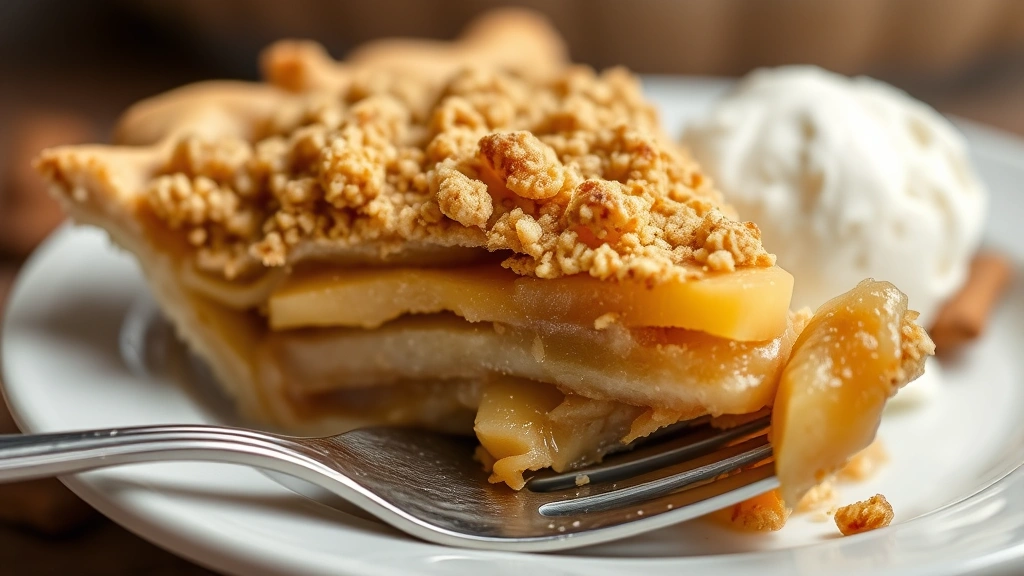
What makes this apple crisp pie so special is the combination of tender, spiced apples nestled in a buttery pie crust, all topped with a golden, crunchy oat and brown sugar mixture. Unlike traditional apple pie that requires a top crust, this version simplifies the process while delivering even more flavor and texture. The crisp topping gets wonderfully caramelized in the oven, creating those addictive little pockets of sweetness and crunch that make every bite memorable.
I’ve been making this recipe for years, and it never fails to impress. Whether you’re preparing dessert for a family gathering, a dinner party, or simply treating yourself on a cozy afternoon, this apple crisp pie is your answer. The best part? The preparation is straightforward enough that even beginner bakers can achieve beautiful results. With just a handful of simple ingredients and about an hour of your time, you’ll have a showstopping dessert that tastes like you spent all day in the kitchen.
The secret to the best apple crisp pie is using a combination of tart and sweet apples—this creates complex flavor layers that keep people coming back for more. Granny Smith apples provide tartness, while Honeycrisp or Gala apples add natural sweetness. The warm spices—cinnamon, nutmeg, and a hint of vanilla—complement the apples perfectly without overpowering them. When you combine these elements with a buttery crust and that irresistible crispy topping, you’ve got pure dessert magic on your hands.
This recipe is perfect for meal planning because you can prepare it ahead of time. The assembled but unbaked pie can be refrigerated for up to 24 hours before baking, or even frozen for longer storage. Simply add a few extra minutes to the bake time if baking from frozen. Serve your apple crisp pie warm with a scoop of vanilla ice cream or a dollop of whipped cream for the ultimate indulgence. You might also want to check out this best heavy cream alfredo sauce recipe for a different type of comfort food, or explore this delicious heavy cream pasta recipe for more kitchen inspiration.
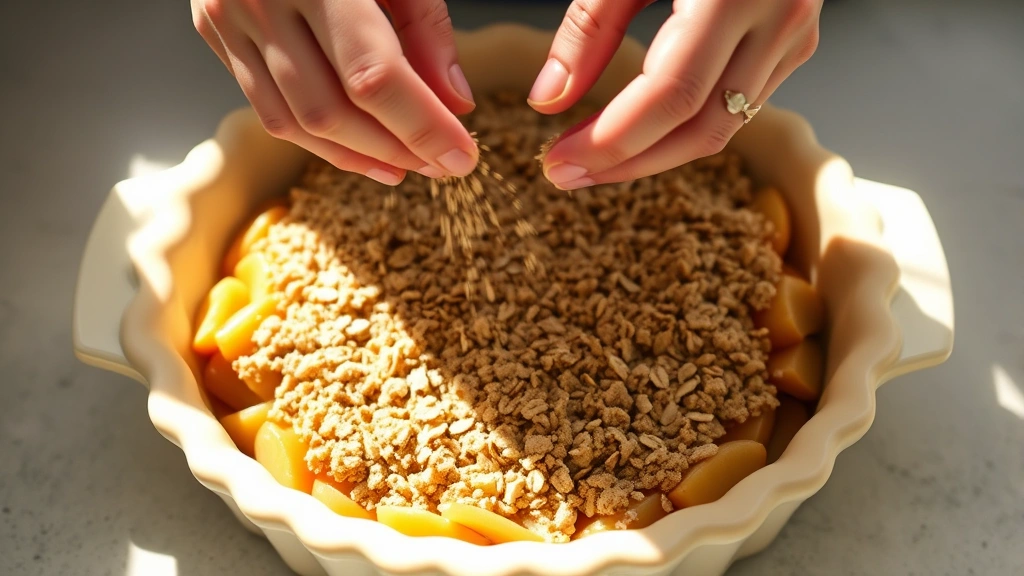
The technique for layering the apples is important—you want them arranged evenly in the crust so they bake uniformly and create that gorgeous, bubbling filling. Toss the apples with the sugar and spices gently to ensure even coating without bruising the fruit. The crisp topping should be distributed evenly across the entire surface; this ensures that every slice has that coveted golden, crunchy element. For additional serving inspiration, consider this easy chicken alfredo recipe as a dinner option before dessert.
Baking this pie fills your home with the most incredible aroma—warm cinnamon, caramelizing apples, and buttery topping create an olfactory experience that’s almost as good as eating the pie itself. Your family will gather in the kitchen just from the smell alone! The edges of the crisp topping will turn deep golden brown while the apples bubble around the sides, indicating that everything is cooked perfectly.
One of the reasons this apple crisp pie is so beloved is its forgiving nature. If your apples are slightly softer or firmer than expected, they’ll still bake beautifully. If your crisp topping isn’t perfectly even, it’ll still taste amazing. This is the kind of recipe that encourages you to bake confidently, knowing that delicious results are practically guaranteed.
Perfect for fall gatherings or anytime you crave comfort in dessert form, this apple crisp pie recipe will become a staple in your kitchen. Make it for potlucks, family dinners, or quiet weeknights when you want something special. The combination of familiar flavors and simple preparation makes it approachable for cooks of all skill levels, while the impressive presentation and incredible taste make it feel like a special occasion dessert. For more simple yet impressive recipes, explore this best pickled red onion recipe for a tangy side dish.
When you pull this golden, bubbling pie from the oven and let it cool just long enough to serve, you’ll understand why apple crisp pie has remained a beloved classic for generations. It’s uncomplicated, it’s delicious, and it’s the kind of dessert that brings people together. Whether you’re a seasoned baker or someone who rarely ventures into the kitchen, this recipe proves that the best desserts don’t need to be complicated—they just need quality ingredients, a little care, and maybe a scoop of vanilla ice cream on top.
Ingredients
- 1 unbaked 9-inch pie crust (store-bought or homemade)
- 6 cups sliced apples (about 6-8 medium apples, mix of Granny Smith and Honeycrisp)
- 1/2 cup granulated sugar
- 1/4 cup brown sugar, packed
- 2 tablespoons all-purpose flour
- 1 teaspoon ground cinnamon
- 1/4 teaspoon ground nutmeg
- 1/4 teaspoon salt
- 1 teaspoon vanilla extract
- 2 tablespoons fresh lemon juice
- 1 cup old-fashioned rolled oats
- 1/2 cup all-purpose flour
- 1/2 cup brown sugar, packed
- 1/4 cup granulated sugar
- 6 tablespoons cold butter, cut into small cubes
- 1/4 teaspoon salt
- 1/2 teaspoon ground cinnamon
Instructions
- Preheat your oven to 375°F (190°C). Place the unbaked pie crust in a 9-inch pie dish and set aside.
- In a large bowl, combine the sliced apples with 1/2 cup granulated sugar, 1/4 cup brown sugar, 2 tablespoons flour, 1 teaspoon cinnamon, 1/4 teaspoon nutmeg, and 1/4 teaspoon salt.
- Add the vanilla extract and lemon juice to the apple mixture and gently toss until all the apples are evenly coated.
- Pour the apple mixture into the prepared pie crust, mounding slightly in the center. Arrange the apples as evenly as possible.
- In a separate bowl, combine 1 cup rolled oats, 1/2 cup flour, 1/2 cup brown sugar, 1/4 cup granulated sugar, 1/4 teaspoon salt, and 1/2 teaspoon cinnamon.
- Add the cold butter cubes to the oat mixture and use a pastry cutter, two knives, or your fingertips to work the butter into the dry ingredients until the mixture resembles coarse breadcrumbs with some pea-sized pieces of butter remaining.
- Sprinkle the crisp topping evenly over the apple filling, pressing down gently so it holds together but doesn’t compress too much.
- Place the pie on a baking sheet (this catches any drips) and bake for 50 minutes to 1 hour, until the crisp topping is golden brown and the apple filling is bubbling around the edges.
- If the topping begins to brown too quickly, loosely tent the pie with aluminum foil for the remaining baking time.
- Remove the pie from the oven and allow it to cool for at least 15-20 minutes before slicing. This allows the filling to set slightly.
- Serve warm with vanilla ice cream or whipped cream if desired.
Pro Tips
The crisp topping can be made several hours ahead and stored in the refrigerator. Simply prepare the mixture and refrigerate until you’re ready to assemble and bake the pie. This is especially helpful if you’re planning ahead for entertaining.
For make-ahead convenience, assemble the entire pie up to 24 hours before baking. Cover it with plastic wrap and refrigerate, then bake as directed, adding just 5-10 minutes to the bake time since it will start cold.
If you prefer a less sweet dessert, reduce the sugar in both the apple filling and the crisp topping by a few tablespoons. The apples themselves provide natural sweetness, and you can adjust to your preference.
The pie can be frozen after baking. Allow it to cool completely, then wrap it tightly in plastic wrap and aluminum foil. Freeze for up to 3 months. Reheat gently in a 300°F oven for about 20-30 minutes until warmed through.
For extra crunch in the topping, add chopped pecans or walnuts (about 1/4 cup) to the oat mixture before adding the butter.
Don’t skip the lemon juice—it brightens the apple flavor and prevents the apples from browning while they’re prepared. It also balances the sweetness perfectly.
The pie will continue to bake slightly as it cools, so don’t overbake it. The topping should be golden brown, not dark brown, for the best texture.
Serving this pie warm versus at room temperature creates different experiences. Warm pie has a softer filling and crispier topping, while room temperature pie has firmer filling that slices more cleanly. Choose based on your preference.
Vanilla ice cream is the classic pairing, but whipped cream, Greek yogurt, or even a drizzle of caramel sauce work beautifully with this dessert.
Pingback: How to Make the Perfect Grilled Mahi Mahi Fish Recipe! – Simple Recipe Finder