
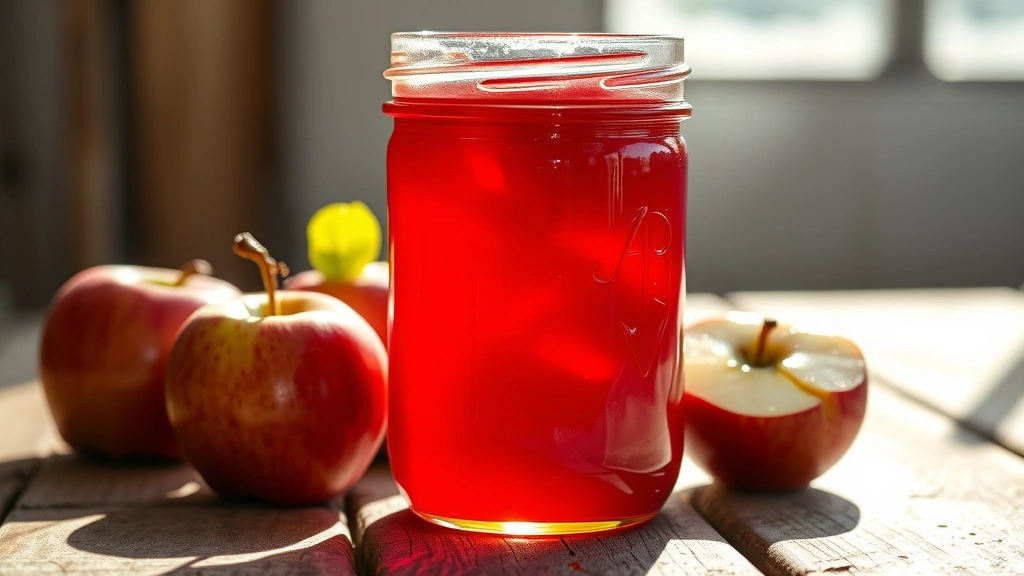
There’s nothing quite like homemade apple jelly—that perfect jewel-toned spread that captures the essence of crisp autumn apples in a jar. This simple apple jelly recipe proves you don’t need fancy equipment or complicated techniques to create restaurant-quality results at home. With just a few quality ingredients and a bit of patience, you’ll have gorgeous, glossy jelly that’s perfect for breakfast toast, pastry fillings, or gifting to friends and family.
I grew up watching my grandmother make jelly every fall, and I was always amazed at how she transformed humble apples into liquid gold. The secret, I learned, is using a combination of tart and sweet apples, which gives you the perfect balance of flavor and natural pectin for that ideal set. Unlike some recipes that require special ingredients or hours of monitoring, this method is straightforward and foolproof—even if you’ve never made jelly before.
The beauty of homemade jelly is that you control exactly what goes into it. No mysterious additives or excessive sugar (well, okay, there’s sugar, but that’s what makes jelly jelly!). This recipe uses a traditional approach that’s been perfected over generations, combining properly prepared apples with just the right amount of sugar and lemon juice to achieve that perfect consistency.
What makes this the BEST apple jelly recipe is the attention to detail in every step. We’re talking about selecting the right apples, extracting maximum flavor from the fruit, and understanding the science behind the jell. The result is jelly with clear, vibrant color, bright apple flavor, and that satisfying wobble that tells you it’s set perfectly. Whether you’re new to jam-making or a seasoned preserver, this recipe delivers exceptional results every single time.
Many people are intimidated by jelly-making, but I promise this process is simple enough for beginners yet satisfying enough for experienced cooks. You’ll need a large pot, a fine-mesh strainer or jelly bag, thermometer, and standard canning jars. The actual hands-on time is minimal—most of the work happens while you’re relaxing with a cup of coffee.
One of my favorite things about this recipe is its versatility. Make it with just apples for a classic version, or experiment with different apple varieties to create unique flavor profiles. Some people add a cinnamon stick or a few cloves for spiced apple jelly, while others prefer it pure and simple. Once you master this basic technique, you can play with flavors and create signature versions that become your trademark.
The most important thing to remember about jelly-making is that it’s equal parts science and art. The science comes from understanding pectin and how sugar, acid, and heat work together to create that perfect gel. The art comes from knowing when something is ready, tasting as you go, and making small adjustments based on your ingredients and preferences. This recipe gives you all the tools you need to succeed.
I’ve made this apple jelly recipe literally hundreds of times over the years, and I’ve refined it based on feedback from family, friends, and readers. The timing, temperatures, and techniques are all designed to give you the most reliable results. Even if something doesn’t go exactly to plan, I’ve included notes about adjustments you can make.
There’s something genuinely magical about opening a jar of homemade jelly in the middle of winter and tasting pure, concentrated apple flavor. It’s one of those simple pleasures that makes home cooking so rewarding. Whether you’re making this for yourself or as gifts, I absolutely guarantee you’ll be proud of your results. Let’s get started!
Ingredients
- 4 pounds mixed apples (use a combination of tart apples like Granny Smith and sweeter varieties like Gala or Honeycrisp)
- 3 cups water
- 3 cups granulated sugar
- 3 tablespoons fresh lemon juice
- ¼ teaspoon salt
- Optional: 1 cinnamon stick or 3-4 whole cloves for spiced variation
Instructions
- Wash the apples thoroughly under cool running water and pat dry with a clean kitchen towel. Roughly chop the apples into quarters, leaving the skin and core intact—these parts contain valuable pectin that will help your jelly set properly.
- Place the chopped apples in a large, heavy-bottomed stainless steel pot and add 3 cups of water. The water should just barely cover the apples.
- Bring the mixture to a boil over high heat, then reduce to medium-high heat and simmer for 20-25 minutes, stirring occasionally, until the apples are very soft and falling apart. The apples should break down significantly and release their juice.
- Remove the pot from heat and let the apple mixture cool for about 10 minutes, then carefully pour everything through a fine-mesh strainer lined with cheesecloth into a large bowl below, allowing the juice to drip through naturally. Do not press on the apples, as this will make your jelly cloudy.
- For the clearest jelly, let the liquid drip through undisturbed for at least 1-2 hours or even overnight. You should end up with about 4-5 cups of clear apple juice.
- Measure out 4 cups of the strained apple juice and return it to your cleaned pot (discard any excess or save for another use).
- Add the sugar and lemon juice to the apple juice and stir well to combine. Place the pot over medium-high heat and bring the mixture to a rolling boil.
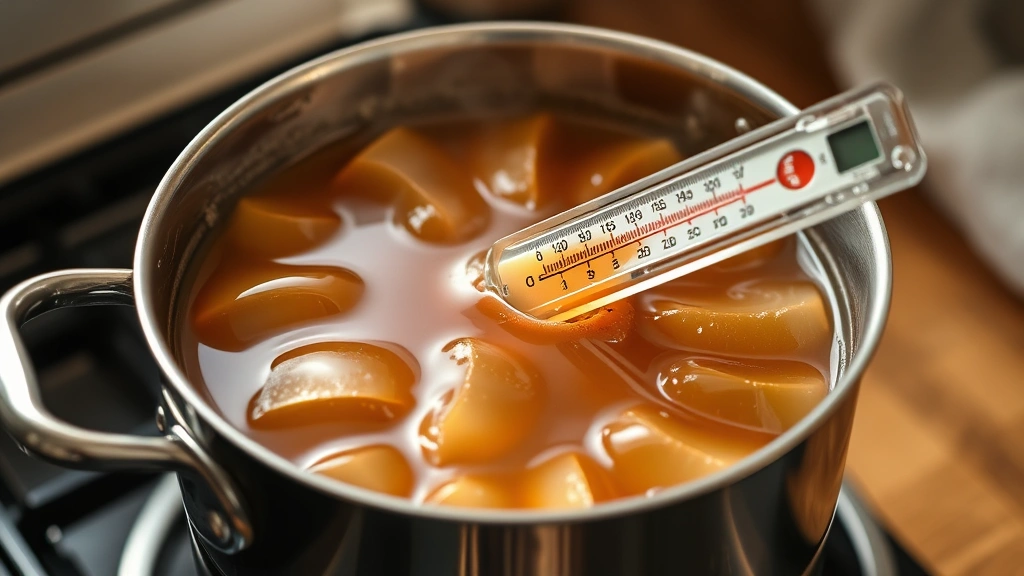
- Once at a rolling boil, insert a candy or jelly thermometer and continue cooking without stirring. The mixture should reach 220°F (104°C), which is the jelly stage. This usually takes 15-20 minutes of boiling.
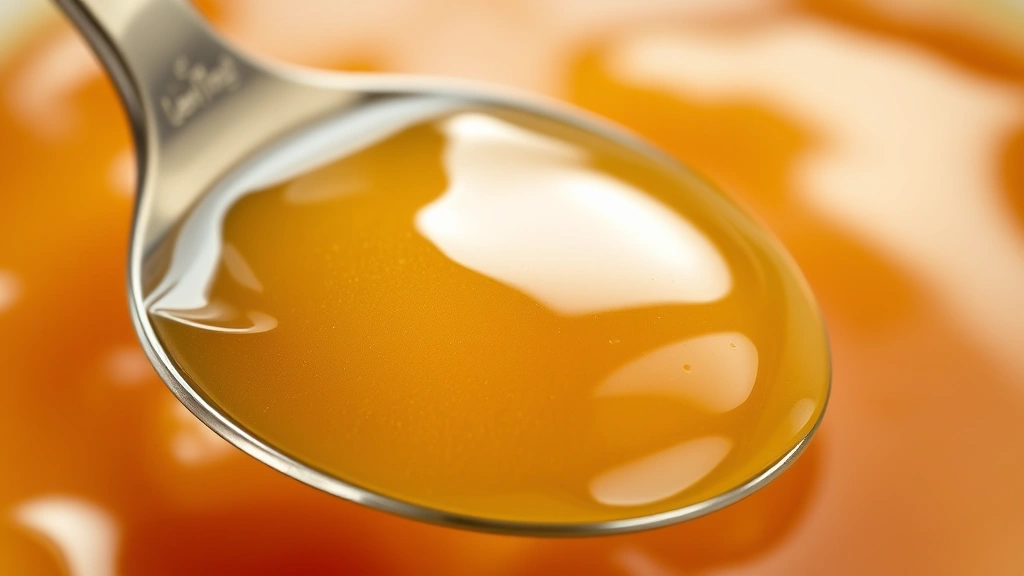
- To test for doneness without a thermometer, place a small plate in the freezer. When you think the jelly is ready, drop a small spoonful onto the cold plate, wait 1 minute, then push with your finger. It should wrinkle and not flow back together if it’s done.
- Remove the pot from heat and let it sit for 5 minutes. Skim off any foam from the surface with a clean spoon.
- While the jelly cools, sterilize your canning jars by running them through the hot cycle of your dishwasher or by boiling them in water for 10 minutes. Keep them hot.
- Carefully ladle the hot jelly into the sterilized jars, leaving ¼ inch headspace at the top. Wipe the rims clean with a damp cloth.
- Apply the flat lids and screw bands, tightening just until snug—do not over-tighten, as the jars need room to vent as they cool.
- If you want shelf-stable jars, process them in a boiling water bath for 10 minutes at sea level (adjust time based on your altitude). Remove and let cool completely on the counter—you should hear the lids pop as they seal.
- Alternatively, if you’re not water-bath canning, simply let the jars cool completely at room temperature. The jelly will continue to set as it cools, and the lids will seal on their own.
- Store sealed jars in a cool, dark place for up to one year. Once opened, store in the refrigerator and use within 3 weeks for best quality.
Pro Tips
- **Apple Selection Matters**: The combination of tart and sweet apples is crucial. Granny Smith apples provide pectin and acidity, while sweeter varieties add flavor and color. Avoid using only one type, as you need both the tart and sweet notes.
- **Natural Pectin**: Apple skins and cores are packed with natural pectin, which is why we don’t remove them before cooking. This eliminates the need for commercial pectin powders and ensures a proper set without any off-flavors.
- **Temperature is Critical**: A candy thermometer is your best friend here. The jelly must reach exactly 220°F to set properly. At lower temperatures, it won’t set; at higher temperatures, it can become rubbery.
- **Don’t Skip the Straining Step**: Patience in the straining stage is what gives you crystal-clear jelly. Pressing the apples will make the jelly cloudy, so resist the urge to squeeze out that last bit of juice.
- **Scaling the Recipe**: This recipe can be easily doubled or halved. Just remember to maintain the same ratios of juice to sugar (roughly 1:1 by volume) and always work with 4-5 cups of juice at a time for the most predictable results.
- **Flavor Variations**: Add a cinnamon stick during cooking for spiced apple jelly, or try a combination with other fruits. A small amount of vanilla extract added at the end creates a lovely depth of flavor.
- **Jelly vs. Jam**: Jelly is clear and smooth, made from strained juice only. If you prefer a chunkier spread with bits of fruit, you’re making jam, not jelly. Both are delicious!
- **Water Bath Canning**: If you’re new to canning, invest in a proper water-bath canner, a jar lifter, and a canning kit. They’re inexpensive and make the process much safer and easier.
- **Troubleshooting**: If your jelly doesn’t set, you can reheat it and add commercial pectin according to package directions, or simply enjoy it as a delicious apple syrup. If it sets too hard, it may have cooked too long—next time, remove it at 219°F.
- **Storage Tips**: Jelly lasts longest in a cool, dark place away from heat and direct sunlight. Even sealed jars will develop mold if stored in warm, humid conditions. A basement or pantry is ideal.
- **Gifting Ideas**: Homemade jelly makes a wonderful gift. Tie a pretty ribbon around the jar and include a label with the type of jelly and the date it was made. Recipients always appreciate the effort and care that goes into homemade preserves.