
There’s something absolutely magical about a perfectly baked brisket – it’s the kind of dish that fills your home with the most incredible aroma and brings everyone to the table with anticipation. This baked brisket recipe is my go-to for special occasions, family gatherings, and honestly, whenever I want to impress without spending all day in the kitchen. Unlike traditional smoked brisket that requires hours of tending, this oven method is surprisingly forgiving and delivers incredibly tender, flavorful results every single time.
Brisket is such an underrated cut of meat. It comes from the lower chest of the cow and has beautiful marbling throughout, which means when you cook it low and slow, all that fat renders down and keeps the meat incredibly moist and tender. The key to the best baked brisket is really threefold: proper seasoning, the right temperature, and patience. I always say that brisket rewards you for taking your time with it, and the results are absolutely worth the wait.
What I love most about this recipe is how foolproof it is. You season your brisket generously, sear it to develop that gorgeous crust, then nestle it into a bed of aromatics with a flavorful braising liquid. Pop it in the oven, and you can actually relax while it cooks. I like to serve mine with roasted vegetables on the side, or you could pair it with easy pickled red onions for a bright contrast. Some people love to shred it for sandwiches the next day, and honestly, the leftovers are just as delicious.
One thing that really sets this recipe apart is the combination of beef broth, Worcestershire sauce, and a touch of brown sugar. It creates this deeply savory, slightly sweet glaze that caramelizes beautifully on top of the brisket. I’ve experimented with so many variations over the years, and this is the one that consistently gets rave reviews. The vegetables underneath – onions, carrots, and celery – become incredibly tender and flavorful from cooking in all those pan drippings, so don’t skip them.
I also want to mention that while this recipe works beautifully year-round, it’s especially wonderful during the cooler months. There’s something so comforting about pulling a massive, steaming brisket out of the oven on a chilly evening. It’s the kind of meal that makes your house feel like a home. For more inspiration on delicious comfort food, check out this best heavy cream alfredo sauce recipe for your next dinner party.
Now, let me share my foolproof method with you. I’ve made this brisket probably over a hundred times, and I’ve refined every single step to make sure you get restaurant-quality results in your own kitchen. Whether you’re a seasoned home cook or someone who’s intimidated by cooking such a large cut of meat, I promise this recipe will become one of your favorites.
Ingredients
- 1 whole beef brisket, 4-5 pounds (flat and point cuts)
- 3 tablespoons kosher salt
- 2 tablespoons freshly ground black pepper
- 2 tablespoons garlic powder
- 1 tablespoon onion powder
- 1 tablespoon smoked paprika
- 2 tablespoons olive oil
- 3 large yellow onions, sliced into thick rings
- 4 large carrots, cut into 2-inch pieces
- 3 celery stalks, cut into 2-inch pieces
- 6 cloves garlic, minced
- 2 cups beef broth
- 1 cup beef stock
- 3 tablespoons Worcestershire sauce
- 2 tablespoons balsamic vinegar
- 1 tablespoon brown sugar
- 3 bay leaves
- 1 teaspoon dried thyme
- 1 teaspoon dried rosemary
- Fresh parsley for garnish, optional
Instructions
- Preheat your oven to 325 degrees Fahrenheit. Remove the brisket from the refrigerator about 30 minutes before cooking so it comes closer to room temperature – this ensures more even cooking throughout.
- In a small bowl, combine the kosher salt, black pepper, garlic powder, onion powder, and smoked paprika to create your dry rub seasoning.
- Pat the brisket dry with paper towels – this is crucial for getting a good sear. Don’t skip this step, as any moisture will prevent browning.
- Rub the seasoning mixture all over the brisket, making sure to coat the entire surface generously. Get into the crevices and don’t be shy with the seasoning – this is what creates the flavorful crust.
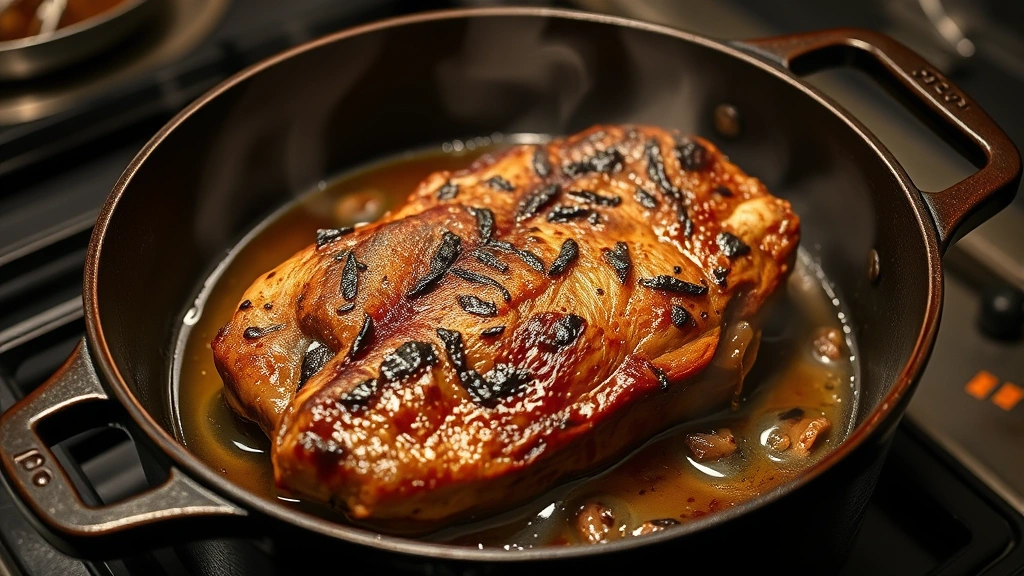
- Heat the olive oil in a large, heavy-bottomed Dutch oven or roasting pan over medium-high heat until it shimmers and is just beginning to smoke.
- Carefully place the seasoned brisket fat-side down into the hot oil. Let it sear for 4-5 minutes without moving it – resist the urge to flip or move it around. You want that gorgeous, dark brown crust to develop.
- Flip the brisket over carefully and sear the other side for another 4-5 minutes until it’s equally browned. Remove the brisket to a clean plate and set aside.
- In the same pot with all those beautiful browned bits (that’s liquid gold called fond), add the sliced onions, carrots, and celery. Sauté for about 5 minutes, stirring occasionally, until the vegetables begin to soften and release their aromatics.
- Add the minced garlic to the vegetables and cook for another minute until fragrant, stirring constantly so the garlic doesn’t burn.
- Pour in the beef broth and beef stock, scraping up all those flavorful browned bits from the bottom of the pot with a wooden spoon – this is deglazing and it adds incredible flavor.
- Stir in the Worcestershire sauce, balsamic vinegar, and brown sugar until well combined. Add the bay leaves, dried thyme, and dried rosemary, stirring to distribute evenly.
- Place the seared brisket back into the pot, positioning it fat-side up on top of the vegetables and in the braising liquid. The liquid should come about halfway up the sides of the brisket – if it doesn’t, add a bit more beef broth.
- Cover the pot tightly with aluminum foil or a lid and transfer it to the preheated 325-degree oven.
- Bake for 3 to 3.5 hours, depending on the thickness of your brisket. The meat should be very tender and easily pierced with a fork when done. Check it after 2.5 hours by inserting a fork – it should meet minimal resistance.
- Remove the pot from the oven carefully – the steam will be incredibly hot. Flip the brisket over and check that it’s fork-tender. If it still seems tough, return it to the oven for another 15-20 minutes.
- Transfer the brisket to a cutting board and let it rest for 10 minutes. This allows the juices to redistribute throughout the meat, keeping it moist when you slice it.
- Strain the vegetables from the braising liquid using a fine-mesh strainer, reserving the liquid. Discard the bay leaves.
- If you prefer a thicker, more concentrated sauce, pour the braising liquid into a saucepan and simmer over medium heat for 10-15 minutes to reduce it slightly.
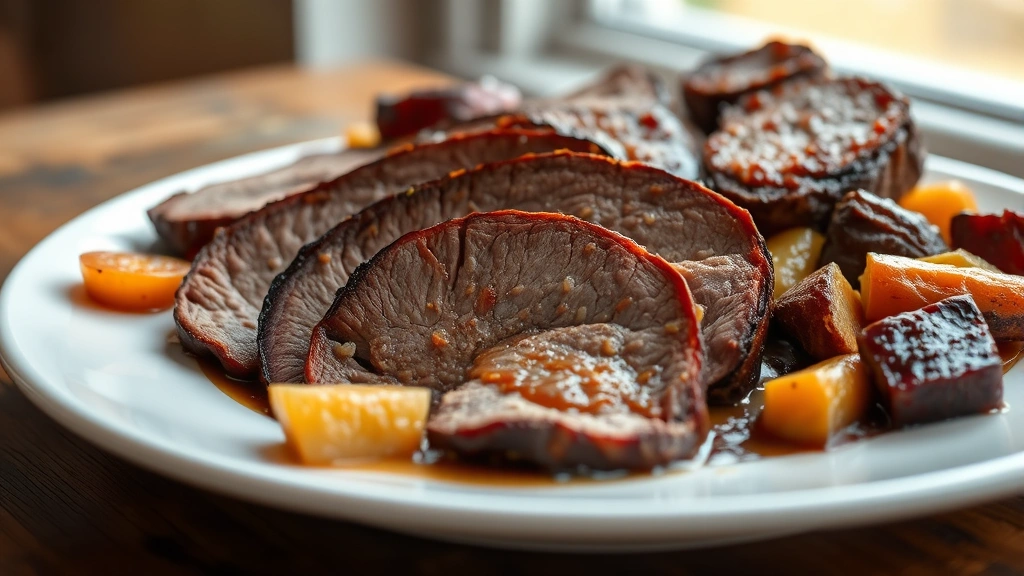
- Slice the brisket against the grain into quarter-inch thick slices. The flat and point cuts may have different grain directions, so pay attention and adjust your knife angle accordingly.
- Arrange the sliced brisket on a serving platter, top with the cooked vegetables, drizzle with the braising sauce, and garnish with fresh parsley if desired.

Pro Tips
Freezing Instructions: You can freeze the completely cooked and sliced brisket with its braising liquid for up to 3 months in a freezer-safe container. Thaw it overnight in the refrigerator and reheat gently in a 325-degree oven. Don’t thaw it at room temperature as this can promote bacterial growth.
Slicing Technique: Pay very close attention to the grain of the meat when slicing. The flat and point cuts of the brisket have different grain directions, so you may need to change your knife angle partway through. Always slice against the grain – this breaks up the muscle fibers and makes each bite incredibly tender. Use a sharp carving knife or serrated knife for the cleanest cuts.
Braising Liquid Variations: Feel free to customize the braising liquid based on what you have on hand. You can substitute the beef broth with chicken broth if needed, add a splash of red wine for extra depth, or include a tablespoon of Dijon mustard. Some people love adding a stick of cinnamon or a star anise for a subtle spice note.
Serving Suggestions: This baked brisket pairs beautifully with roasted potatoes, mashed potatoes, or buttered egg noodles to soak up that delicious sauce. A simple best chickpea salad recipe makes a wonderful side dish for a lighter counterpoint to the rich meat.
Leftover Ideas: Shred any leftover brisket and use it for sandwiches, tacos, or grain bowls. You can also chop it finely and use it as a filling for empanadas or hand pies. The braising liquid makes an excellent base for soups or can be used to braise other vegetables.
Temperature Tips: Use an instant-read meat thermometer to check for doneness. Brisket is best served when it reaches an internal temperature of 190-205 degrees Fahrenheit. At this temperature, the collagen has fully broken down into gelatin, making the meat incredibly tender.
Quality Matters: Choose a brisket with good marbling – those white streaks of fat throughout the meat. This fat will render during cooking and keep the brisket moist and flavorful. Ask your butcher for a well-marbled brisket if you can.
Do Not Rush: Resist the temptation to increase the oven temperature to speed up cooking. Low and slow is the key to tender brisket. High heat will cause the outside to dry out before the inside becomes tender.