

Bar cookies are the ultimate crowd-pleaser dessert that combines the best of both worlds: the convenience of sheet pan baking with the indulgent flavors of your favorite cookies. Whether you’re baking for a special occasion, a potluck, or simply satisfying a sweet craving, these bar cookies deliver impressive results with minimal fuss.
What makes bar cookies so special is their versatility and ease of preparation. Unlike traditional drop cookies that require portioning and individual baking times, bar cookies bake all at once in a single pan, making them perfect for feeding a crowd. The beauty of this recipe lies in its adaptability—you can customize the base, add your favorite mix-ins, and create endless flavor combinations that suit your taste preferences.
I absolutely love making bar cookies because they’re forgiving, foolproof, and always deliver consistent results. The dense, chewy texture combined with crispy edges creates the perfect bite every time. Plus, they’re ideal for meal prep and can be stored for several days, making them an excellent choice for busy weeks.
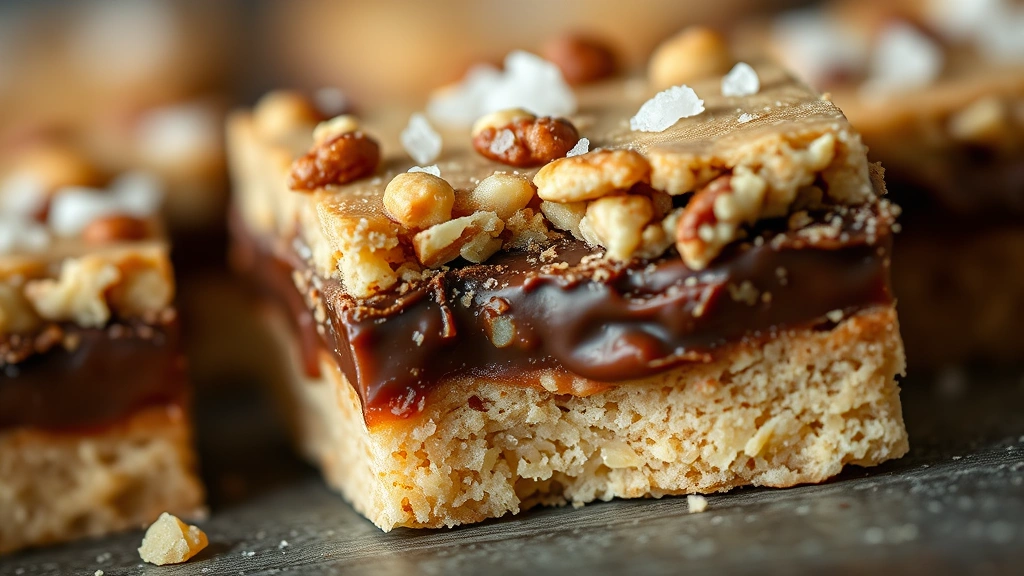
This particular recipe features a buttery shortbread base topped with a gooey center layer and optional mix-ins like chocolate chips, nuts, or dried fruit. The combination of textures—from the crumbly base to the fudgy middle—makes every bite absolutely irresistible. I’ve tested this recipe numerous times to ensure it works perfectly in your kitchen.
When baking bar cookies, the key is not to overbake them. You want the edges to be set and golden brown while the center remains slightly soft. This creates that perfect chewy texture that makes people come back for more. The residual heat will continue cooking them as they cool, so remove them from the oven while they still look slightly underdone in the center.
If you’re new to bar cookie baking, don’t worry! This recipe is incredibly beginner-friendly. You’ll simply mix your dry ingredients, combine your wet ingredients, layer them in the pan, and bake. No fancy techniques or special equipment required—just a standard 9×13-inch baking pan and basic kitchen tools.
For those looking to elevate their bar cookie game, I’ve included several variations and tips below. You can experiment with different extracts, spices, and add-ins to create your signature version. Many bakers find that homemade bar cookies far surpass store-bought versions in both flavor and quality.
These bar cookies are perfect served warm with a cold glass of milk or enjoyed at room temperature with coffee. They’re also wonderful for gift-giving—just wrap them in parchment paper and tie with twine for a homemade present that’s sure to impress. Check out our Best Heavy Cream Alfredo Sauce Recipe for more crowd-pleasing dishes, or explore our Delicious Heavy Cream Pasta Recipe for complete meal planning.
The magic of bar cookies lies in their simplicity combined with their impressive presentation. Your friends and family will be amazed that you made them from scratch, but the straightforward process means you’ll have these ready in under an hour. Whether you’re hosting a gathering or stocking your cookie jar, this recipe is an absolute must-try.
I’ve also included detailed baking tips and troubleshooting advice to ensure your bar cookies turn out perfectly every single time. From preventing overbaking to achieving the ideal thickness, you’ll find all the guidance you need. And if you’re looking for complementary treats, our Easy Chicken Alfredo Recipe makes a wonderful complete meal when paired with a dessert course.
Once you master this basic bar cookie recipe, you’ll discover endless possibilities for customization. Some popular variations include adding espresso powder for a mocha version, incorporating peanut butter for a classic combination, or swirling in caramel sauce for extra indulgence. The foundation remains the same, but the flavor variations are truly limitless.
For those watching their sugar intake or preferring alternative ingredients, I’ve included notes on substitutions that maintain the cookie’s integrity and delicious taste. You can adapt this recipe to suit dietary preferences, allergies, or simply what you have on hand in your pantry.
Bar cookies also freeze beautifully, making them an excellent make-ahead option for busy schedules. You can bake a batch, cut them into squares, and freeze them in an airtight container for up to three months. Simply thaw at room temperature before serving, and they taste just as fresh as the day you baked them. For more make-ahead inspiration, check out our Best Pickled Red Onion Recipe for items that prepare in advance.
Ingredients
- 2 cups all-purpose flour
- 1 cup (2 sticks) unsalted butter, softened
- 3/4 cup granulated sugar
- 1/4 cup light brown sugar, packed
- 1 large egg yolk
- 1 teaspoon vanilla extract
- 1/2 teaspoon salt
- 1 cup chocolate chips (semi-sweet or dark chocolate)
- 3/4 cup sweetened condensed milk
- 1/2 cup chopped walnuts or pecans
- 1/4 teaspoon sea salt for topping
Instructions
- Preheat your oven to 350°F (175°C). Line a 9×13-inch baking pan with parchment paper, leaving slight overhang on two sides for easy removal. This prevents sticking and makes cleanup effortless.
- In a medium mixing bowl, combine 2 cups all-purpose flour and 1/2 teaspoon salt. Set this dry mixture aside and let it rest while you prepare the wet ingredients.
- In a large mixing bowl, cream together 1 cup softened unsalted butter with 3/4 cup granulated sugar and 1/4 cup packed light brown sugar. Beat on medium speed for 2-3 minutes until the mixture is light, fluffy, and pale in color. This creaming process incorporates air and creates the perfect base texture.
- Add 1 large egg yolk and 1 teaspoon vanilla extract to the butter mixture. Mix on medium speed for about 1 minute until fully incorporated and the mixture is smooth and homogeneous.
- Gradually add the flour mixture to the wet ingredients, mixing on low speed until just combined. Do not overmix, as this can result in tough cookies. Mix only until you no longer see streaks of flour.
- Press the dough evenly into the prepared 9×13-inch pan. Use your fingers or the bottom of a measuring cup to create an even layer. This base layer should be about 1/4-inch thick and cover the entire pan.
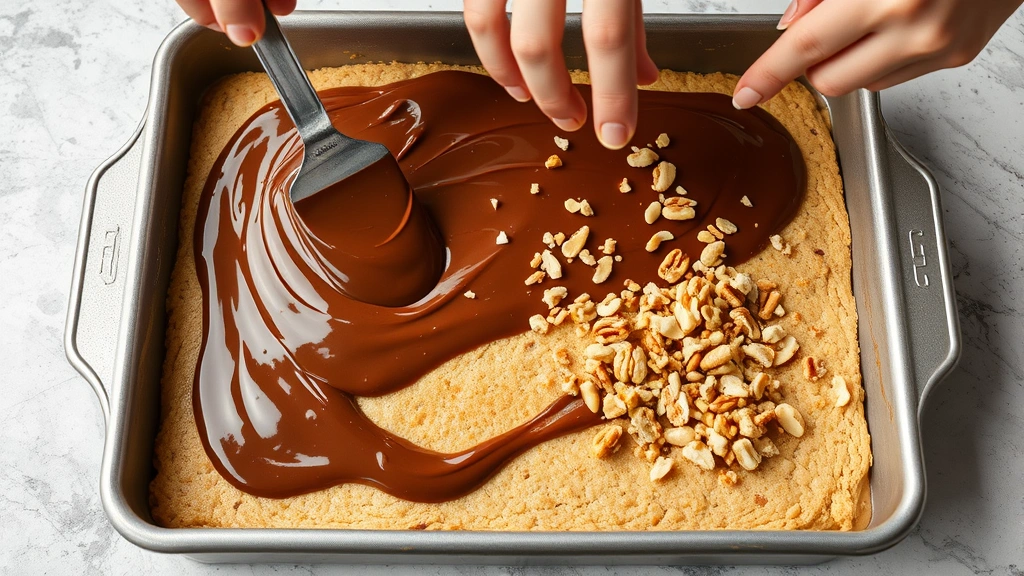
- In a small saucepan or microwave-safe bowl, combine 1 cup chocolate chips and 3/4 cup sweetened condensed milk. Heat gently, stirring occasionally, until the chocolate is completely melted and the mixture is smooth. This can be done in 30-second intervals in the microwave, stirring between each interval.
- Spread the chocolate-condensed milk mixture evenly over the pressed dough base, using a spatula or the back of a spoon to create an even layer.
- Sprinkle 1/2 cup chopped walnuts or pecans over the chocolate layer, pressing them gently into the chocolate so they adhere well and won’t fall off when you cut the bars.
- Place the pan in the preheated 350°F oven and bake for 25-30 minutes. The bars are done when the edges are golden brown and set, while the center still looks slightly soft. The center will continue cooking as the bars cool.
- Remove the pan from the oven and let it cool in the pan for 15 minutes. During this time, sprinkle the 1/4 teaspoon sea salt over the top while the chocolate is still slightly warm—this creates a beautiful contrast and enhances all the flavors.
- Once cooled slightly, use the parchment paper overhang to lift the entire block of cookies out of the pan and transfer to a cutting board. Allow to cool to room temperature, about 30 minutes, before cutting.
- Using a sharp knife dipped in hot water and wiped clean between cuts, carefully cut the cooled cookies into 24 equal squares. For the cleanest cuts, use a sawing motion rather than pressing straight down.
- Store the bars in an airtight container at room temperature for up to 5 days, or freeze in a freezer-safe container for up to 3 months. They taste wonderful either way!
Pro Tips
Cutting Tips: The key to clean, professional-looking cuts is using a sharp knife and wiping it between each cut. Dipping the knife in hot water helps prevent sticking. For extra-clean edges, try using a plastic knife or dental floss.
Customization Options: Feel free to experiment with different mix-ins such as white chocolate chips, dried cranberries, shredded coconut, or crushed candy canes for seasonal variations. You can also drizzle melted white chocolate over the cooled bars for added elegance.
Making It Vegan: Substitute the butter with vegan butter, the egg yolk with aquafaba (liquid from canned chickpeas), and use dairy-free chocolate chips and condensed coconut milk for a vegan-friendly version that tastes equally delicious.
Alcohol Additions: For an adult version, add 1-2 tablespoons of coffee liqueur, Kahlúa, or Bailey’s Irish Cream to the condensed milk mixture for sophisticated flavor undertones.
Nut-Free Version: Omit the nuts entirely or replace with seeds such as sunflower seeds, pumpkin seeds, or sesame seeds for a different texture and nutritional boost.
Chocolate Variations: Use milk chocolate, dark chocolate, or a combination for different sweetness levels. White chocolate works beautifully too, though the baking time may be slightly shorter.
Making Ahead: These bars are perfect for preparing 2-3 days in advance. Store them in an airtight container, and they’ll actually taste even better as the flavors meld together.
Scaling the Recipe: This recipe doubles well if you need to bake for larger crowds. Simply use two 9×13-inch pans and increase all ingredients by two times.
Frosting Options: Once cooled completely, you can spread frosting over the bars for extra indulgence. Cream cheese frosting, chocolate frosting, or salted caramel work beautifully.
Shipping: These bars hold up well for shipping because of their dense texture. Wrap individual bars in plastic wrap and pack in a sturdy box with packing material.
Pingback: How to make the Best Italian Lasagna Recipe! So Tasty! – Simple Recipe Finder