
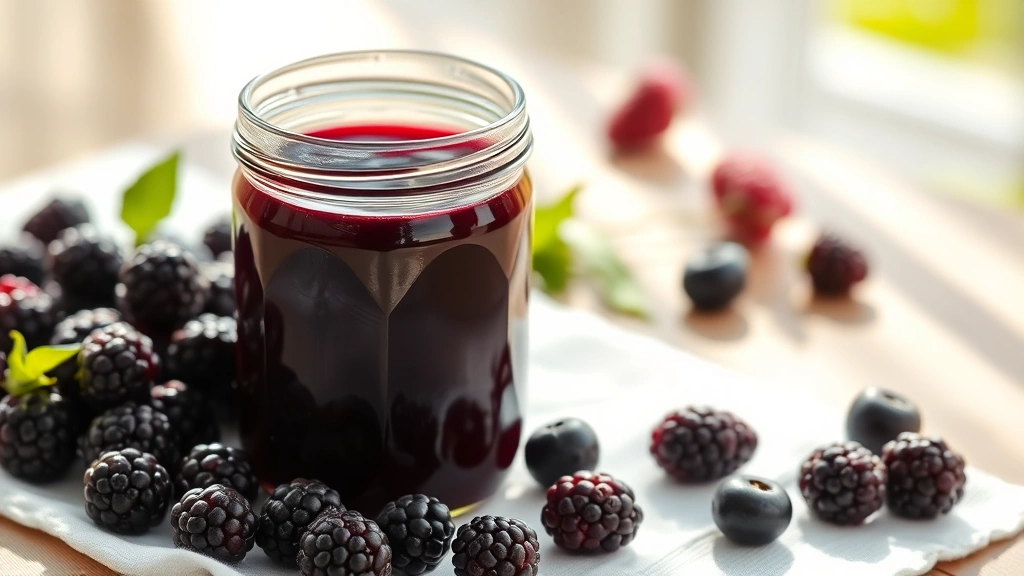
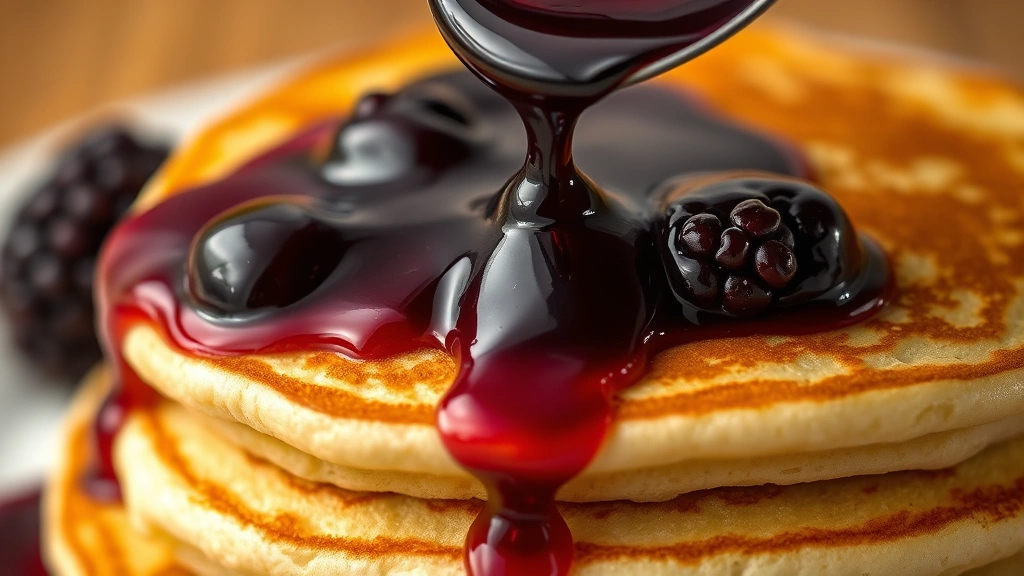
There’s something absolutely magical about homemade blackberry syrup that store-bought versions just can’t capture. This luscious, jewel-toned syrup is bursting with fresh berry flavor and comes together in just about an hour. Whether you’re drizzling it over fluffy pancakes, swirling it into yogurt, or using it as a base for cocktails, this recipe will become your go-to.
I’ve been making this blackberry syrup for years, and I have to say, it’s one of my favorite ways to preserve the taste of summer. The beauty of this recipe is its simplicity—just blackberries, sugar, and a touch of lemon juice create pure syrup magic. Unlike complicated jam recipes, this syrup comes together quickly and requires minimal equipment. You don’t even need special canning skills; it’s foolproof and absolutely delicious.
What makes this the BEST blackberry syrup recipe? It’s all about quality ingredients and the perfect balance of flavors. I use fresh, ripe blackberries at their peak, which means maximum flavor and natural pectin. The ratio of sugar to fruit is carefully calibrated to create that perfect consistency—thick enough to coat your pancakes beautifully, but pourable enough for drizzling. A squeeze of fresh lemon juice brightens the berry flavor and adds a subtle complexity that makes people ask for your secret ingredient.
This recipe yields about two cups of gorgeous, glossy syrup that keeps in your refrigerator for up to three weeks, or frozen for several months. You can also water-bath can it if you want to preserve it longer, though I find we go through ours so quickly that’s rarely necessary. The syrup is perfect for breakfast applications, but don’t limit yourself—it’s phenomenal in baking, as a sauce for vanilla ice cream, mixed into cocktails, or even drizzled over roasted duck or pork.
One of my favorite things about this recipe is how versatile it is. Want to make it extra special? Add a vanilla bean, a cinnamon stick, or a touch of cardamom while the syrup simmers. Prefer it thicker? Simply cook it a bit longer. Like it with bits of berry? Skip the straining step. This is a recipe that invites creativity while maintaining that perfect, classic blackberry syrup flavor that makes everyone at your breakfast table ask for seconds.
The process is meditative and rewarding. You’ll start with beautiful, plump blackberries and watch them transform into liquid gold. Your kitchen will smell absolutely heavenly—like a summer farmers market concentrated into the most wonderful aroma. Even the most novice home cook will feel like a culinary genius pulling this stunning syrup off the stove.
I’ve shared this recipe with countless friends and family members, and it consistently gets rave reviews. People are always surprised at how easy it is to make, and they’re even more surprised at how much better it tastes than anything they’ve ever bought. Once you make this berry recipe, you’ll understand why homemade is always superior. Let me walk you through exactly how to create this liquid treasure in your own kitchen.
Ingredients
- 4 cups fresh blackberries (about 1.5 pounds), rinsed and drained
- 2 cups granulated sugar
- 2 tablespoons fresh lemon juice
- 1/4 teaspoon vanilla extract (optional but recommended)
- Pinch of sea salt
- 1 tablespoon cornstarch mixed with 1 tablespoon water (if you prefer thicker syrup)
Instructions
- Add the fresh blackberries to a large, heavy-bottomed saucepan. Using a wooden spoon or potato masher, gently crush the blackberries to release their juices. You want to break them down enough to release liquid but don’t need to create a complete puree—some small berry pieces are lovely.
- Place the saucepan over medium heat and bring the crushed blackberries to a gentle simmer. Stir occasionally and let them cook for about 5 minutes, allowing the berries to break down further and release all their beautiful juice.
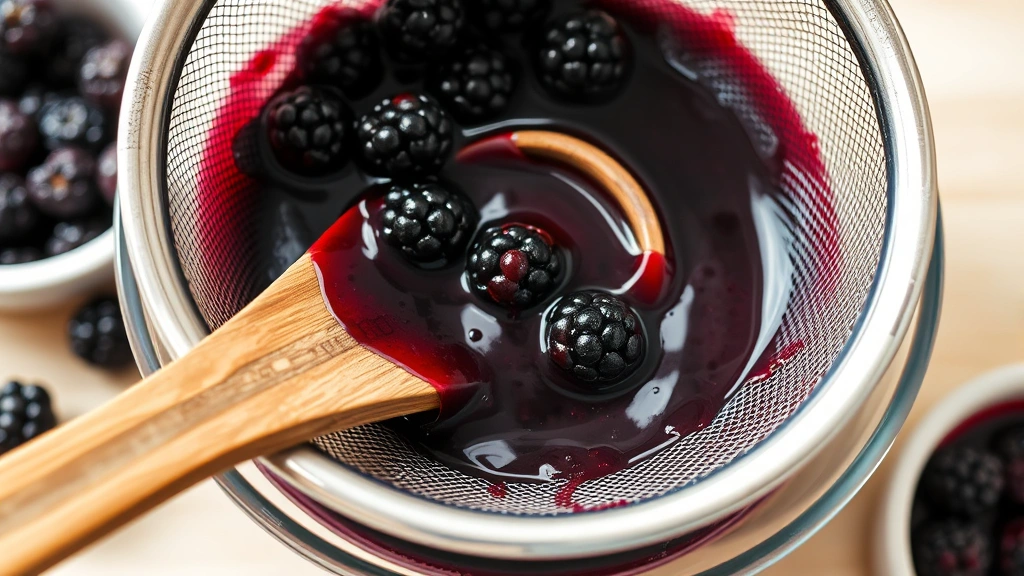
- Once the berries are very soft and have released plenty of juice, pour the mixture through a fine-mesh strainer set over a large bowl. Press gently on the berries with the back of a spoon to extract all the precious juice, but don’t force it so hard that you push pulp through the strainer. Discard the solids.
- Pour the strained blackberry juice back into your saucepan. Add the sugar, lemon juice, and sea salt. Stir well to combine, making sure all the sugar dissolves completely.
- Bring the mixture to a rolling boil over medium-high heat. Once it reaches a boil, reduce the heat to medium and maintain a steady, gentle boil for 20-30 minutes. Stir occasionally and skim off any foam that rises to the top with a clean spoon.
- To test for doneness, place a small spoon in the freezer for a few minutes until it’s cold. Drop a small amount of syrup onto the cold spoon and tilt it. If it wrinkles and doesn’t immediately run, your syrup has reached the proper consistency (about 220°F on a candy thermometer). If it’s still too thin, continue cooking for another few minutes.
- If you prefer a thicker syrup, create a slurry by mixing cornstarch with water. About 5 minutes before your syrup reaches the desired thickness, slowly stir in the cornstarch mixture while the syrup continues to simmer. Stir constantly to prevent lumps and cook for 1-2 minutes more.
- Remove the saucepan from heat and stir in the vanilla extract if using. Let the syrup cool for 5 minutes in the pan.
- Carefully pour the hot syrup into clean glass jars or bottles using a funnel. Leave about 1/4 inch of space at the top. Wipe the rims clean with a damp cloth.
- Allow the syrup to cool to room temperature before covering with lids. The syrup will continue to thicken slightly as it cools.
- Once cooled, label your jars with the date and store in the refrigerator for up to 3 weeks, or freeze for up to 6 months. Thaw frozen syrup in the refrigerator before using.
Pro Tips
- For the best flavor, use fresh, locally-sourced blackberries at peak ripeness. Frozen blackberries work too, but fresh berries give superior flavor and a more beautiful color.
- This recipe creates a pourable syrup rather than a thick jam. If you prefer it thicker, add the cornstarch slurry or simply cook it longer (up to 35-40 minutes total).
- The foam that appears on top while cooking is just impurities and excess sugar. Skim it off for a clearer, more beautiful final syrup.
- For a smoother syrup with no berry pieces, strain through cheesecloth or a coffee filter, though this takes longer and isn’t necessary.
- Want to jazz it up? Add one vanilla bean (split and scraped), a cinnamon stick, or a few whole cardamom pods while simmering. Remove before jarring.
- If your syrup crystallizes over time, gently warm it in a saucepan over low heat until the crystals dissolve, then return to the jar.
- This syrup is perfect for pancakes and waffles, but also try it over vanilla ice cream, swirled into yogurt, mixed into cocktails, or drizzled over roasted meats.
- For a reduced-sugar version, use 1.5 cups sugar instead, though the syrup will be thinner and slightly less shelf-stable.
- The cooking time varies based on your stove and how vigorously you boil. Start checking for doneness at 20 minutes.
- Always use clean, dry jars to prevent mold or spoilage. Sterilizing in boiling water is ideal.
- If making this for gifts, use beautiful glass jars and add a pretty label with the date and ingredients—it’s absolutely gorgeous wrapped with ribbon.
- This recipe can be easily doubled if you want to make larger batches, though you may need to increase cooking time slightly.