
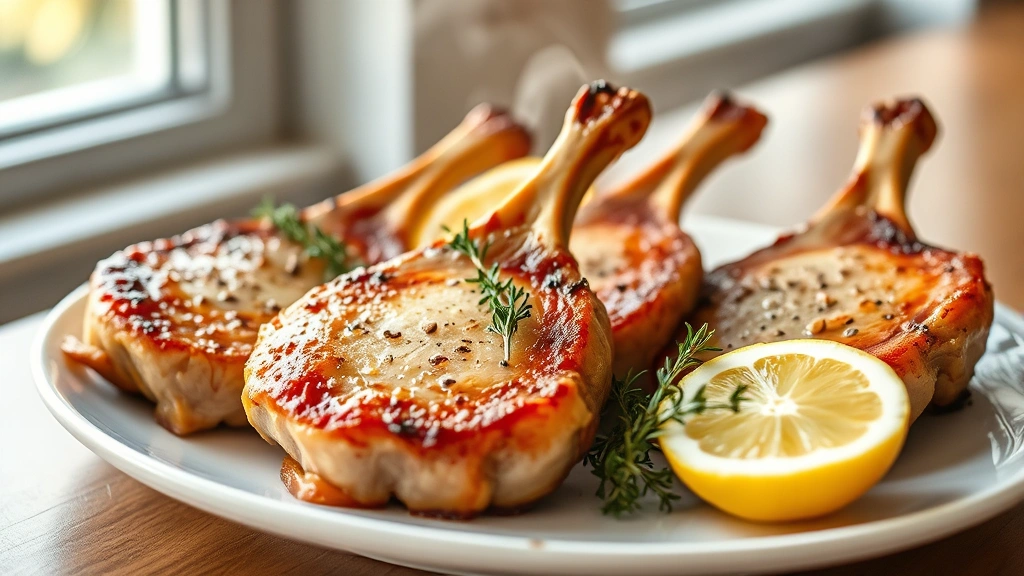
There’s something absolutely magical about a perfectly cooked bone-in pork chop – it’s the kind of dinner that feels fancy enough for guests but simple enough for a weeknight. The bone not only adds incredible flavor to the meat as it cooks, but it also makes for such a beautiful presentation on the plate. I’ve been making pork chops for years, and I can honestly say that mastering this recipe has completely transformed my weeknight dinner game.
The secret to the BEST bone-in pork chops is all about respecting the meat and not overthinking it. You want to start with thick-cut chops – at least an inch and a half thick – because they’ll stay juicy on the inside while developing that gorgeous golden crust on the outside. The beauty of bone-in chops is that the bone acts as an insulator, keeping the meat tender and moist throughout the cooking process. I always make sure my chops are at room temperature before they hit the pan because cold meat won’t sear properly, and that crust is everything.
What I love most about this recipe is how versatile it is. You can serve these alongside pickled red onions for brightness, pair them with creamy sides like heavy cream Alfredo sauce, or keep it simple with roasted vegetables. The technique I’m sharing today will work beautifully no matter which direction you decide to take it. I’ve tested this method dozens of times, and the results are consistently perfect – juicy, flavorful, and restaurant-quality.
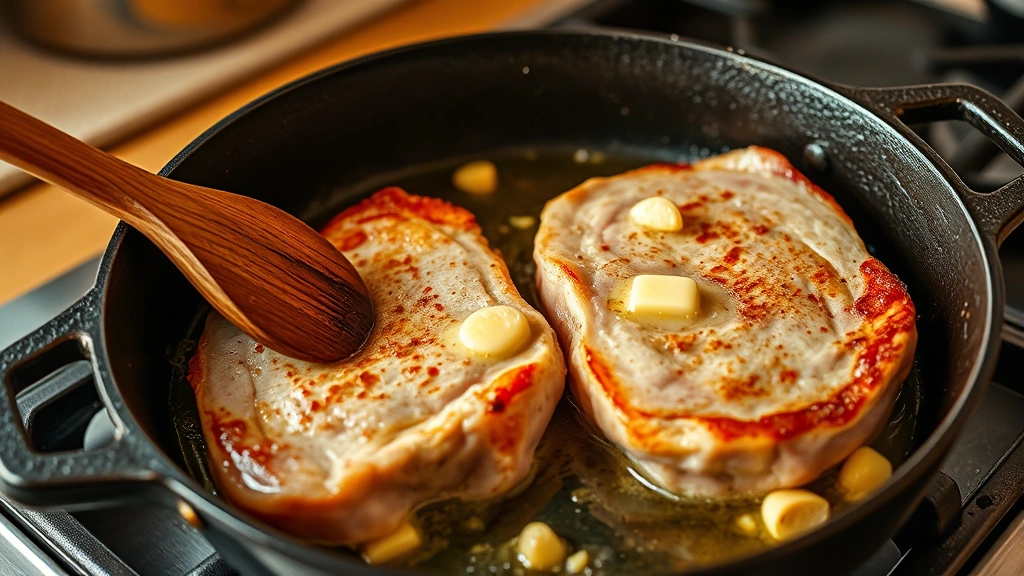
The technique involves a quick sear in a hot skillet followed by a gentle finish in the oven. This two-step process ensures that you get that beautiful caramelized exterior while keeping the inside perfectly moist and tender. The basting with butter, garlic, and fresh herbs during the final cooking stages adds layers of flavor that make people ask for seconds. Trust me, once you master this method, you’ll be making bone-in pork chops at least twice a month.
Let me walk you through exactly how I make mine, and I promise you’ll understand why this has become my go-to protein for entertaining. For more inspiration on building a complete dinner, check out this delicious heavy cream pasta recipe or a quick tasty bacon carbonara if you’re planning a special meal. And if you’re looking for fresh sides, this best chickpea salad recipe pairs beautifully alongside.
For even more techniques and inspiration, I love checking out Bon Appétit’s take on pan-roasted pork chops and Serious Eats’ comprehensive pork chop guide. The New York Times has a wonderful resource on perfect pork chops that I reference often. These resources have really helped me refine my technique over the years, and I’m excited to share what I’ve learned with you.
Ingredients
- 4 bone-in pork chops, 1½ inches thick (about 8-10 ounces each)
- 2 teaspoons kosher salt, plus more to taste
- 1 teaspoon freshly ground black pepper, plus more to taste
- 1 teaspoon garlic powder
- ½ teaspoon smoked paprika
- 3 tablespoons olive oil
- 4 tablespoons unsalted butter
- 6 cloves garlic, smashed
- 4 sprigs fresh thyme (or 2 sprigs rosemary)
- 2 tablespoons fresh lemon juice
- ¼ teaspoon red pepper flakes (optional)
- Fresh parsley for garnish (optional)
Instructions
- Remove your pork chops from the refrigerator and let them sit at room temperature for 15 minutes. This is crucial – cold meat won’t develop a proper crust.
- While the chops come to room temperature, preheat your oven to 400°F. Position the oven rack in the middle position.
- In a small bowl, combine the kosher salt, black pepper, garlic powder, and smoked paprika. Mix well and set aside.
- Pat the pork chops completely dry with paper towels. Any moisture on the surface will prevent browning.
- Generously season both sides of each pork chop with your spice mixture, pressing it gently so it adheres to the meat.
- Heat the olive oil in a large oven-safe skillet over medium-high heat. Wait until the oil is shimmering – this usually takes about 2-3 minutes.
- Carefully place the pork chops in the hot skillet, being mindful of any splattering oil. Don’t move them for 4-5 minutes – let them develop that beautiful golden crust.
- Flip the chops and sear the other side for another 3-4 minutes until golden brown. You’re looking for a deep caramelized color on both sides.
- Reduce the heat to medium and add the butter, smashed garlic cloves, and fresh thyme sprigs to the skillet around the pork chops.
- Tilt the skillet slightly and use a spoon to baste the pork chops with the melted butter and pan juices for about 1-2 minutes.
- Transfer the skillet to the preheated 400°F oven. Bake for 8-10 minutes, or until the internal temperature reaches 145°F when measured with a meat thermometer in the thickest part of the chop.
- Remove the skillet from the oven and transfer the pork chops to a cutting board. Tent loosely with foil and let rest for 5 minutes.
- While the chops rest, add the fresh lemon juice to the pan juices and stir to combine. Taste and adjust seasoning with salt and pepper as needed.
- Drizzle the pan sauce over the rested pork chops, garnish with fresh parsley if desired, and serve immediately while hot.
Pro Tips
Thickness Matters: Buy pork chops that are at least 1½ inches thick. Thin chops will dry out before the exterior can brown properly. Ask your butcher to cut them to order if needed – they’re usually happy to help.
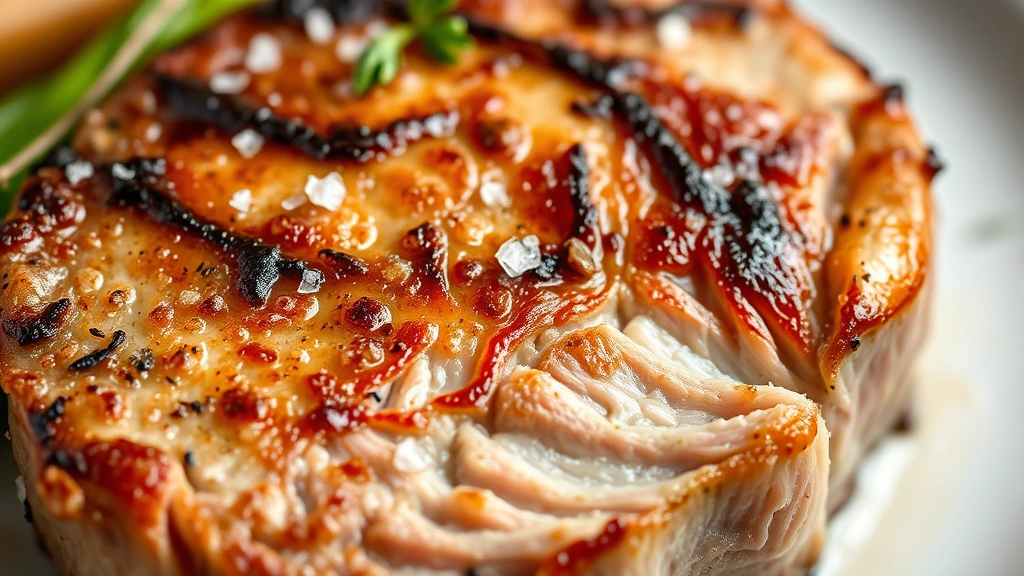
Don’t Skip the Searing: The initial high-heat sear creates the Maillard reaction, which develops complex flavors and that gorgeous golden crust. This step is non-negotiable for restaurant-quality results.
Meat Thermometer is Essential: Pork is safe to eat at 145°F, but overcooked pork becomes dry and tough. Invest in a good instant-read thermometer to ensure perfect doneness every single time.
Resting Period: The 5-minute rest allows the juices to redistribute throughout the meat, ensuring moist, tender chops. Don’t skip this step, even though it’s tempting to dig in right away.
Butter Basting: This technique adds incredible flavor and helps keep the chops moist during the oven phase. The garlic and herbs infuse into the meat as it finishes cooking.
Oven-Safe Skillet Required: Make sure your skillet has an oven-safe handle. If you’re unsure, transfer the chops to a baking dish after searing and finish cooking there.
Customize Your Seasonings: While I love the paprika and garlic combination, feel free to experiment with fresh herbs like sage, oregano, or Italian seasoning based on your preferences.
Leftover Storage: Store cooked pork chops in an airtight container in the refrigerator for up to 3 days. Reheat gently in a 325°F oven to avoid drying them out.