
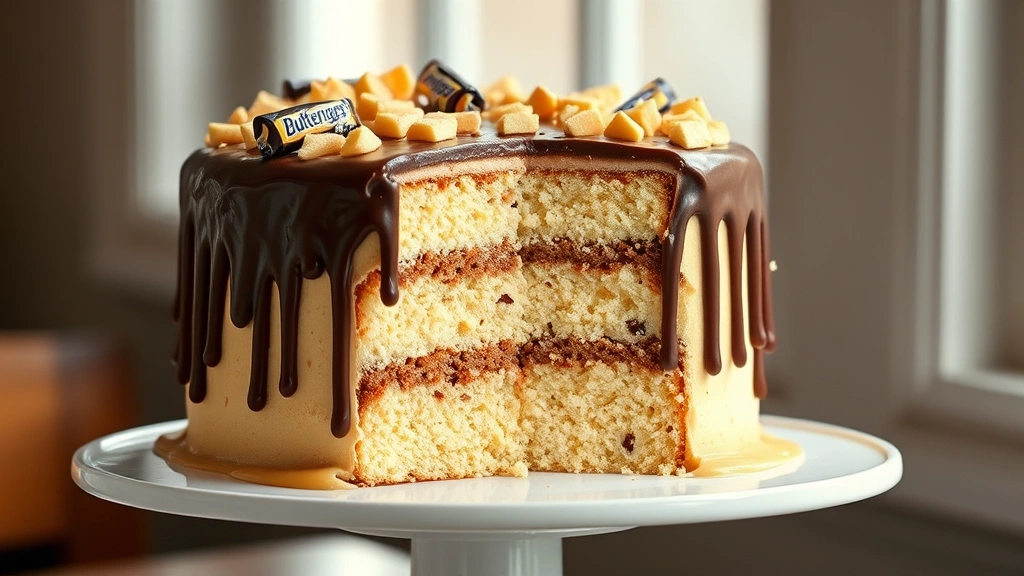
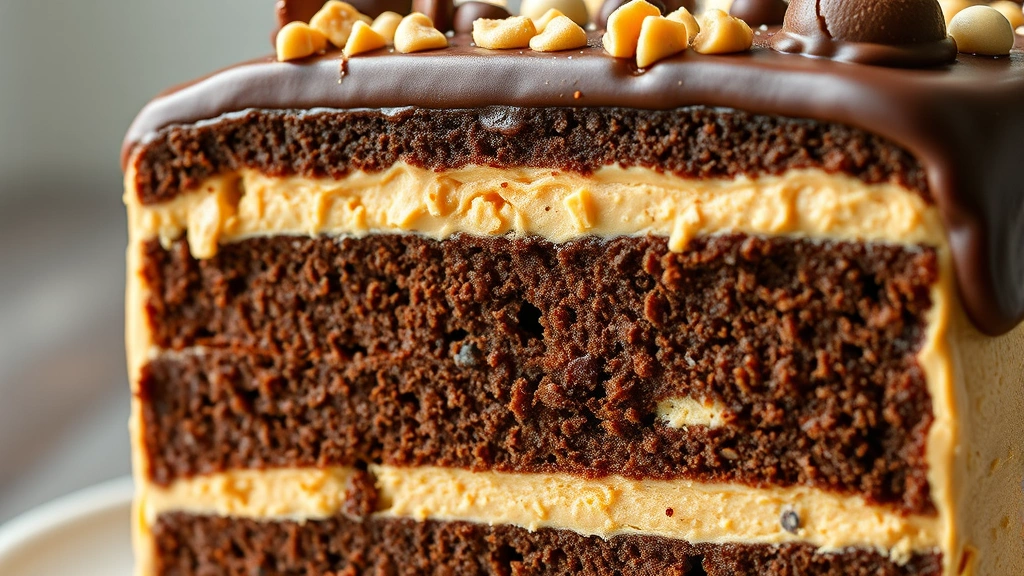
There’s something absolutely magical about a Butterfinger cake that brings back all those nostalgic candy memories in the most decadent dessert form. This show-stopping beauty combines layers of rich chocolate cake with creamy peanut butter frosting, crushed Butterfinger bars, and a silky chocolate ganache that’ll have everyone asking for seconds. I’ve been perfecting this recipe for years, and I’m thrilled to share my foolproof method with you today.
What makes this Butterfinger cake recipe truly special is the combination of textures and flavors working in perfect harmony. You get the tender, moist chocolate cake base, the smooth and indulgent peanut butter frosting, and those signature Butterfinger candy pieces that add that delightful crunch and toffee flavor throughout. The beauty of this cake is that while it looks incredibly impressive, it’s actually quite manageable to make at home. Whether you’re baking for a special celebration or just want to treat your family to something extraordinary, this recipe delivers restaurant-quality results.
I always recommend reading through the entire recipe before starting, as understanding the process will make your baking day so much smoother. Don’t be intimidated by the multiple components – you can actually prepare several elements ahead of time. The cake layers can be baked a day in advance, the frosting can be made several hours ahead, and you can even crush your Butterfinger bars the night before. This flexibility makes it perfect for entertaining or when you want to spread out your baking efforts. For more inspiration on creating stunning layered cakes, check out our Best Heavy Cream Alfredo Sauce Recipe for techniques on building flavor layers.
The key to success with this butterfinger cake recipe is using quality ingredients and taking your time with each step. Room temperature ingredients blend together more smoothly, creating a better crumb structure in your cake. When you’re frosting, working with frosting that’s the right consistency makes all the difference between a beautiful finish and a frustrating one. I always keep my spatula warm and my workspace organized. If you’re looking to expand your dessert repertoire, our Delicious Heavy Cream Pasta Recipe offers great techniques for working with rich ingredients.
One of my favorite aspects of this recipe is how customizable it can be. If you prefer extra crunch, you can add more Butterfinger pieces throughout the layers. If you want it even more chocolatey, you can swap the peanut butter frosting for a chocolate frosting instead. Some people love adding a drizzle of salted caramel on top for extra richness. The foundation of this cake is solid enough to handle your personal touches and preferences. For more ideas on flavor combinations and complementary recipes, visit our Easy Chicken Alfredo Recipe for inspiration on building cohesive flavor profiles.
I’ve had so many people ask me about this recipe over the years, and the most common question is about storing the finished cake. The good news is that this butterfinger cake recipe actually tastes better after a day or two, as the flavors have time to meld together. You can keep it covered in the refrigerator for up to five days, and it also freezes beautifully for up to three months. This makes it an excellent choice for make-ahead entertaining. When you’re ready to serve, simply let it come to room temperature for about an hour for the best texture and flavor. The combination of techniques and ingredients in this recipe draws inspiration from classic cake-making methods you’ll find at Bon Appétit, one of my favorite culinary resources.
This Butterfinger cake recipe truly is the best version I’ve ever created, and I can’t wait for you to make it and see why it’s become such a beloved classic in my family. The combination of chocolate, peanut butter, and toffee is simply unbeatable, and every element works together to create something truly memorable. Whether this is your first time making a layered cake or you’re an experienced baker looking for a new favorite, I promise this recipe will become a staple in your rotation. For additional inspiration and techniques, check out Serious Eats for their scientific approach to baking perfection. Your guests will be absolutely amazed when you present this stunning dessert at your next gathering.
Ingredients
- 2 cups all-purpose flour
- 2 cups granulated sugar
- 3/4 cup unsweetened cocoa powder
- 2 teaspoons baking soda
- 1 teaspoon baking powder
- 1 teaspoon salt
- 2 large eggs, room temperature
- 1 cup strong brewed coffee, cooled
- 1 cup buttermilk, room temperature
- 1/2 cup vegetable oil
- 2 teaspoons vanilla extract
- 1 cup (2 sticks) butter, room temperature
- 1 cup creamy peanut butter, room temperature
- 3 cups powdered sugar
- 1/4 cup heavy cream
- 1 teaspoon vanilla extract
- 8 Butterfinger candy bars, divided
- 1 cup semi-sweet chocolate chips
- 1/2 cup heavy cream for ganache
- 2 tablespoons butter for ganache
- 1 tablespoon light corn syrup
- Pinch of salt
Instructions
- Preheat your oven to 350°F. Grease and flour two 9-inch round cake pans, then line the bottoms with parchment paper for easy removal.
- In a large mixing bowl, whisk together the flour, sugar, cocoa powder, baking soda, baking powder, and salt until well combined.
- In another bowl, beat the eggs, then add the cooled coffee, buttermilk, vegetable oil, and vanilla extract, whisking until smooth.
- Pour the wet ingredients into the dry ingredients and stir until just combined – do not overmix, as this can lead to a tough cake.
- Divide the batter evenly between the prepared pans and smooth the tops with a spatula.
- Bake for 30-35 minutes, or until a toothpick inserted in the center comes out with just a few moist crumbs.
- Allow the cakes to cool in the pans for 15 minutes, then turn out onto wire racks to cool completely.
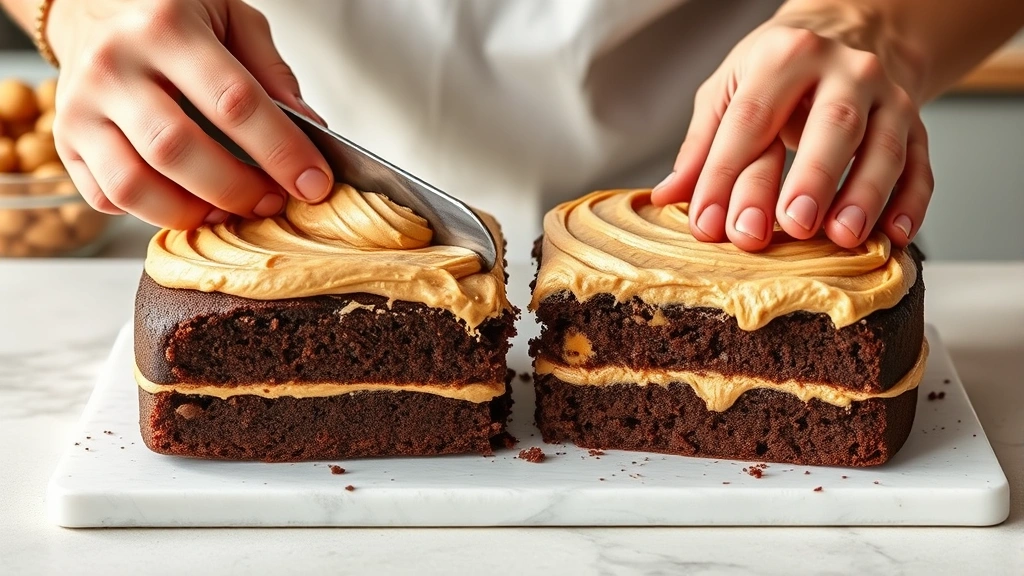
- While the cakes cool, prepare the peanut butter frosting by beating together the butter and peanut butter until creamy.
- Gradually add the powdered sugar, one cup at a time, beating well after each addition.
- Add the heavy cream and vanilla extract, beating until the frosting reaches a spreadable consistency – add more cream if needed.
- Coarsely chop 6 of the Butterfinger bars, reserving the other 2 bars for decoration.
- Fold most of the chopped Butterfinger pieces into the peanut butter frosting, reserving some for garnish.
- Place the first cake layer on a serving plate or cake board and spread a generous layer of frosting on top.
- Sprinkle additional chopped Butterfinger pieces over the frosting layer.
- Place the second cake layer on top and frost the top and sides with the remaining peanut butter frosting.
- Prepare the chocolate ganache by heating the heavy cream and butter together until steaming.
- Pour the hot cream mixture over the chocolate chips in a bowl and let sit for 1 minute without stirring.
- Stir the ganache until smooth and glossy, then add the corn syrup and salt.
- Allow the ganache to cool slightly, then pour it over the top of the cake, letting it drip down the sides.
- Finely chop the remaining 2 Butterfinger bars and sprinkle them over the ganache while still wet.
- Refrigerate the cake for at least 1 hour before serving to allow all layers to set properly.
Pingback: How to make the BEST Waldorf Salad Recipe (Quick & Tasty!) – Simple Recipe Finder