

There’s something absolutely magical about a homemade cherry pie, and here’s my little secret: you don’t need fresh cherries to make an absolutely show-stopping dessert! This canned cherry pie recipe is my go-to when I want that classic, bakery-quality pie without the fuss of pitting fresh fruit. I’ve perfected this recipe over years of baking, and I’m thrilled to share it with you today.
Canned cherries are truly a baker’s best friend. They’re picked at peak ripeness and preserved at their finest, which means you’re getting incredible flavor in every bite. Plus, they’re already pitted (hallelujah!), which saves you so much time and mess. The beauty of this recipe lies in its simplicity and the way the cherry filling becomes this gorgeous, glossy masterpiece that holds together perfectly when you slice it.
I love making this pie for summer gatherings, holiday dinners, or whenever I need to impress someone with minimal stress. The filling is perfectly balanced—not too sweet, with just the right amount of tartness from the cherries. The crust is buttery and flaky, and when you combine them together, you get that perfect dessert that everyone will be asking you to make again and again.
One thing I absolutely adore about this recipe is that it works beautifully with either a traditional double crust or a gorgeous lattice top. I usually go with the lattice because it looks so stunning and really shows off that beautiful cherry filling. The way the filling bubbles up through those lattice strips during baking? Pure perfection.
What makes this cherry pie recipe so special is that it delivers restaurant-quality results with pantry staples. You can keep canned cherries on hand year-round, so you’re never more than an hour away from fresh-baked pie. I always recommend keeping a few cans in your pantry because you never know when you’ll need to whip up something spectacular. This pie is also wonderfully forgiving—even if you’re not the most experienced baker, this recipe will make you look like a pro.
The secret to the best canned cherry pie is in the filling preparation. We’re going to reduce that gorgeous cherry juice into a thick, luscious syrup that coats every single cherry. I use a combination of cornstarch and tapioca starch to thicken the filling, which creates this beautiful glossy texture that holds up perfectly when you slice the pie. Some bakers use just one thickener, but I’ve found that using both gives you the most elegant results.
I also add a touch of almond extract to the filling—just a quarter teaspoon—because it enhances the cherry flavor in the most subtle, sophisticated way. It’s not enough to make the pie taste like almonds; it just makes you wonder what that delicious something extra is. That’s the mark of good baking!
Another tip from my kitchen: make sure you’re using quality ingredients throughout. The butter in your crust, the type of cherries you choose, even the vanilla extract—these things matter. I always use unsalted butter so I can control the salt level, and I invest in pure vanilla extract because it makes such a difference in the final taste.
This recipe makes enough filling to create a pie that’s absolutely bursting with cherries. There’s nothing worse than a pie that’s mostly crust and barely any filling! You’ll have a generous amount of that gorgeous ruby-red cherry mixture packed into your pie, and every slice will be loaded with fruit.
For external inspiration and technique verification, I often reference Bon Appétit for professional baking tips and Serious Eats for the science behind pie making. Understanding why we do certain things in baking—like chilling the dough or crimping the edges a certain way—really elevates your results.
The crust is where so many home bakers struggle, so I’m going to walk you through my foolproof method. We’re making an all-butter crust because butter provides the best flavor and creates those gorgeous, flaky layers. The key is keeping everything cold and not overworking the dough. When you mix the butter into the flour, you want pea-sized pieces of butter throughout the dough. These little pockets of butter are what create those beautiful, distinct flaky layers when the pie bakes.
I also recommend using proper pie-making techniques like pre-chilling your mixing bowl and using ice water. These small details make an enormous difference in the final texture of your crust. You want a crust that’s tender and crisp, not tough and dense.
Once your dough comes together, you’ll wrap it in plastic wrap and refrigerate it for at least 30 minutes. This resting period is crucial because it allows the gluten in the flour to relax, which means your crust won’t shrink as much during baking. I usually make my dough ahead of time and refrigerate it overnight, which actually improves the flavor.
When you’re ready to assemble your pie, work quickly so the dough stays cold. A cold dough creates a flakier crust, so if your kitchen is warm, you might want to pop the dough back in the fridge between steps. I always have my refrigerator standing by throughout the assembly process.
The filling preparation is straightforward but important. You’ll drain your canned cherries, reserving the juice. Then you’ll create a slurry with your thickening agents and some of that reserved juice, which you’ll then combine with the cherry juice in a saucepan. As this mixture heats, it will thicken into this gorgeous, glossy syrup. You’ll pour this over your cherries and let it cool slightly before adding it to your pie crust.
One pro tip: don’t skip the cooling step! If you add hot filling to your crust, the bottom crust won’t have time to set properly, and you’ll end up with a soggy bottom. By cooling the filling for about 15 minutes, you’re giving the bottom crust a chance to start setting without actually baking.
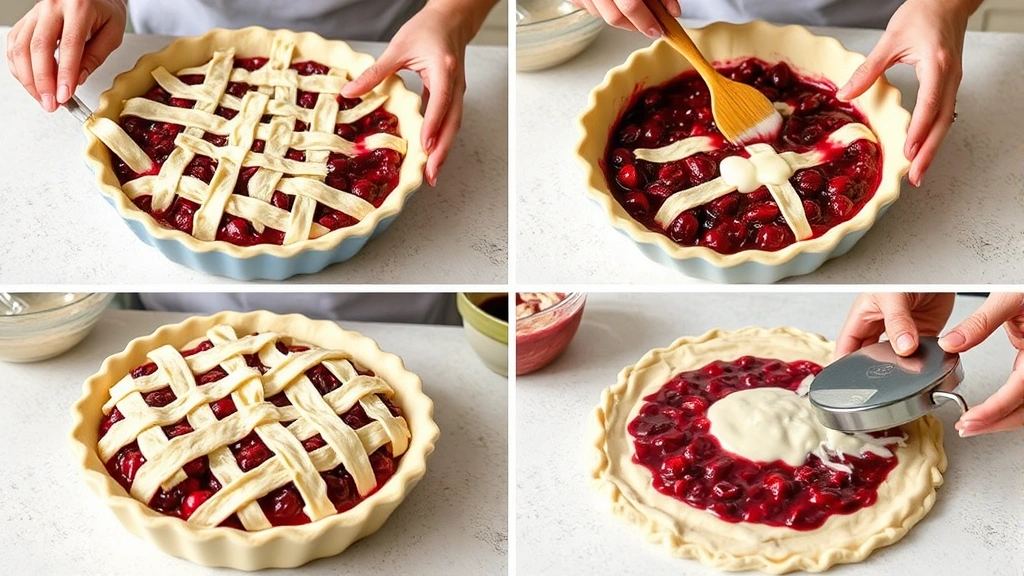
When assembling the pie, I like to place my bottom crust in the pie dish and let it relax for a few minutes. Then I’ll add the cherry filling, mounding it slightly in the center because the filling will settle a bit. If you’re doing a lattice top, now’s the time to weave those beautiful strips. If you’re doing a traditional top crust, lay it over the filling and seal the edges with a fork or your fingers.
I always brush the top crust with an egg wash (one egg beaten with a tablespoon of water) and sprinkle it with a little coarse sugar. This creates a beautiful golden-brown finish and adds a lovely sparkle to the finished pie.
Before baking, I make sure to cut a few vents in the top crust to allow steam to escape. This helps prevent the filling from bubbling over and also ensures that your crust bakes evenly.
The pie bakes at 375°F for about 50-60 minutes, until the crust is golden brown and you can see the filling starting to bubble around the edges. I usually tent it with foil after about 30 minutes to prevent the crust from browning too quickly.
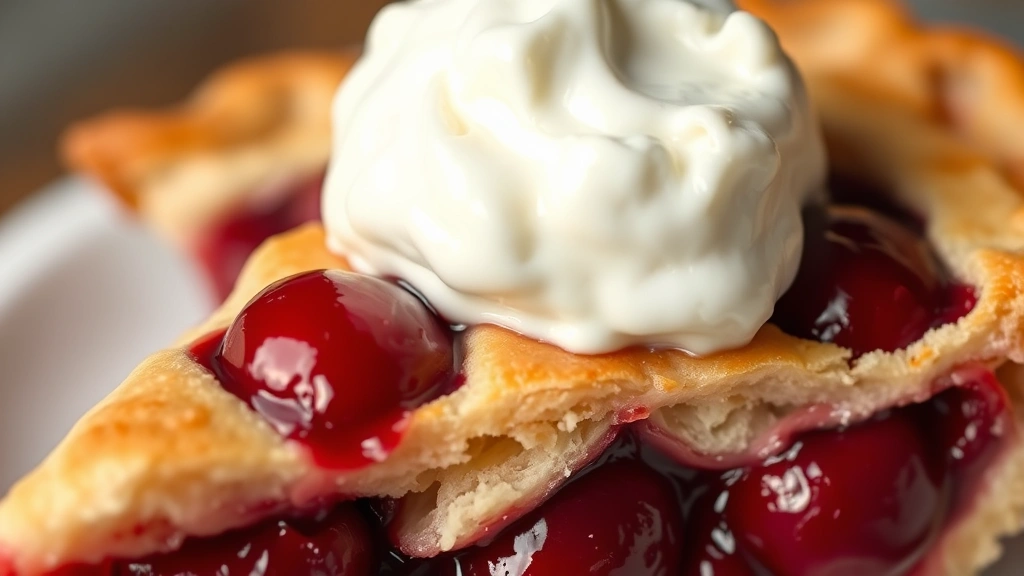
Once your pie comes out of the oven, let it cool completely before slicing. I know it’s tempting to dive in right away, but the filling needs time to set, and if you cut into it while it’s hot, you’ll end up with runny filling instead of those gorgeous, defined cherry slices.
This cherry pie is absolutely stunning on its own, but it’s even better served with a scoop of vanilla ice cream or a dollop of freshly whipped cream. The cool creaminess against the warm, tart-sweet cherries is absolutely divine.
You can also make this pie ahead of time. It keeps beautifully in an airtight container for up to two days, and it reheats wonderfully. Just pop it in a 350°F oven for about 10 minutes to warm it through before serving.
I hope you make this recipe and fall in love with it as much as I have. It’s the kind of pie that brings people together and creates memories around the dinner table. Happy baking!
Ingredients
- 2 1/2 cups all-purpose flour
- 1 teaspoon salt
- 1 tablespoon sugar
- 1 cup (2 sticks) cold unsalted butter, cubed
- 6-8 tablespoons ice water
- 2 cans (15 oz each) pitted dark cherries in heavy syrup, drained (reserve 1/2 cup juice)
- 3/4 cup sugar
- 2 tablespoons cornstarch
- 1 tablespoon tapioca starch
- 1/4 teaspoon almond extract
- 1/4 teaspoon salt
- 1/2 teaspoon vanilla extract
- 1 egg, beaten (for egg wash)
- 1 tablespoon water (for egg wash)
- 2 tablespoons coarse sugar for topping
Instructions
- Make the pie dough: In a large bowl, whisk together flour, salt, and sugar. Add the cold cubed butter and use a pastry cutter or your fingertips to work the butter into the flour until the mixture resembles coarse breadcrumbs with pea-sized pieces of butter throughout.
- Add ice water one tablespoon at a time, mixing gently with a fork until the dough just comes together. Divide the dough in half, shape each half into a disk, wrap in plastic wrap, and refrigerate for at least 30 minutes (or up to overnight).
- While the dough chills, prepare the cherry filling: In a medium saucepan, combine 1/2 cup reserved cherry juice with the sugar, cornstarch, tapioca starch, and salt.
- Heat the mixture over medium heat, stirring constantly, until it thickens and becomes glossy (about 5 minutes). The mixture should coat the back of a spoon.
- Remove from heat and stir in the almond extract and vanilla extract. Add the drained cherries and gently fold until all cherries are coated with the thickened syrup.
- Let the cherry filling cool to room temperature (about 15 minutes) before using.
- Preheat your oven to 375°F.
- On a floured surface, roll out one disk of dough to about 1/8-inch thickness. Transfer to a 9-inch pie dish, letting the excess hang over the edges.
- Pour the cooled cherry filling into the prepared crust, mounding it slightly in the center.
- Roll out the second disk of dough to 1/8-inch thickness. If making a lattice top, cut the dough into strips about 3/4-inch wide and weave them over the filling in a crosshatch pattern. If making a traditional top crust, place it over the filling and seal the edges.
- For a traditional top crust: trim excess dough to 1 inch beyond the pie dish, fold under the edges, and crimp with a fork or your fingers. Cut 3-4 small vents in the top. For lattice: trim the excess dough from around the sides and crimp the bottom crust edges.
- In a small bowl, whisk together the egg and water to make an egg wash. Brush the egg wash over the crust and sprinkle with coarse sugar.
- Place the pie on a baking sheet (to catch any drips) and bake for 25-30 minutes until the crust begins to turn golden brown.
- Cover the crust edges with foil to prevent over-browning and continue baking for another 25-30 minutes until the crust is deep golden brown and you can see the filling starting to bubble around the edges.
- Remove from the oven and let cool on a wire rack for at least 2-3 hours before slicing. The filling needs time to set for clean slices.
- Serve at room temperature or slightly warm with vanilla ice cream or whipped cream.
Pro Tips
Canned Cherry Selection: Use high-quality canned cherries packed in heavy syrup for the best results. Dark red or black cherries provide the most vibrant color and rich flavor. Some brands offer cherries in light syrup—these work too, but you may want to add an extra tablespoon of sugar to the filling.
Thickening Agent Tips: Cornstarch and tapioca starch work beautifully together because tapioca creates a clearer filling while cornstarch provides structure. If you only have one available, use 3 tablespoons total of whichever you have. Avoid flour as a thickener for this pie—it can make the filling cloudy.
Crust Secrets: The key to a flaky crust is keeping everything cold and not overworking the dough. If your kitchen is warm, keep your bowl and utensils in the freezer for 15 minutes before starting. Work quickly and don’t hesitate to pop the dough back in the refrigerator if it starts to warm up.
Lattice Weaving: If you’re nervous about weaving a lattice top, practice makes perfect! Start with strips going one direction, then fold every other strip back and lay a perpendicular strip across. Unfold the strips and repeat. It’s easier than it looks.
Bottle Soggy Bottom: To prevent a soggy bottom crust, make sure your filling is cooled before adding it to the crust. You can also brush the bottom crust lightly with egg white before adding the filling—this creates a protective barrier.
Bubbling Over Prevention: Place your pie on a baking sheet before baking to catch any drips. If you notice filling bubbling over the edges, don’t panic—this is normal! Just let it bake. Any overflow will crisp up on the baking sheet.
Cooling is Crucial: I cannot stress this enough—let your pie cool completely before slicing. The filling will look set after 2-3 hours, and this resting time allows the thickeners to fully set. Cutting into a warm pie will result in runny filling.
Storage: Store leftover pie covered with plastic wrap or in an airtight container at room temperature for up to 2 days, or refrigerate for up to 4 days. Reheat gently in a 350°F oven for about 10 minutes before serving.
Variations: Add a tablespoon of cherry liqueur or kirsch to the filling for an adult version. You can also add 1/4 teaspoon of cinnamon or nutmeg to the filling for warm spice notes that complement the cherries beautifully.