
There’s something absolutely magical about a homemade cherry tart that makes you feel like a professional pastry chef, even if you’ve never made one before. This cherry tart recipe is so easy and foolproof that anyone can master it, yet it looks and tastes like you spent hours in the kitchen. The combination of a buttery, tender crust, silky custard filling, and jewel-like cherries makes this dessert the perfect showstopper for summer gatherings, dinner parties, or simply treating yourself to something special.
What I love most about this recipe is its versatility and simplicity. You don’t need any fancy equipment or difficult techniques—just a few quality ingredients and about an hour of your time (mostly hands-off baking). The pastry crust comes together quickly with a food processor, the custard filling is basically a French classic made accessible, and the fresh cherries do all the beautiful decorating work for you. Whether you’re serving this at a garden party or enjoying a slice with afternoon tea, this cherry tart will absolutely impress.
I’ve spent years perfecting this recipe, testing different crust techniques, filling ratios, and cherry preparations. The result is what I’m sharing with you today—a cherry tart that’s foolproof, elegant, and absolutely delicious. The key is using fresh, high-quality cherries when they’re in season, quality butter for the crust, and not overcomplicating the process. Let me walk you through each step so you can create this stunning dessert with confidence.
The beauty of this culinary approach is that once you master the basic technique, you can adapt it throughout the year. While cherries are the star here, this same method works beautifully with other seasonal fruits. The custard filling remains consistently silky and perfect, providing an elegant base that lets whatever fruit you choose truly shine.
Preparing this tart is also a wonderful opportunity to practice fundamental pastry skills. You’ll learn how to create a tender, flaky crust that shatters under your fork, how to make a proper custard that’s smooth and creamy, and how to arrange fruit in a way that’s both beautiful and intentional. These are skills that will serve you well in the kitchen for years to come, elevating everything from simple weeknight dinners to impressive dinner party desserts.
One of my favorite aspects of this cherry tart is how it brings people together. There’s something about serving a beautiful, homemade tart that makes everyone feel special and celebrated. It’s the kind of dessert that becomes a treasured memory, the kind that people ask you to make again and again. I promise you, once you make this cherry tart once, you’ll want to make it constantly throughout cherry season.
The recipe below includes helpful tips and tricks I’ve learned through countless batches. I encourage you to read through everything before starting, gather your ingredients, and then follow along step by step. Don’t be intimidated by the length of the instructions—they’re detailed to help you succeed, but the actual hands-on work is quite simple. You’ve got this, and I cannot wait for you to experience the joy of pulling this gorgeous tart from your oven.
Ingredients
- 1 1/2 cups all-purpose flour
- 1/2 teaspoon salt
- 1 tablespoon granulated sugar
- 6 tablespoons cold unsalted butter, cubed
- 3 tablespoons cold vegetable shortening or additional butter
- 4-5 tablespoons ice water
- 2 tablespoons butter for the tart pan
- 1 1/2 cups whole milk
- 1 vanilla bean, split and scraped (or 1 teaspoon vanilla extract)
- 5 large egg yolks
- 1/3 cup granulated sugar for filling
- 3 tablespoons cornstarch
- 1/4 teaspoon salt
- 2 tablespoons butter
- 2 pounds fresh cherries, pitted and halved
- 3 tablespoons cherry jam or apricot jam
- 1 tablespoon water
- 1 tablespoon sugar for dusting (optional)
Instructions
- Make the pastry dough: In a food processor, combine flour, salt, and 1 tablespoon sugar. Pulse to mix evenly.
- Add the cold cubed butter and shortening to the flour mixture. Pulse 8-10 times until the mixture resembles coarse breadcrumbs with some pea-sized pieces of butter remaining.
- Add 4 tablespoons of ice water and pulse until the dough just comes together. If it’s too dry, add another tablespoon of ice water. Don’t overmix—the dough should be shaggy and just barely combined.
- Turn the dough out onto plastic wrap, form it into a disk, wrap tightly, and refrigerate for at least 30 minutes or up to 2 days.
- Preheat your oven to 375°F (190°C). Butter a 9-inch tart pan with removable bottom using about 2 tablespoons of butter, making sure to coat the sides well.
- On a lightly floured surface, roll out the chilled dough to about 1/8-inch thickness, making it 2 inches larger than your tart pan.
- Carefully transfer the dough to the prepared tart pan by rolling it onto your rolling pin or folding it gently and unfolding into the pan.
- Press the dough gently into the bottom and sides of the pan, ensuring no air pockets remain. Trim the excess dough flush with the top of the pan.
- Line the pastry with parchment paper and fill with pie weights or dried beans. Bake for 15 minutes.
- Remove the parchment and weights, prick the bottom with a fork, and bake for another 5-8 minutes until light golden. Remove and let cool while you make the filling.
- Make the custard filling: Pour the milk into a saucepan and add the vanilla bean (or extract). Heat over medium heat until steaming, but do not boil. If using a vanilla bean, let it steep for 5 minutes then remove.
- In a medium bowl, whisk together egg yolks, 1/3 cup sugar, cornstarch, and 1/4 teaspoon salt until pale and thick, about 2 minutes.
- Slowly pour the hot milk into the egg mixture while whisking constantly to temper the eggs and prevent scrambling.
- Pour the mixture back into the saucepan and cook over medium heat, whisking constantly, until it thickens and comes to a gentle boil, about 3-5 minutes.
- Remove from heat and stir in 2 tablespoons of butter until melted and incorporated.
- Strain the custard through a fine-mesh sieve into a bowl to remove any lumps. Press plastic wrap directly onto the surface to prevent a skin from forming.
- Spread the warm custard evenly into the pre-baked tart shell, smoothing the top with a spatula.
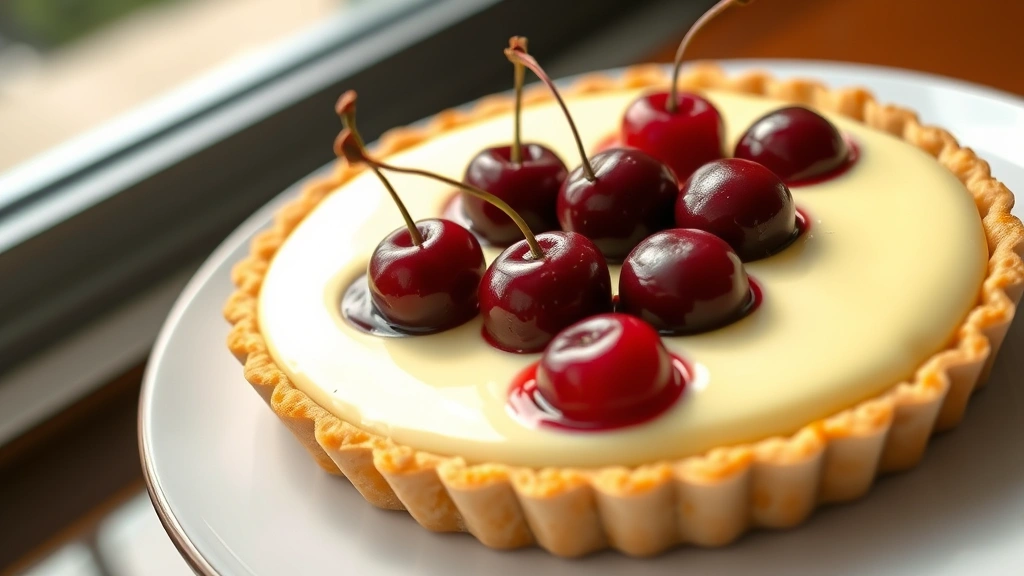
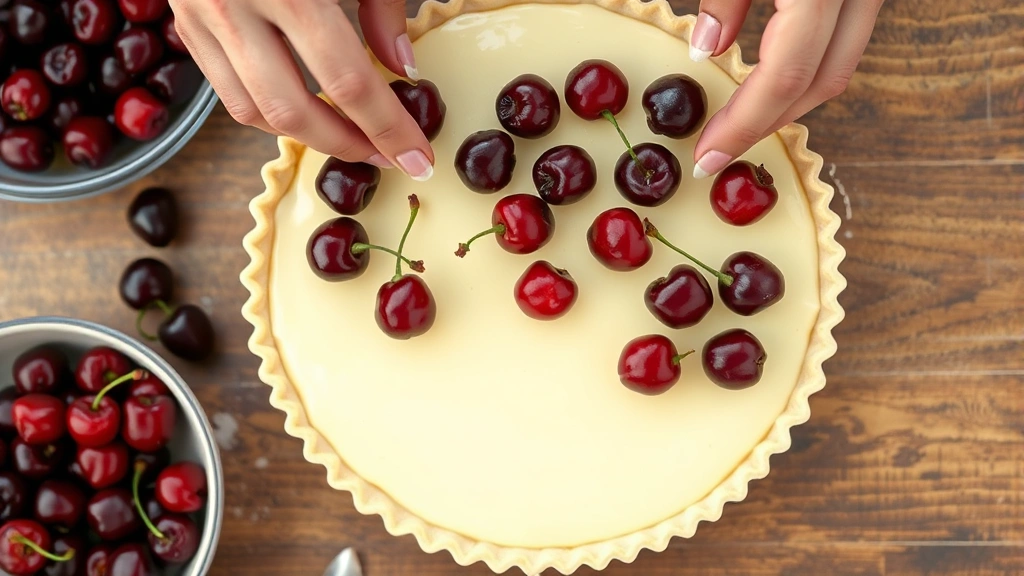
- Arrange the pitted cherry halves in concentric circles or your desired pattern over the custard, pressing them down gently so they nestle into the filling.
- In a small saucepan, combine the jam and water over low heat, stirring until smooth and warm.
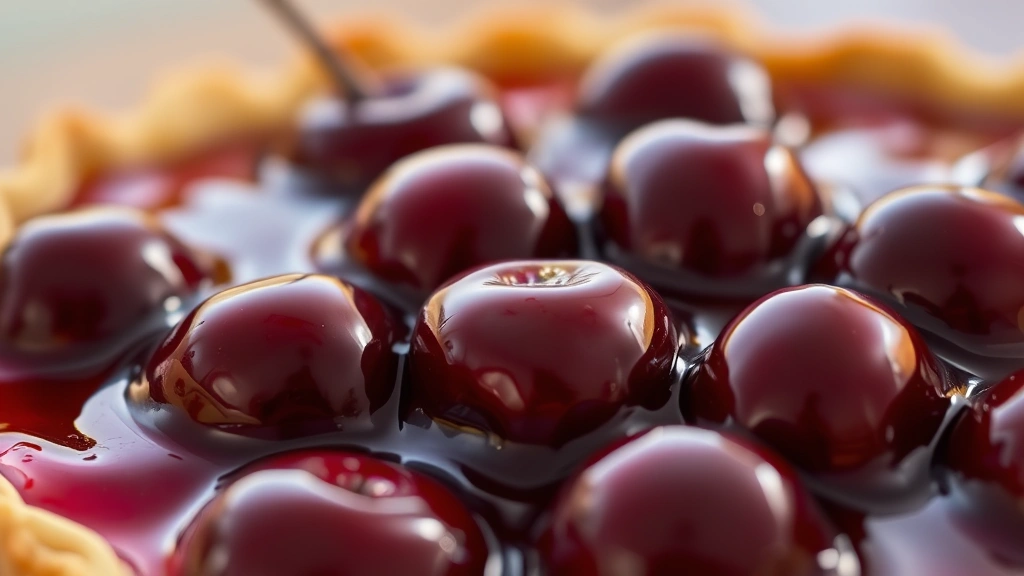
- Brush the warm jam glaze over the cherries and custard filling, ensuring even coverage.
- Bake the tart at 375°F (190°C) for 12-15 minutes, until the cherries are warm and the glaze is set.
- Remove from the oven and let cool to room temperature, about 20-30 minutes, before removing from the tart pan.
- Optional: dust lightly with granulated sugar just before serving for a beautiful finish.
Pro Tips
Cherry selection: Fresh, ripe cherries are essential for this recipe. Look for bright, deeply colored cherries with no soft spots. Bing cherries and other dark varieties have the most flavor and look the most beautiful. Avoid canned or frozen cherries for this application.
Making ahead: You can prepare the pastry dough up to 2 days in advance. The tart shell can be blind-baked up to 4 hours ahead and filled when you’re ready. However, the tart is best served the same day it’s made for optimal texture and taste.
Custard consistency: The custard should be thick enough to hold its shape but still creamy and spoonable. If it seems too thick after cooking, whisk in a tablespoon of milk to loosen it. If it’s too thin, cook it a minute or two longer.
Pitting cherries: A cherry pitter makes this task infinitely easier, but if you don’t have one, you can use a small sharp knife to cut around the pit and extract it by hand. Work over a bowl to catch the juice.
Variations: Swap the cherries for raspberries, blackberries, or sliced strawberries. You can also use a combination of berries. The technique remains exactly the same.
Glaze options: Instead of jam, you can brush the warm cherries with a simple glaze made from 1/4 cup apple juice, 1 tablespoon cornstarch, and 1 tablespoon sugar, cooked until thickened.
Storage: Keep leftovers covered loosely with plastic wrap at room temperature for up to 2 days. Don’t refrigerate as it will harden the crust. The tart can be frozen for up to 1 month before filling, then thawed and filled when ready to serve.
Tart pan tip: A removable-bottom tart pan is essential for this recipe. It makes removing the finished tart easy and beautiful. If you don’t have one, you can use a 9-inch pie dish, though the presentation will be slightly different.