
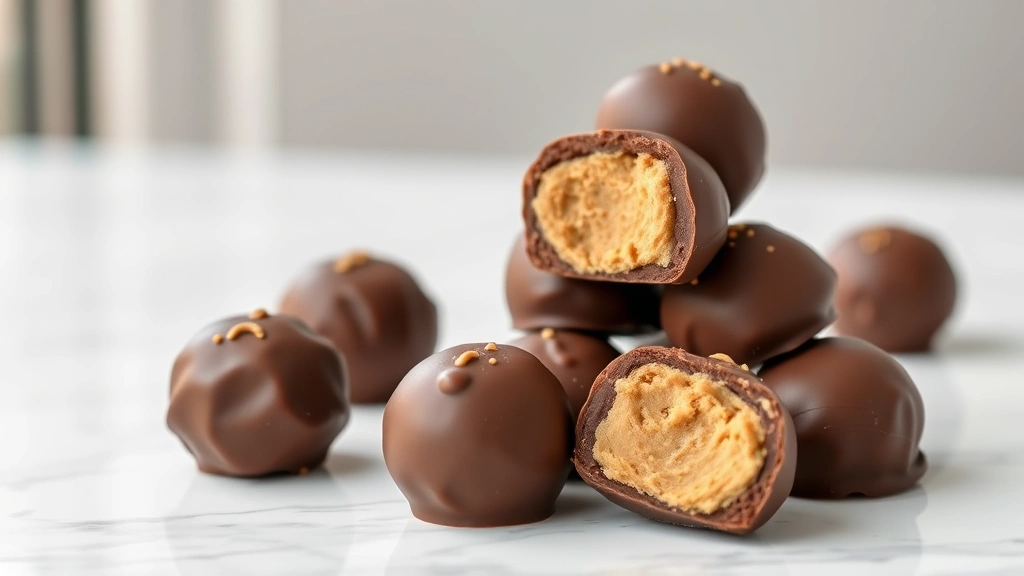
There’s nothing quite like biting into a homemade chocolate peanut butter ball—that perfect contrast of creamy peanut butter filling and rich dark chocolate coating is absolutely irresistible. These elegant little treats look like they came from a fancy candy shop, but I’m going to let you in on a secret: they’re surprisingly easy to make at home!
I’ve been making these chocolate peanut butter balls for years, and they’ve become a holiday tradition that my family requests every single season. The beauty of this recipe is that it requires just a handful of simple ingredients that you probably already have in your pantry. No fancy equipment needed, no complicated techniques—just good ingredients and a little bit of patience.
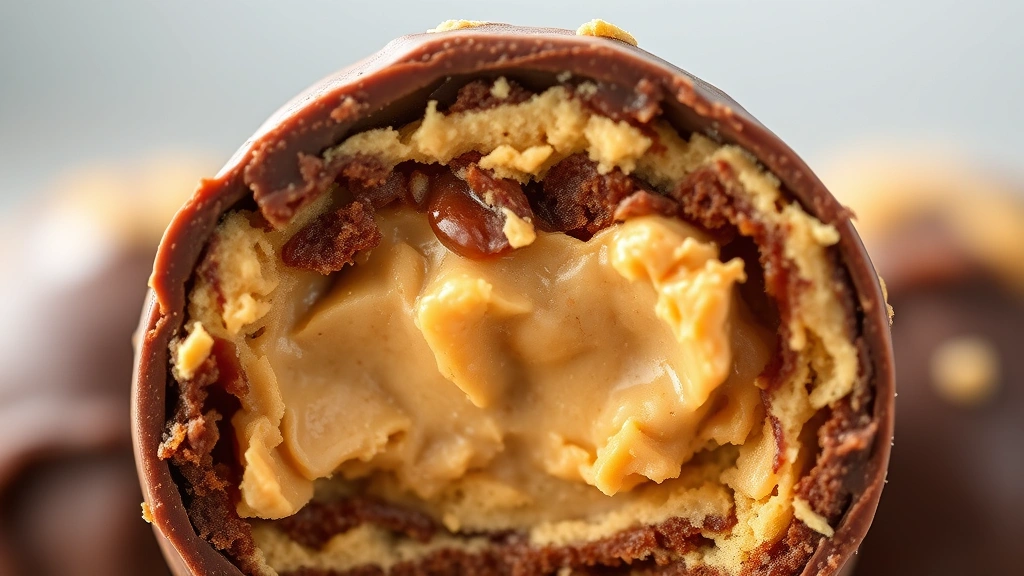
What makes these truly the BEST is the balance of flavors. The peanut butter filling is rich and creamy without being overly sweet, thanks to a touch of butter and a hint of salt that makes the peanut flavor really sing. Then it’s all wrapped up in a silky chocolate coating that snaps satisfyingly when you bite into it. Whether you’re making these for a holiday gift, a special occasion, or just because you deserve a homemade treat, this recipe will not disappoint.
I love serving these alongside creamy dessert sauces or pairing them with indulgent flavor combinations. The versatility of peanut butter makes it perfect for experimenting with different chocolate coatings—milk chocolate, dark chocolate, or even white chocolate if you’re feeling adventurous.
One thing I always recommend is tempering your chocolate properly. This isn’t as intimidating as it sounds, and it’s worth the extra five minutes to ensure your chocolate coating sets up beautifully with that professional shine and snap. Check out Serious Eats for more detailed tempering techniques if you want to dive deeper.
These chocolate peanut butter balls keep beautifully in an airtight container in the refrigerator for up to two weeks, or you can freeze them for up to a month. They make incredible gifts, and I always make extra batches to have on hand for unexpected visitors. The homemade quality really shines through, and people are always amazed when they find out you made them from scratch.
Let me walk you through the process step by step, and soon you’ll be making batches of these beautiful, delicious homemade treats that rival anything you’d buy at a candy store.
Ingredients
- 1 cup natural peanut butter, creamy and smooth
- 1/2 cup unsalted butter, softened
- 2 cups powdered sugar, sifted
- 1/4 teaspoon sea salt
- 1/2 teaspoon vanilla extract
- 12 ounces semi-sweet or dark chocolate chips
- 1 tablespoon coconut oil or shortening
- Pinch of fleur de sel for garnish (optional)
Instructions
- In a medium bowl, combine the softened butter and peanut butter, stirring until completely smooth and well combined. This should take about 2-3 minutes of mixing.
- Gradually add the sifted powdered sugar to the peanut butter mixture, stirring constantly until fully incorporated. The mixture should be thick and hold its shape when scooped.
- Stir in the sea salt and vanilla extract, mixing until the filling is uniform in color and texture throughout.
- Line a baking sheet with parchment paper. Using a small cookie scoop or rounded tablespoon, drop the peanut butter mixture onto the prepared baking sheet, spacing them about 2 inches apart.
- Gently roll each mound between your palms to form smooth, uniform balls. If the mixture gets too warm and sticky, refrigerate for 10 minutes before continuing.
- Place the formed peanut butter balls on the lined baking sheet and refrigerate for at least 2 hours, or until they are firm and hold their shape without any give.
- Once the peanut butter balls are thoroughly chilled, prepare your chocolate coating by placing the chocolate chips and coconut oil in a microwave-safe bowl.
- Microwave the chocolate in 30-second intervals, stirring between each interval, until completely melted and smooth. Do not overheat, as this can cause the chocolate to become grainy or burned.
- Alternatively, use a double boiler method: place a heat-safe bowl over a pot of simmering water (the bowl should not touch the water), and stir the chocolate and coconut oil together until smooth and melted.
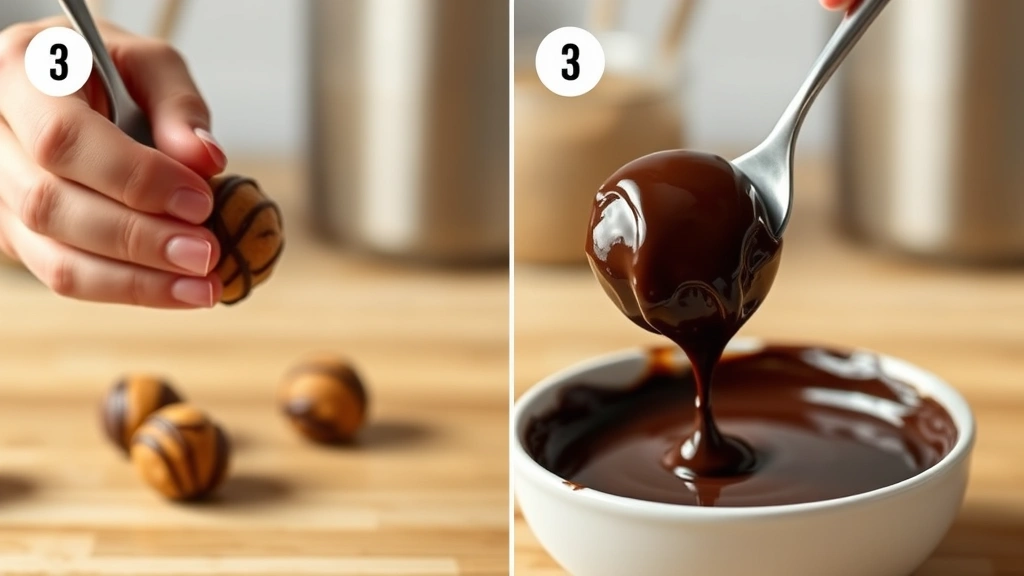
- Working quickly so the chocolate doesn’t set, use a fork or chocolate dipping tool to carefully place one peanut butter ball into the melted chocolate.
- Coat the ball completely with chocolate by rolling it gently in the melted chocolate using the fork, then carefully lift it out, allowing excess chocolate to drip back into the bowl.
- Place the chocolate-covered ball back onto the parchment-lined baking sheet, using the fork to gently slide it off and smooth out any rough edges.
- Repeat the dipping process with the remaining peanut butter balls, working in batches and reheating the chocolate if it begins to thicken.
- Once all balls are coated, if desired, sprinkle a tiny pinch of fleur de sel on top of each ball while the chocolate is still wet to add a sophisticated sweet and salty contrast.
- Place the finished chocolate peanut butter balls in the refrigerator for at least 1 hour to allow the chocolate coating to set completely before serving or storing.
Pro Tips
- Storage is simple: keep your chocolate peanut butter balls in an airtight container in the refrigerator for up to two weeks, or freeze them for up to one month. Just let them come to room temperature for about 10 minutes before serving for the best flavor and texture.
- For the smoothest peanut butter filling, make sure you’re using natural peanut butter—the kind with just peanuts and salt, no added oils or sugars. This gives you much better control over the filling’s consistency and flavor.
- If your peanut butter filling is too soft and won’t hold its shape, you can add a tablespoon or two more powdered sugar to firm it up. Conversely, if it’s too dry, add a teaspoon of milk at a time until you reach the right consistency.
- The coconut oil or shortening in the chocolate coating is crucial—it thins out the chocolate just enough so that it coats smoothly without making the balls too slick. This creates that beautiful, professional-looking finish.
- For tempering chocolate without special equipment, the microwave method works beautifully. The key is using low power and frequent stirring to prevent overheating, which can cause chocolate to seize.
- Want to get fancy? Drizzle contrasting chocolate (white chocolate over dark chocolate or vice versa) over the finished balls before the coating sets, or dip the bottoms in a second chocolate color for a two-tone effect.
- These make wonderful gifts when packaged in pretty boxes with parchment paper between layers. They’re always impressive, and homemade gifts are so much more meaningful than store-bought candy.
- You can customize these endlessly: try adding a teaspoon of espresso powder to the peanut butter filling for a coffee-peanut flavor, or mix in a teaspoon of cinnamon for warmth and spice.