
There’s nothing quite like the crisp, tangy crunch of a homemade Claussen-style pickle! While store-bought versions are convenient, making your own dill pickle spears at home is easier than you might think and yields results that are absolutely superior. This recipe captures that signature Claussen flavor—bright dill, garlic, and that perfect balance of vinegar and salt—all while giving you complete control over the ingredients and crunchiness level.
The beauty of homemade Claussen pickles is that they’re made using the cold-pack method, which means no cooking required for the cucumbers themselves. This preserves that signature crisp texture that makes Claussen pickles so beloved. You’ll simply prepare a flavorful brine, pack it with fresh cucumbers and aromatics, and let time do the work. Within just a few days, you’ll have pickles that rival the deli section.
I’m obsessed with making these pickles because they’re the perfect condiment for so many dishes. Serve them alongside bacon carbonara for a bright contrast, chop them up for chickpea salad, or simply enjoy them straight from the jar as a snack. They also make wonderful gifts when packaged in pretty jars with custom labels.
The secret to achieving that perfect Claussen pickle texture starts with selecting the right cucumbers. You’ll want to use pickling cucumbers (also called Kirby cucumbers), which are smaller and have thinner skins than slicing cucumbers. Their lower water content means they’ll stay crunchier during the pickling process. Fresh is absolutely essential—use cucumbers within 24 hours of picking or purchasing for the best results.
Another pro tip: include grape leaves or horseradish leaves in your brine. These contain tannins that help maintain pickle crunchiness by preventing the breakdown of pectin in the cucumber skin. It’s a classic pickling technique that makes a real difference in the final texture. You can find these at specialty markets or online.
The brine itself is where the magic happens. We’re using a combination of white vinegar and water, seasoned with dill, garlic, mustard seeds, and red pepper flakes. The ratio of vinegar to water is crucial—too much vinegar and your pickles will be overly sour, too little and they won’t preserve properly. This recipe uses a 1:1 ratio, which gives you that perfect tangy flavor without being overwhelming.
Fresh dill is non-negotiable here. While dried dill can work in a pinch, fresh dill fronds provide a more vibrant, aromatic flavor that really makes these pickles shine. If you can’t find fresh dill, you could substitute dill seeds, though the flavor will be slightly different. I like to use both the dill fronds and some dill seeds for maximum flavor complexity.
One of the best aspects of making Claussen-style pickles at home is that they’re ready to eat much faster than traditional fermented pickles. Because we’re using the cold-pack method with vinegar, you’ll have delicious, crunchy pickles ready in just 3-5 days. They’ll continue to develop flavor over time and will keep for several months in the refrigerator.
For more pickling inspiration, check out this easy pickled red onion recipe that uses similar techniques. You can also explore flavor variations once you master this basic recipe. Try adding jalapeños for heat, or experiment with different herbs like tarragon or cilantro.
According to Serious Eats, the key to crispy pickles is using fresh cucumbers, including tannin sources, and maintaining proper temperature. This recipe incorporates all those elements for guaranteed success.
Making pickles is also a wonderful way to preserve your garden harvest if you grow cucumbers. Once you’ve mastered this basic recipe, you can scale it up and prepare multiple jars at once. They make excellent gifts, and there’s something incredibly satisfying about opening your refrigerator to find rows of beautiful homemade pickles.
The beauty of this recipe is its simplicity and reliability. With just a handful of ingredients and minimal hands-on time, you’ll create pickles that taste like they came straight from the deli counter. Your family and friends will be amazed when you tell them you made them at home!
Check out Bon Appétit for more pickle variations and New York Times Cooking for pickling science. Once you’ve made this recipe successfully, you’ll have the confidence to experiment with other vegetables and flavor profiles.
Ingredients
- 2 lbs fresh pickling cucumbers (Kirby cucumbers), about 3-4 inches long
- 4 cups white vinegar
- 4 cups water
- 3 tablespoons kosher salt
- 1 tablespoon sugar
- 8-10 cloves garlic, smashed
- 4-5 fresh dill heads (or 2 tablespoons dill seeds)
- 2 teaspoons mustard seeds
- 1 teaspoon red pepper flakes
- 6-8 grape leaves or horseradish leaves (optional but recommended)
- 4-5 bay leaves
- 1 teaspoon black peppercorns
Instructions
- Wash the pickling cucumbers thoroughly under cold running water, scrubbing gently to remove any dirt or debris. Trim off the blossom end (the end opposite the stem) as it contains enzymes that can soften pickles. Pat dry with paper towels.
- Prepare two quart-sized glass jars by washing them thoroughly with hot soapy water and rinsing well. You can sterilize them if desired by running them through the dishwasher on a hot cycle or placing them in boiling water for 10 minutes.
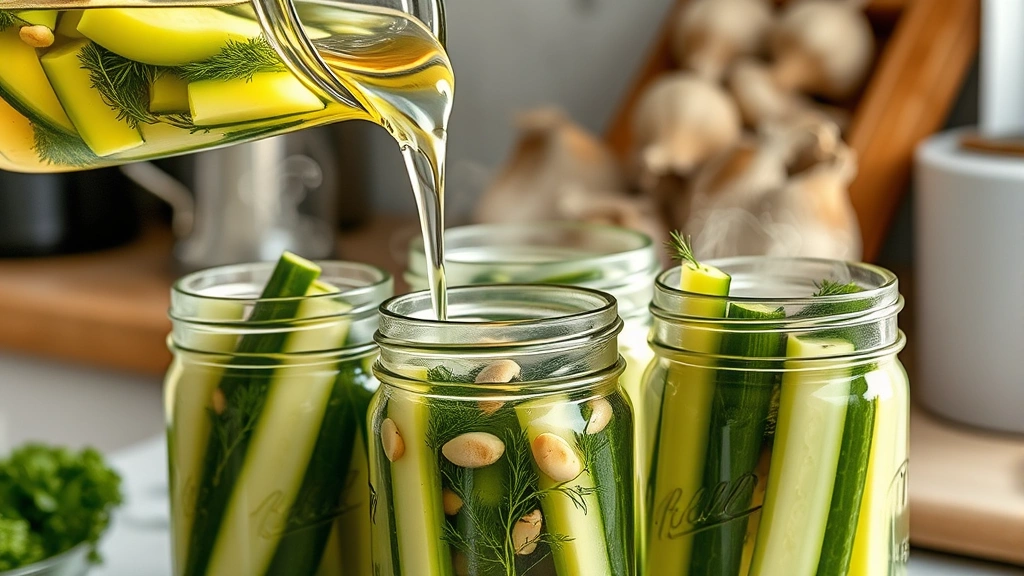
- In a large pot, combine the white vinegar, water, kosher salt, and sugar. Bring to a boil over medium-high heat, stirring occasionally until the salt and sugar are completely dissolved. Remove from heat and let cool for about 5 minutes.
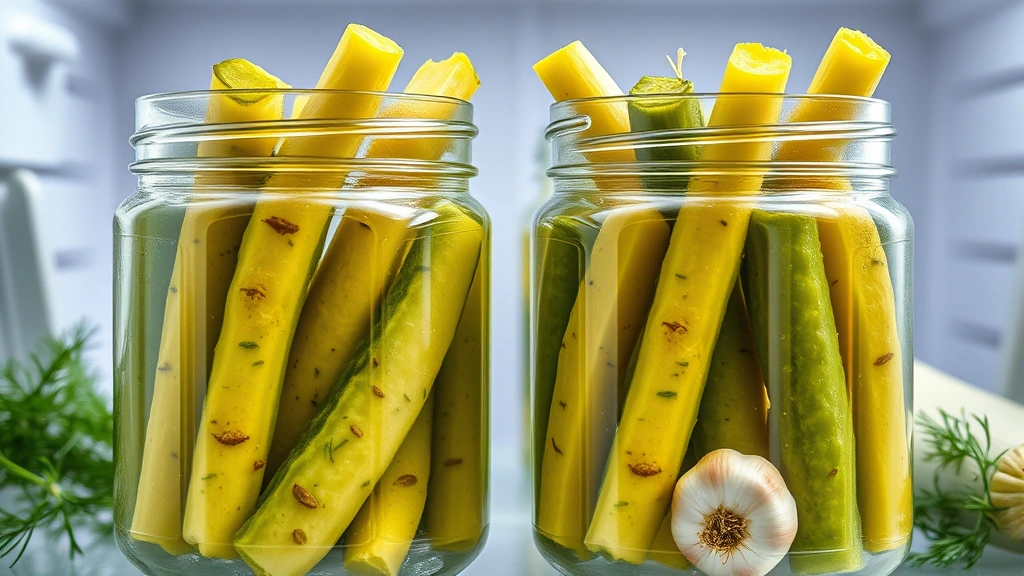
- While the brine is cooling, prepare your jar contents. Divide the smashed garlic cloves, fresh dill heads, mustard seeds, red pepper flakes, grape leaves, bay leaves, and black peppercorns equally between the two prepared jars.
- Arrange the prepared cucumber spears vertically in the jars, packing them tightly but not so tight that they’re crushed. You can cut some cucumbers in half lengthwise if needed to fit them better. Leave about 1.5 inches of headspace at the top of each jar.
- Carefully pour the cooled brine over the cucumbers in each jar, ensuring all cucumbers are completely submerged. Top cucumbers with additional grape leaves if needed to keep them under the brine level.
- Let the brine cool to room temperature, then cover the jars with lids and refrigerate. The pickles will be ready to eat in 3-5 days, but they’ll taste even better after a week as the flavors continue to develop.
- Once opened, keep the jars refrigerated and consume within 2-3 months for best quality. The pickles will remain crispy and flavorful throughout this time period.
- To serve, simply remove pickles from the brine as needed and enjoy straight from the jar or incorporate them into recipes as desired.
Pro Tips
- For the crispiest pickles possible, use cucumbers that are no more than 24 hours old. Older cucumbers have begun to lose their moisture and won’t crisp up as well during pickling.
- The blossom end of the cucumber contains enzymes (particularly pectinase) that soften pickles during storage. Always remove this end before pickling for maximum crunchiness.
- Grape leaves and horseradish leaves contain tannins that help preserve the crispness of pickles by preventing pectin breakdown. These are highly recommended and make a noticeable difference in texture. You can find them at specialty grocery stores, farmers markets, or online retailers.
- This recipe uses a cold-pack method with vinegar, which means the pickles are ready to eat much faster than fermented pickles (which can take weeks). The trade-off is that these pickles don’t have the probiotic benefits of fermented pickles, but they’re still delicious and shelf-stable when refrigerated.
- For a spicier version, increase the red pepper flakes to 1.5 teaspoons or add fresh jalapeño slices to the jars.
- You can customize the dill by using dill seeds instead of fresh dill heads, or by using a combination of both. Dill seeds provide a slightly different flavor profile—more concentrated and herbaceous.
- Storage is simple: keep the sealed jars in the refrigerator for up to 2-3 months. The pickles will continue to develop flavor over time, so they often taste best after sitting for a week or two.
- If you’re scaling this recipe up to make multiple batches, you can make a larger batch of brine and store it in the refrigerator between uses. Simply reheat before pouring over fresh cucumbers.
- These pickles are perfect alongside sandwiches, burgers, charcuterie boards, or enjoyed straight as a snack. They also add a wonderful tangy crunch to salads and grain bowls.
- The liquid left over after you’ve eaten the pickles can be reused for making quick pickled vegetables like onions or carrots. Simply bring the brine to a boil, let it cool, and use it again with fresh vegetables.