
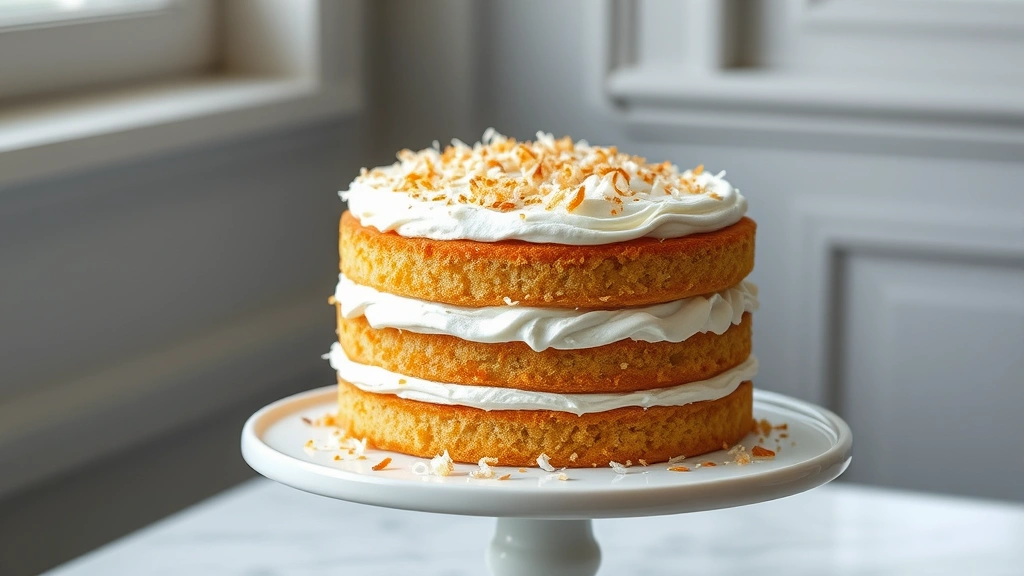
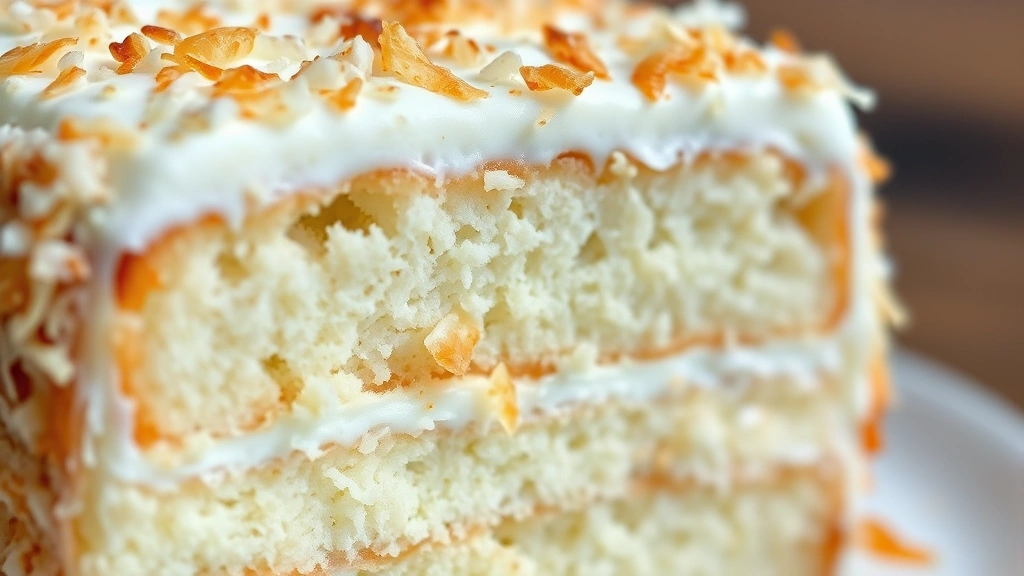
There’s something absolutely magical about a homemade coconut cake – it’s the kind of dessert that makes people stop mid-conversation and ask for the recipe. This coconut cake is tender, moist, and bursting with genuine coconut flavor in every single bite. Unlike those dry, store-bought versions, this beauty stays fresh for days and gets even better as the flavors develop.
What makes this the BEST coconut cake recipe is the combination of technique and ingredient quality. We’re using both shredded coconut and coconut milk in the batter to ensure maximum flavor, while the frosting is a silky-smooth coconut buttercream that’s absolutely divine. The secret? Toasting some of the coconut before adding it to the cake – this deepens the flavor profile and adds a subtle complexity that keeps people guessing what makes it so special.
I’ve tested this recipe dozens of times, tweaking ratios and methods until I landed on this foolproof version. The crumb is impossibly tender thanks to a combination of buttermilk and sour cream, while the structure stays perfectly intact thanks to proper creaming technique. Whether you’re baking this for a birthday celebration, Easter dinner, or just because you deserve something delicious, this recipe delivers restaurant-quality results from your own kitchen.
What I love most about this coconut cake is its versatility. Serve it as-is with a simple frosting, dress it up with fresh fruit, or keep it elegant and minimal. The beauty of a well-made cake is that it doesn’t need much – the flavor speaks for itself. This pairs beautifully with creamy dessert accompaniments or stands alone as the star of your dessert table.
For those new to cake baking, don’t be intimidated! I’ve broken down every step to ensure success. The most important things to remember are: bring your ingredients to room temperature, don’t overmix once you add the flour, and measure your ingredients properly (I always recommend using a kitchen scale for precision). Understanding proper mixing techniques is key to achieving that perfect crumb.
If you’re serving this at a special occasion, you can bake the layers ahead of time and freeze them for up to a month. The frosting can be made 2-3 days in advance and kept in the refrigerator. This makes entertaining so much easier! I always recommend checking out Bon Appétit’s coconut cake variations for additional inspiration, and Serious Eats has wonderful baking fundamentals that will help you understand the science behind what’s happening in your oven.
Let me share one more pro tip: when frosting your cake, crumb coating is your best friend. Apply a thin layer of frosting first, chill it for 15 minutes, then apply your final frosting layer. This prevents crumbs from getting into your beautiful frosting. The result? A cake that looks as professional as it tastes. I’ve also found that proper layering techniques learned from other baking projects apply here too.
For additional cake decoration ideas and advanced frosting techniques, The New York Times offers stunning presentation ideas. This recipe truly is the best coconut cake you’ll ever make – I promise!
Ingredients
- 2 1/4 cups all-purpose flour
- 2 teaspoons baking powder
- 1/2 teaspoon salt
- 1/2 cup (1 stick) unsalted butter, room temperature
- 1 1/2 cups granulated sugar
- 3 large eggs, room temperature
- 1 cup full-fat sour cream, room temperature
- 3/4 cup unsweetened coconut milk, room temperature
- 2 teaspoons vanilla extract
- 1 teaspoon coconut extract
- 1 1/2 cups unsweetened shredded coconut, divided
- 1/2 cup sweetened shredded coconut, lightly toasted
- 1 cup (2 sticks) unsalted butter, room temperature (for frosting)
- 3 cups powdered sugar
- 3-4 tablespoons heavy cream or coconut milk
- 1 teaspoon coconut extract (for frosting)
- 1/4 teaspoon salt (for frosting)
- Flaked coconut for garnish (optional)
Instructions
- Preheat your oven to 350°F (175°C). Grease and flour two 9-inch round cake pans, or line the bottoms with parchment paper for easy removal. Set aside.
- In a medium bowl, whisk together the flour, baking powder, and salt. Set this dry mixture aside.
- In a small skillet over medium heat, lightly toast 1/2 cup of the unsweetened shredded coconut for 3-4 minutes, stirring frequently, until it turns a light golden color and becomes fragrant. Transfer to a plate to cool. This step is crucial for deepening the coconut flavor!
- In a large bowl using an electric mixer on medium speed, cream together the room-temperature butter and granulated sugar for 3-4 minutes until the mixture is light, fluffy, and pale in color. This step is essential for incorporating air into the batter.
- Add the eggs one at a time to the butter-sugar mixture, beating well after each addition. Scrape down the bowl between additions to ensure even mixing.
- In a small bowl, combine the sour cream, coconut milk, vanilla extract, and coconut extract. Mix gently to combine.
- Add the flour mixture to the butter mixture in three additions, alternating with the cream mixture, starting and ending with the flour. Begin with one-third of the flour, then half the cream mixture, then another third of the flour, then the remaining cream mixture, and finally the last third of the flour. Mix on low speed just until combined after each addition – do not overmix.
- Fold in the 1 cup of untoasted unsweetened shredded coconut and the toasted coconut using a rubber spatula, being careful not to deflate the batter. The batter should look slightly speckled with coconut.
- Divide the batter evenly between the two prepared cake pans, using an offset spatula to spread it into an even layer.
- Bake for 30-35 minutes, until a toothpick inserted in the center comes out clean or with just a few moist crumbs. The tops should be light golden brown.
- Remove the cakes from the oven and let them cool in the pans for 10-15 minutes. Then turn them out onto cooling racks and allow them to cool completely, at least 1 hour, before frosting.
- While the cakes cool, prepare the frosting: In a large bowl using an electric mixer on medium speed, beat the room-temperature butter for 1-2 minutes until creamy and pale.
- Gradually add the powdered sugar, one cup at a time, beating well between additions. The frosting will start off crumbly but will come together as you continue to beat it.
- Add 3 tablespoons of heavy cream or coconut milk along with the coconut extract and salt. Beat on medium-high speed for 2-3 minutes until the frosting is light, fluffy, and spreadable. If it’s too thick, add more cream, one tablespoon at a time.
- Place one cooled cake layer on a serving plate or cake board. Spread a generous layer of coconut frosting on top, about 1/2 inch thick.
- Place the second cake layer on top, pressing down gently to secure it.
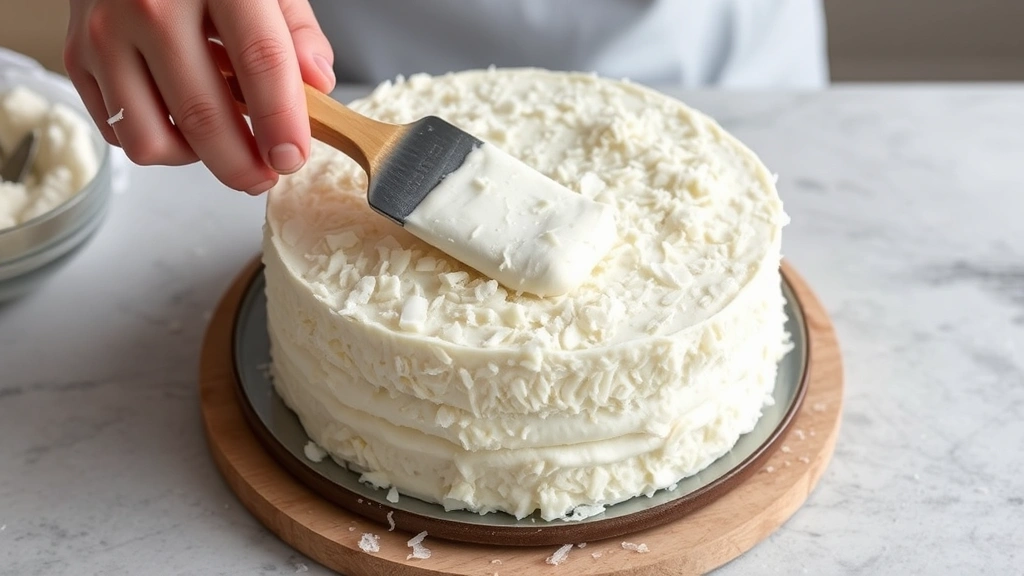
- Apply a thin crumb coat of frosting over the entire cake, covering the top and sides. Refrigerate this for 15 minutes to set the crumbs.
- Apply the final layer of frosting to the top and sides of the cake, making decorative swirls with an offset spatula or piping bag if desired.
- Press toasted coconut flakes and sweetened shredded coconut onto the sides of the cake and sprinkle additional coconut on top for garnish.
- Refrigerate the finished cake for at least 1 hour before serving to allow the frosting to set completely.
Pro Tips
Coconut Selection: Use unsweetened shredded coconut for the best flavor control. Sweetened coconut can make the cake overly sweet. However, a small amount of sweetened coconut works beautifully for garnish and adds nice color contrast.
Toasting the Coconut: Don’t skip this step! Toasting brings out the natural oils and creates a deeper, more complex coconut flavor. Watch it carefully though – coconut can go from golden to burnt quickly.
Mixing Technique: The key to a tender cake is not overmixing once you add the flour. Use a low speed and stop as soon as no streaks of flour remain. Overmixing develops gluten, which makes the cake tough.
Pan Preparation: Greasing and flouring (or using parchment) prevents sticking and ensures even baking. If your pans aren’t properly prepared, you risk the cake sticking to the sides and creating an uneven bake.
Baking Time: Every oven is different, so start checking for doneness at 28 minutes. A toothpick inserted in the center should come out clean or with just a few moist crumbs – not completely clean (which indicates overbaking) and not wet.
Cooling: Don’t rush this step! Cooling the cakes completely before frosting prevents the frosting from melting off. If you’re in a hurry, place the layers in the refrigerator for 20 minutes.
Frosting Consistency: The frosting should be thick enough to hold peaks but spreadable. If it’s too stiff, add a bit more cream. If it’s too soft, refrigerate it for 15 minutes and beat it again.
Make-Ahead: Bake the cake layers up to 1 day ahead and keep them wrapped tightly in plastic wrap at room temperature, or freeze for up to 1 month. The frosting can be made 2-3 days ahead and kept refrigerated. Assemble the cake no more than 24 hours before serving for the best texture.
Storage: Keep the finished cake covered on the counter for up to 2 days, or refrigerate for up to 4 days. The cake actually tastes better after 24 hours as the flavors have time to develop.
Serving Suggestion: Slice with a hot, wet knife (wipe it clean between slices) for the cleanest pieces. This coconut cake pairs beautifully with fresh berries, a cup of coffee, or a glass of iced tea.
Pingback: How to Make the Best Chicken and Wild Rice Soup Recipe! – Simple Recipe Finder
Pingback: How to make the BEST Ginger Salad Dressing Recipe! – Simple Recipe Finder