
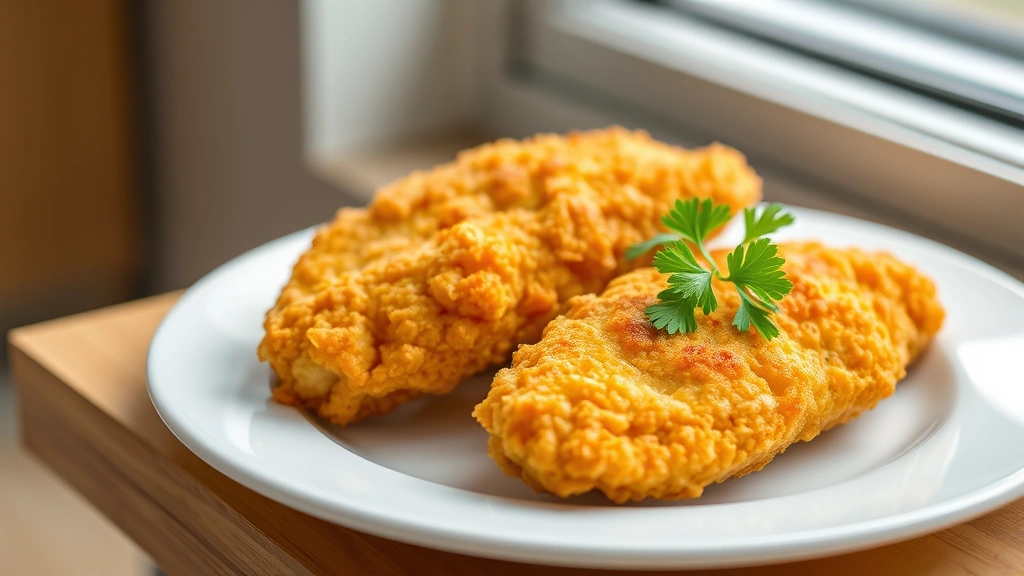
There’s something absolutely magical about crispy chicken tenders—they’re the ultimate comfort food that appeals to everyone from picky eaters to sophisticated palates. This foolproof recipe will teach you how to make restaurant-quality crispy chicken tenders right in your own kitchen, with a golden, crunchy exterior and incredibly juicy, tender meat inside.
The secret to achieving that perfect crispiness lies in a combination of proper brining, strategic breading technique, and precise cooking temperature. I’ve refined this recipe over years of testing, and I’m thrilled to share my best tricks with you. Whether you’re preparing a weeknight dinner for the family or hosting a casual gathering, these crispy chicken tenders are guaranteed to be a hit.
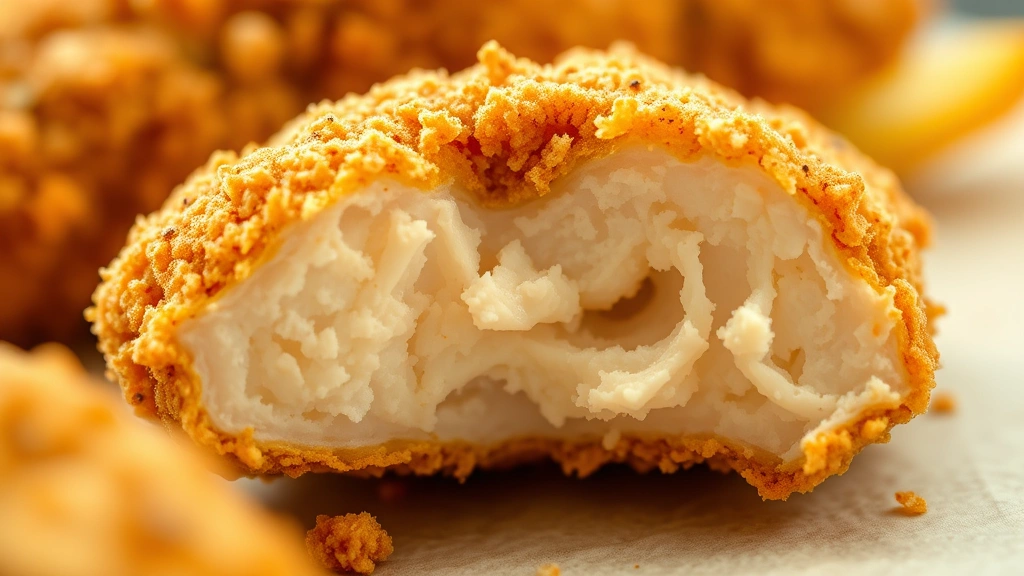
What makes these tenders different from standard recipes is the double-dredging method combined with a buttermilk soak that keeps the chicken impossibly moist while the exterior achieves maximum crispiness. The buttermilk acts as a tenderizer, breaking down the protein fibers and allowing the breading to adhere perfectly. I always recommend using panko breadcrumbs for superior crunch, and adding a touch of cornstarch to the flour mixture elevates the texture to restaurant standards.
These tenders pair beautifully with so many sides and sauces. You can serve them alongside our Best Heavy Cream Alfredo Sauce for a comforting dinner, or create a chicken tenders bowl with our Perfect Pickled Red Onions for a more modern presentation. For a lighter option, try pairing them with our Best Chickpea Salad Recipe.
The cooking method is equally important—I prefer shallow frying in a cast-iron skillet because it gives you superior control over temperature and allows the tenders to cook evenly. The oil temperature should remain between 325-350°F for optimal results. Too hot, and the outside burns before the inside cooks; too cool, and they’ll absorb excess oil and become greasy.
I’ve included detailed instructions for both shallow frying and air frying methods, so you can choose what works best for your kitchen setup. Both methods yield fantastic results when executed properly. The air fryer option is perfect if you’re looking for a lighter preparation without sacrificing that coveted crispiness.
One final tip: don’t skip the resting period after breading. Allowing the breaded tenders to rest in the refrigerator for at least 30 minutes (or up to overnight) helps the coating adhere better and cook more evenly. This small step makes a significant difference in your final result.
According to Serious Eats, proper brining and breading techniques are essential for achieving optimal texture and flavor in fried chicken. Their extensive testing confirms that the double-dredging method I’ve included here produces superior results compared to single-dredging approaches.
Ingredients
- 2 pounds boneless, skinless chicken breasts
- 1.5 cups buttermilk
- 2 teaspoons kosher salt (plus more for seasoning)
- 1 teaspoon black pepper
- 1 teaspoon garlic powder
- 1 teaspoon paprika
- 1 cup all-purpose flour
- 1/2 cup cornstarch
- 2 teaspoons baking powder
- 1.5 cups panko breadcrumbs
- 2 cups vegetable oil (for frying)
- 1/2 teaspoon cayenne pepper (optional)
- 2 tablespoons fresh parsley, chopped (for garnish)
Instructions
- Prepare your chicken by slicing each breast lengthwise into three to four strips of approximately 3/4-inch thickness. Pound gently with a meat mallet to ensure even thickness throughout each tender.
- In a shallow bowl or measuring cup, combine buttermilk with 1 teaspoon of kosher salt and 1/2 teaspoon of black pepper. Stir well to dissolve the salt completely.
- Add all chicken tenders to the buttermilk mixture, ensuring each piece is fully submerged. Cover with plastic wrap and refrigerate for at least 4 hours, or preferably overnight, for maximum tenderness and flavor absorption.
- In a large shallow bowl, combine 1 cup all-purpose flour, 1/2 cup cornstarch, 1 teaspoon kosher salt, 1/2 teaspoon black pepper, 1 teaspoon garlic powder, 1 teaspoon paprika, 2 teaspoons baking powder, and 1/2 teaspoon cayenne pepper (if using). Whisk together thoroughly to evenly distribute all dry ingredients.
- In a separate shallow bowl, place 1.5 cups panko breadcrumbs and mix with a pinch of salt and a few grinds of black pepper.
- Working with one chicken tender at a time, remove it from the buttermilk, allowing excess liquid to drip back into the bowl. Place the tender into the flour mixture and coat thoroughly on all sides, pressing gently so the coating adheres.
- Transfer the flour-coated tender to the panko breadcrumb mixture and press firmly so the breadcrumbs stick to the wet flour coating. Ensure complete coverage on all surfaces.
- Place the breaded tender on a parchment-lined baking sheet. Repeat steps 6-8 with remaining chicken tenders, spacing them apart so they don’t touch.
- Cover the baking sheet with plastic wrap and refrigerate the breaded tenders for at least 30 minutes. This resting period is crucial for optimal crispiness.
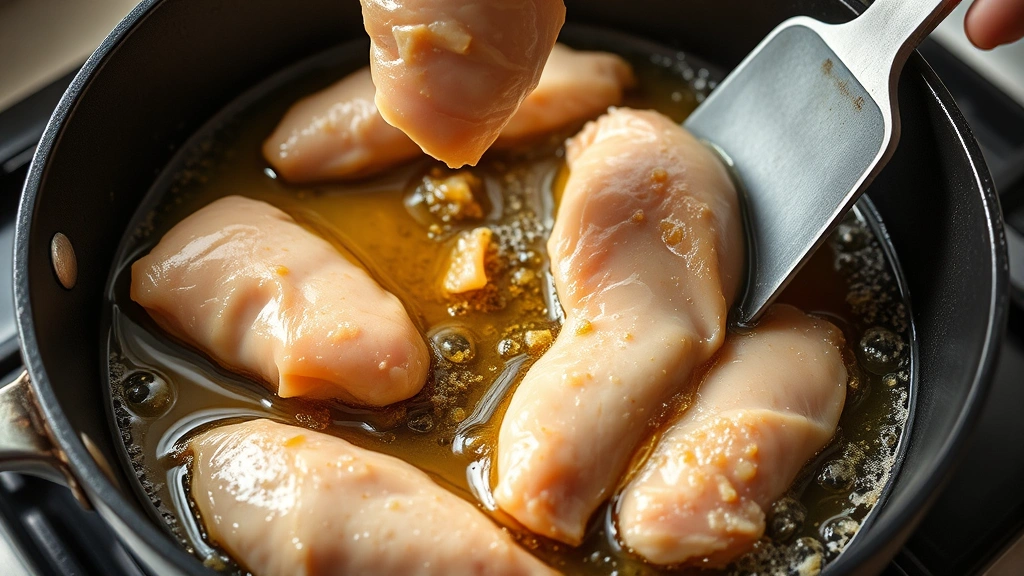
- Pour 2 cups vegetable oil into a large cast-iron skillet or heavy-bottomed pan. Heat over medium-high heat until the oil reaches 325-350°F, using a cooking thermometer to verify temperature.
- Carefully place three to four breaded tenders into the hot oil, working in batches to avoid overcrowding the pan. Do not stack or overlap the tenders.
- Fry for 4-5 minutes without moving the tenders, allowing the bottom side to develop a deep golden-brown color. Flip each tender carefully using tongs.
- Continue frying for another 4-5 minutes on the second side until the coating is uniformly golden brown and the internal temperature reaches 165°F when measured with an instant-read thermometer.
- Transfer cooked tenders to a paper towel-lined plate to drain excess oil. Season immediately with fleur de sel or additional kosher salt while still hot.
- Allow tenders to cool for 2-3 minutes before serving to allow the coating to set and the interior to finish cooking through residual heat.
- For air fryer preparation: Preheat air fryer to 400°F. Arrange breaded tenders in a single layer without overlapping. Spray lightly with cooking oil spray. Air fry for 12-14 minutes, shaking the basket halfway through cooking, until coating is golden and chicken reaches 165°F internally.
Pro Tips
Buttermilk Substitute: If buttermilk is unavailable, create a substitute by adding 1 tablespoon of fresh lemon juice or white vinegar to 1.5 cups of regular milk. Allow the mixture to sit for 5 minutes before using.
Breading Texture: Panko breadcrumbs are essential for achieving maximum crispiness due to their larger, flakier structure compared to regular breadcrumbs. Do not substitute with regular breadcrumbs without expecting textural differences.
Oil Temperature: Maintaining proper oil temperature is absolutely critical. Use a reliable cooking thermometer rather than relying on visual cues. Oil that’s too hot will burn the exterior before cooking the interior; oil that’s too cool produces greasy, soggy results.
Make-Ahead Options: Breaded tenders can be prepared through step 9 and frozen for up to 2 weeks. Fry directly from frozen, adding 2-3 minutes to cooking time. Do not thaw before frying.
Serving Suggestions: Serve with honey mustard, ranch dressing, buffalo sauce, or marinara. Pair with Bon Appétit’s recommended side dishes for a complete meal.
Storage: Leftover tenders keep refrigerated for up to 3 days. Reheat in a 350°F oven for 8-10 minutes to restore crispiness. Do not microwave as this will make the coating soggy.
Cooking Method Variations: While shallow frying produces the crispiest exterior, baking at 400°F for 18-20 minutes yields a lighter option. Air frying offers an excellent middle ground with significantly less oil and outstanding crispiness.
Seasoning Customization: Add lemon zest, Italian seasoning, or Old Bay seasoning to the flour mixture for flavor variations.
Double-Dredging Technique: This method is the secret to superior crispiness. The flour coating seals moisture while the panko creates structural integrity for maximum crunch. Do not skip this step for best results.
Pingback: How to Make the BEST Steak Seasoning Recipe! – Simple Recipe Finder
Pingback: How to make the BEST Chick Fil A Mac and Cheese Recipe! – Simple Recipe Finder